Quantcast
Channel: Christos S. – chsakell's Blog
Viewing all 43 articles
Browse latest View live

Dynamic templates in AngularJS

$
0
0

Sometimes you may find yourself that the common patterns in web development cannot support your UI requirements in terms of how dynamic a specific view can be. Let me explain what I mean by a simple example: Assume that you have a route in your Single Page Application that displays all the azure services that a user is registered at. Each registered service has its own section on the template an of course specific functionality such as unregister, add or remove features. The question is which is the proper way to implement such a view? You could create a template such as the following:

<div ng-controller="servicesCtrl">
    <section ng-show="hasServiceOne">
        <div ng-click="addFeatureToServiceOne">Service One Content</div>
    </section>
    <section ng-show="hasServiceTwo">
        <div ng-click="addFeatureToServiceTwo">Service Two Content</div>
    </section>
    <section ng-show="hasServiceThree">
        <div ng-click="addFeatureToServiceThree">Service Three Content</div>
    </section>
</div>

Indeed with this template you could display or hide specific sections depending on if the user is registered or not respectively but there are some drawbacks:

  • The servicesCtrl controller needs to implement the functionality for all the services even if the user isn’t registered at all of them.
  • The template isn’t sufficient in case we wanted to display the registered services in a specific order (dynamic behavior)

The solution: Dynamic compiled directives

The solution to the problem is to use custom directives for each service and add it to the template dynamically only if the user is registered. With this pattern you could add each service section in any order you want, assuming this info comes from an api. More over each directive would encapsulate its own functionality and only in the relative controller, template and css file.
angularjs-dynamic-templates-03

Show me some code

I have created an SPA that solves the scenario we presented before related to azure services. Each post is an opportunity to learn new things so I found this one to also present you a proper way to create your own AngularJS 3rd party library. By 3rd party library i mean that you can encapsulate any custom angularJS elements or API you want in a single my-library.js file and use it in any angularJS application. The source code of the application is available for download on Github. Let’s take a look at the architecture first:
angularjs-dynamic-templates
We can see that for each service we have a respective directive with all the required files along. More specifically we have directives for 4 azure services, Active Directory, BizTalk, RedisCache and Scheduler. Here is the code for the RedisCache directive which is responsible to display and handle RedisCache service related functionality.

(function() {
    'use strict';

    angular.module('azure.redisCache', []);
})();
(function() {
    'use strict';

    angular
        .module('azure.redisCache')
        .directive('redisCache', redisCache);

    function redisCache() {
        //Usage:
        //<redis-cache></redis-cache>"/>
        var directive = {
            controller: 'RedisCache',
            restrict: 'E',
            templateUrl: 'external-lib/redisCache/redisCache.html'
        };
        return directive;
    }
})();
(function() {
    'use strict';

    angular
        .module('azure')
        .controller('RedisCache', RedisCache);

    RedisCache.$inject = ['$scope'];

    function RedisCache($scope) {

        activate();

        function activate() { }
    }
})();
<!-- Page Content -->
<div class="container rediscache">

    <!-- Page Heading/Breadcrumbs -->
    <div class="row">
        <div class="col-lg-12">
            <h1 class="page-header">{{service.title}}
                    <small>service</small>
                </h1>
        </div>
    </div>
    <!-- /.row -->

    <!-- Projects Row -->
    <div class="row">
        <div class="col-md-6 img-portfolio">
            <a href="portfolio-item.html">
                <img class="img-responsive img-hover" ng-src="{{service.image01}}" alt="">
            </a>
            <h3>
                    <a href="portfolio-item.html">About</a>
                </h3>
            <p>Azure Redis Cache is based on the popular open-source Redis cache. It gives you access to a secure, dedicated Redis cache, managed by Microsoft and accessible from any application within Azure.</p>
            <p>Azure Redis Cache is easy to use. Just provision a cache using the Microsoft Azure portal and call into its end point using any client that supports Redis. If you’ve used Redis before, you already know how to use Azure Redis Cache.</p>
        </div>
        <div class="col-md-6 img-portfolio">
            <a href="portfolio-item.html">
                <img class="img-responsive img-hover" ng-src="{{service.image02}}" style="height:207px" alt="">
            </a>
            <h3>
                    <a href="portfolio-item.html">High performance</a>
                </h3>
            <p>Azure Redis Cache helps your application become more responsive even as user load increases. It leverages the low-latency, high-throughput capabilities of the Redis engine. This separate, distributed cache layer allows your data tier to scale independently for more efficient use of compute resources in your application layer.</p>
        </div>
    </div>
    <!-- /.row -->
</div>
<!-- /.container -->
.rediscache {
    background-color: #eee;
}

Notice in the redisCache.html the bindings through a service object. But where does this $scope object came from? The answer is behind the azurePanel directive which works as a container to display the azure services. Let’s examine its code:

(function() {
    'use strict';

    angular.module('azure', [
        'azure.core',
        'azure.activeDirectory',
        'azure.bizTalk',
        'azure.redisCache',
        'azure.scheduler'
        ]);
})();

The azure.core module holds the api that fetches any data required to feed the azure service directives. We ‘ll take it a look later on.

(function() {
    'use strict';

    angular
        .module('azure')
        .directive('azurePanel', azPanel);

    function azPanel() {
        //Usage:
        //<azure-panel user='selectedUser'></azure-panel>"/>
        var directive = {
            scope: {
                'user': '='
            },
            controller: 'AzurePanel',
            restrict: 'E',
            templateUrl: 'external-lib/azurePanel/azurePanel.html'
        };
        return directive;
    }
})();

This directive will take a user’s id parameter in order to fetch user’s services through the api..

(function() {
    'use strict';

    angular
        .module('azure')
        .controller('AzurePanel', AzurePanel);

    AzurePanel.$inject = ['$scope', 'azureapi'];

    function AzurePanel($scope, azureapi) {

        $scope.servicesLoaded = false;

        activate();

        function activate() {
            azureapi.getAzureServices($scope.user.id)
                .then(function(data) {
                    $scope.user.services = data;
                    $scope.servicesLoaded = true;
                });
        }

        $scope.$watch('user', function(newValue, oldValue) {
            activate();
        });
    }
})();

If the user change, we make sure to re-activate the azure directives for that user. Let’s see now how those azure directives are rendered.

<div ng-if="servicesLoaded">
    <div class="row">
        <div class="col-md-12" ng-repeat="service in user.services">
            <azure-service service="service">
            </azure-service>
            <hr/>
        </div>
    </div>
</div>

Each service found for the selected user is passed to an azureService directive.

(function() {
    'use strict';

    angular
        .module('azure')
        .directive('azureService', azureService);

    azureService.$inject = ['$compile'];

    function azureService($compile) {
        //Usage:
        //<azure-service service='service'></azure-service>"/>
        var directive = {
            scope: {
                'service': '='
            },
            link: link,
            restrict: 'E'
        };
        return directive;

        function link(scope, element, attrs) {
            var newElement = angular.element(scope.service.type);
            element.append(newElement);
            $compile(newElement)(scope);
        }
    }
})();

The only thing that this directive has to do is to angularJS compile the specific directive found in the scope.service.type. I believe now is the right moment to view the api..

(function() {
    'use strict';

    angular
        .module('azure.core')
        .factory('azureapi', azureapi);

    azureapi.$inject = ['$q', '$timeout'];

    function azureapi($q, $timeout) {
        var users = [
            {
                id: 1,
                services: [
                    {
                        type: '<biz-talk></biz-talk>',
                        title: 'BizTalk Azure',
                        image: 'images/bizTalk.png'
                    },
                    {
                        type: '<scheduler></scheduler>',
                        title: 'Scheduler Azure',
                        image: 'images/azure-scheduler.png'
                    },
                    {
                        type: '<redis-cache></redis-cache>',
                        title: 'Redis Cache Azure',
                        image01: 'images/redis-cache-01.png',
                        image02: 'images/redis-cache-02.jpg'
                    }
                ]
            },
            {
                id: 2,
                services: [
                    {
                        type: '<active-directory></active-directory>',
                        title: 'Active Directory',
                        image: 'images/activeDirectory.png'
                    },
                    {
                        type: '<redis-cache></redis-cache>',
                        title: 'Redis Cache Azure',
                        image01: 'images/redis-cache-01.png',
                        image02: 'images/redis-cache-02.jpg'
                    },
                    {
                        type: '<biz-talk></biz-talk>',
                        title: 'BizTalk Azure',
                        image: 'images/bizTalk.png'
                    },
                ]
            }
        ];

        var service = {
            getAzureServices: getAzureServices
        };

        return service;

        function getAzureServices(userId) {
            var deferred = $q.defer();

            var services = [];

            $timeout(function() {

                // amazing implementation
                services = users[userId - 1].services;

                deferred.resolve(services);
            }, 1000);

            return deferred.promise;
        }
    }
})();

As you can see each service has definitely a type which is being mapped to certain azure-directives. Depending on the service type you may add any custom property that azure-service directive may need (dynamic behavior).

How to consume this external-lib?

The final product of such a library should be a JavaScript plus a css file. In order to achieve this you need to write grunt or gulp tasks that will concatenate, minify and generally optimize and package your library. I have done this using Gulp and you can see those tasks here.
In the SPA app’s side the only thing you need to declare in order to view a user’s services is the following:

<div class="container">
    <azure-panel user="selectedUser"></azure-panel>
 </div>

The selectedUser is just an id which will be used from the lib’s api to fetch user’s services. In the app I have declared two users’s that have been registered in azure services in a different order. You can switch the selected user and check how this library works.
angularjs-dynamic-templates-02
That’s it we have finished! We saw how to create a re-usable angularJS library and how to create dynamic views using AngularJS. You can download the project I created from here where you will also find instructions on how to run it.

In case you find my blog’s content interesting, register your email to receive notifications of new posts and follow chsakell’s Blog on its Facebook or Twitter accounts.

Facebook Twitter
.NET Web Application Development by Chris S.
facebook twitter-small


Migrating ASP.NET 5 RC1 apps to ASP.NET Core

$
0
0

.NET Core RC2 is a major update from the November RC1 release and since announced all those that developed apps using the RC1 version are now required to upgrade them. The new version of .NET Core includes new APIs, performance and reliability improvements and a new set of tools as well. This means that not migrating your RC1 apps to it is not even an option. On the very first day of this year I released the Cross-platform SPAs with ASP.NET Core 1.0, Angular 2 & TypeScript post where we have seen how to get started developing Single Page Applications using ASP.NET 5, Angular 2 and Typescript. The post started with ASP.NET 5 beta and Angular 2 beta versions as well, but I made a promise that I will be upgrading the app as soon as new releases are out. Angular 2 was upgraded to RC.1 and now it’s time for the big change we have all waiting for. Upgrade from ASP.NET 5 RC1 to ASP.NET Core.

What is this post all about

This post will describe the changes needed in order to upgrade the PhotoGallery SPA application we built together, from ASP.NET 5 RC.1 to ASP.NET Core. You do know the PhotoGallery app or not, it really doesn’t matter. In case you have your own ASP.NET 5 application and you are interesting to migrate it, then you are on the right place. The interesting part is that the PhotoGallery app had incorporated many important features such as Entity Framework Core 7 with migrations and MVC services so you will have the chance to see not only the changes required to get the upgrade right but also some problems I encountered during the process. Before starting let me inform you that I have moved the ASP.NET 5 version of the project to its own Github branch named RC_1 so it is always available as a reference. The master branch will always contain the latest version of the app. You can view the RC_1 branch here.
asp5-to-aspcore-19

Starting migration…

The first thing you have to do is remove all previous versions of .NET Core from your system which obviously is different for different operating systems. On Windows you can do this through the control panel using Add/Remove programs. In my case I had two versions installed.
asp5-to-aspcore-01
Believe it or not this is where I got the first issue and un-installation failed. I got a setup blocked message for some reason and also asked for a specific .exe file in order for the process to continue. It turned out that the web installer file required was this file so in case you get the same exception download it and select it if asked. At the end of this step you shouldn’t have any version of ASP.NET 5 in the Add/Remove programs panel.
asp5-to-aspcore-02

Install .NET Core SDK

Depending on the OS you use, follow the exact instructions described here. I had VS 2015 already installed so I continued the process with the Visual Studio official MSI Installer..
asp5-to-aspcore-03
asp5-to-aspcore-04
… and the NuGet Manager extension for Visual Studio..
asp5-to-aspcore-06
When all these finished make sure that the new .NET Core CLI has been successfully installed by typing the following command in a console.

dotnet --version

asp5-to-aspcore-07
In a nutchel, .NET Core CLI replaces the old DNX tooling. This means no more DNX, dnu or dnvm commands, only dotnet. Find more about their differences here.
By the way in case you want to remove DNVM you have two options. Either run dnvm list to get all installed versions and then run dnvm uninstall version_to_delete or simply remove the runtime folders from the user’s profile folder.

dnvm list
dnvm uninstall version_to_delete

asp5-to-aspcore-21
After doing this, if you open a new terminal dnvm will not be recognized by the system. For deleting DNU and DNX delete the %USERPROFILE%\.dnx folder and any reference exists in the PATH environment variable.
asp5-to-aspcore-22

Project Configuration

It’s time to open the PhotoGallery ASP.NET 5 application and convert it to ASP.NET Core one. Open the solution (or your own ASP.NET 5 project) and make sure you have the Github RC_1 branch version. I must say that at this point and ASP.NET 5 uninstalled the project still worked as charmed. The first thing you need to change is the SDK version that the application is going to use. This is being set in the global.json folder under the Solution items folder. Change it as follow:

{
    "projects": [ "src", "test" ],
    "sdk": {
        "version": "1.0.0-preview1-002702"
    }
}

Notice that this is the exact version that the previous command printed. We continue with the project.json. Before showing you the entire file let’s point some important changes. The compilationOptions changes to buildOptions as follow:

"buildOptions": {
        "emitEntryPoint": true,
        "preserveCompilationContext": true
    }

Target frameworks declaration changes as follow:

"frameworks": {
        "dnx451": { },
        "dnxcore50": {
            "dependencies": {
                "System.Security.Cryptography.Algorithms": "4.0.0-beta-23516"
            }
        }
    }
"frameworks": {
        "netcoreapp1.0": {
            "imports": [
                "dotnet5.6",
                "dnxcore50",
                "portable-net45+win8"
            ]
        }
    }

The old publish and excludePublish options have been replaced with the publishOptions as follow:

"exclude": [
        "wwwroot",
        "node_modules"
    ],
    "publishExclude": [
        "**.user",
        "**.vspscc"
    ]
"publishOptions": {
        "include": [
            "wwwroot",
            "Views",
            "appsettings.json",
            "web.config"
        ],
        "exclude": [
            "node_modules"
        ]
    }

Any 1.0.0-rc1-final depedency should change to 1.0.0-rc2-final and any Microsoft.AspNet.* dependency to Microsoft.AspNetCore.*. For example..

"Microsoft.AspNet.Authentication.Cookies": "1.0.0-rc1-final"

.. changed to

"Microsoft.AspNetCore.Authentication.Cookies": "1.0.0-rc2-final"

The commands object we knew has been changed to a corresponding tools object. Here is the entire ASP.NET Core version of the project.json file.

{
    "webroot": "wwwroot",
    "userSecretsId": "PhotoGallery",
    "version": "2.0.0-*",
    "buildOptions": {
        "emitEntryPoint": true,
        "preserveCompilationContext": true
    },

    "dependencies": {
        "AutoMapper.Data": "1.0.0-beta1",
        "Microsoft.AspNetCore.Authentication.Cookies": "1.0.0-rc2-final",
        "Microsoft.AspNetCore.Diagnostics": "1.0.0-rc2-final",
        "Microsoft.AspNetCore.Diagnostics.EntityFrameworkCore": "1.0.0-rc2-final",
        "Microsoft.AspNetCore.Identity": "1.0.0-rc2-final",
        "Microsoft.AspNetCore.Mvc": "1.0.0-rc2-final",
        "Microsoft.AspNetCore.Mvc.TagHelpers": "1.0.0-rc2-final",
        "Microsoft.AspNetCore.Server.IISIntegration": "1.0.0-rc2-final",
        "Microsoft.AspNetCore.Server.Kestrel": "1.0.0-rc2-final",
        "Microsoft.AspNetCore.StaticFiles": "1.0.0-rc2-final",
        "Microsoft.EntityFrameworkCore": "1.0.0-rc2-final",
        "Microsoft.EntityFrameworkCore.SqlServer": "1.0.0-rc2-final",
        "Microsoft.EntityFrameworkCore.Tools": {
            "version": "1.0.0-preview1-final",
            "type": "build"
        },
        "Microsoft.Extensions.Configuration.EnvironmentVariables": "1.0.0-rc2-final",
        "Microsoft.Extensions.Configuration.Json": "1.0.0-rc2-final",
        "Microsoft.Extensions.Configuration.UserSecrets": "1.0.0-rc2-final",
        "Microsoft.Extensions.FileProviders.Physical": "1.0.0-rc2-final",
        "Microsoft.NETCore.App": {
            "version": "1.0.0-rc2-3002702",
            "type": "platform"
        }
    },

    "tools": {
        "Microsoft.AspNetCore.Razor.Tools": {
            "version": "1.0.0-preview1-final",
            "imports": "portable-net45+win8+dnxcore50"
        },
        "Microsoft.AspNetCore.Server.IISIntegration.Tools": {
            "version": "1.0.0-preview1-final",
            "imports": "portable-net45+win8+dnxcore50"
        },
        "Microsoft.EntityFrameworkCore.Tools": {
            "version": "1.0.0-preview1-final",
            "imports": [
                "portable-net45+win8+dnxcore50",
                "portable-net45+win8"
            ]
        },
        "Microsoft.Extensions.SecretManager.Tools": {
            "version": "1.0.0-preview1-final",
            "imports": "portable-net45+win8+dnxcore50"
        },
        "Microsoft.VisualStudio.Web.CodeGeneration.Tools": {
            "version": "1.0.0-preview1-final",
            "imports": [
                "portable-net45+win8+dnxcore50",
                "portable-net45+win8"
            ]
        }
    },

    "frameworks": {
        "netcoreapp1.0": {
            "imports": [
                "dotnet5.6",
                "dnxcore50",
                "portable-net45+win8"
            ]
        }
    },

    "runtimeOptions": {
        "gcServer": true,
        "gcConcurrent": true
    },

    "publishOptions": {
        "include": [
            "wwwroot",
            "Views",
            "appsettings.json",
            "web.config"
        ],
        "exclude": [
            "node_modules"
        ]
    },

    "scripts": {
        "postpublish": [ "dotnet publish-iis --publish-folder %publish:OutputPath% --framework %publish:FullTargetFramework%" ]
    }
}

Feel free to compare it with the ASP.NET 5 version. I have highlighted some important dependencies cause you certainly cannot ignore. For example you need to declare the Microsoft.EntityFrameworkCore.Tools if you want to work with EF migrations. At this point I noticed that Visual Studio was complaining that the NPM packages weren’t successfully installed. More over it seemed that it was trying to download extra packages not defined in the package.json as well.
asp5-to-aspcore-08
asp5-to-aspcore-10
What I did to resolve this is make Visual Studio use my own Node.js version. Right clink on the npm folder and select Configure External Tools.
asp5-to-aspcore-11
Add the path to your Node.js installation folder and make sure to set it to the top. VS will use this from now on.
asp5-to-aspcore-12

Code refactoring

After all those settings I believe the solution had at least 200 compilation errors so my reaction was like..
ezgif.com-gif-maker
The first thing I did is fix all the namespaces. If you remember we renamed all Microsoft.AspNet.* dependencies to Microsoft.AspNetCore.* so you have to replace any old reference with the new one. Another important naming change is the one related to Entity Framework. The core dependency in the project.json is the “Microsoft.EntityFrameworkCore”: “1.0.0-rc2-final” which means there is no Microsoft.Data.Entity any more. Let’s compare the namespaces in the PhotoGalleryContext class which happens to inherit DbContext:

using Microsoft.EntityFrameworkCore;
using PhotoGallery.Entities;
using System;
using System.Collections.Generic;
using System.Linq;
using System.Threading.Tasks;
using Microsoft.EntityFrameworkCore.Internal;
using Microsoft.EntityFrameworkCore.Metadata.Internal;

namespace PhotoGallery.Infrastructure
{
    public class PhotoGalleryContext : DbContext
    {

Compare it with the old version. You can find more info about upgrading to Entity Framework RC2 here.
Here is an example of namespace changes all MVC Controller classes needed:

using System;
using System.Collections.Generic;
using System.Linq;
using System.Threading.Tasks;
using Microsoft.AspNetCore.Mvc;
using PhotoGallery.Entities;
using PhotoGallery.ViewModels;
using AutoMapper;
using PhotoGallery.Infrastructure.Repositories;
using PhotoGallery.Infrastructure.Core;
using Microsoft.AspNetCore.Authorization;

namespace PhotoGallery.Controllers
{
    [Route("api/[controller]")]
    public class AlbumsController : Controller
    {
	// code omitted

One of the key changes in ASP.NET Core is how the application fires. You need to define a Main method in the same way you would as if it was a console application. Why? Because believe it or not ASP.NET Core applications are just console applications. This means that you need to define an entry point for your application. You have two choices: Either create a new Program.cs file and define it over there or instead use the existing Main method in the Startup.cs file as follow:

// Entry point for the application.
        public static void Main(string[] args)
        {
            var host = new WebHostBuilder()
              .UseKestrel()
              .UseContentRoot(Directory.GetCurrentDirectory())
              .UseIISIntegration()
              .UseStartup<Startup>()
              .Build();

            host.Run();
        }

Here is the updated Startup class. The highlighted lines are most important changes.

using System;
using System.Collections.Generic;
using System.Linq;
using System.Threading.Tasks;
using Microsoft.AspNetCore.Builder;
using Microsoft.AspNetCore.Hosting;
using Microsoft.AspNetCore.Http;
using Microsoft.Extensions.DependencyInjection;
using Microsoft.Extensions.PlatformAbstractions;
using Microsoft.Extensions.Configuration;
using PhotoGallery.Infrastructure;
using Microsoft.EntityFrameworkCore;
using PhotoGallery.Infrastructure.Repositories;
using PhotoGallery.Infrastructure.Services;
using PhotoGallery.Infrastructure.Mappings;
using PhotoGallery.Infrastructure.Core;
using System.Security.Claims;
using Microsoft.AspNetCore.StaticFiles;
using System.IO;
using Microsoft.Extensions.FileProviders;

namespace PhotoGallery
{
    public class Startup
    {
        private static string _applicationPath = string.Empty;
        private static string _contentRootPath = string.Empty;
        public Startup(IHostingEnvironment env)
        {
            _applicationPath = env.WebRootPath;
            _contentRootPath = env.ContentRootPath;
            // Setup configuration sources.

            var builder = new ConfigurationBuilder()
                .SetBasePath(_contentRootPath)
                .AddJsonFile("appsettings.json")
                .AddJsonFile($"appsettings.{env.EnvironmentName}.json", optional: true);

            if (env.IsDevelopment())
            {
                // This reads the configuration keys from the secret store.
                // For more details on using the user secret store see http://go.microsoft.com/fwlink/?LinkID=532709
                builder.AddUserSecrets();
            }
            builder.AddEnvironmentVariables();
            Configuration = builder.Build();
        }

        public IConfigurationRoot Configuration { get; set; }
        // This method gets called by the runtime. Use this method to add services to the container.
        // For more information on how to configure your application, visit http://go.microsoft.com/fwlink/?LinkID=398940
        public void ConfigureServices(IServiceCollection services)
        {
            services.AddDbContext<PhotoGalleryContext>(options =>
                options.UseSqlServer(Configuration["Data:PhotoGalleryConnection:ConnectionString"]));


            // Repositories
            services.AddScoped<IPhotoRepository, PhotoRepository>();
            services.AddScoped<IAlbumRepository, AlbumRepository>();
            services.AddScoped<IUserRepository, UserRepository>();
            services.AddScoped<IUserRoleRepository, UserRoleRepository>();
            services.AddScoped<IRoleRepository, RoleRepository>();
            services.AddScoped<ILoggingRepository, LoggingRepository>();

            // Services
            services.AddScoped<IMembershipService, MembershipService>();
            services.AddScoped<IEncryptionService, EncryptionService>();

            services.AddAuthentication();

            // Polices
            services.AddAuthorization(options =>
            {
                // inline policies
                options.AddPolicy("AdminOnly", policy =>
                {
                    policy.RequireClaim(ClaimTypes.Role, "Admin");
                });

            });

            // Add MVC services to the services container.
            services.AddMvc();
        }

        // This method gets called by the runtime. Use this method to configure the HTTP request pipeline.
        public void Configure(IApplicationBuilder app, IHostingEnvironment env)
        {
            // this will serve up wwwroot
            app.UseFileServer();

            // this will serve up node_modules
            var provider = new PhysicalFileProvider(
                Path.Combine(_contentRootPath, "node_modules")
            );
            var _fileServerOptions = new FileServerOptions();
            _fileServerOptions.RequestPath = "/node_modules";
            _fileServerOptions.StaticFileOptions.FileProvider = provider;
            _fileServerOptions.EnableDirectoryBrowsing = true;
            app.UseFileServer(_fileServerOptions);

            AutoMapperConfiguration.Configure();

            app.UseCookieAuthentication(new CookieAuthenticationOptions
            {
                AutomaticAuthenticate = true,
                AutomaticChallenge = true
            });

            // Custom authentication middleware
            //app.UseMiddleware<AuthMiddleware>();

            // Add MVC to the request pipeline.
            app.UseMvc(routes =>
            {
                routes.MapRoute(
                    name: "default",
                    template: "{controller=Home}/{action=Index}/{id?}");

                    // Uncomment the following line to add a route for porting Web API 2 controllers.
                    //routes.MapWebApiRoute("DefaultApi", "api/{controller}/{id?}");
                });

            DbInitializer.Initialize(app.ApplicationServices, _applicationPath);
        }

        // Entry point for the application.
        public static void Main(string[] args)
        {
            var host = new WebHostBuilder()
              .UseKestrel()
              .UseContentRoot(Directory.GetCurrentDirectory())
              .UseIISIntegration()
              .UseStartup<Startup>()
              .Build();

            host.Run();
        }
    }
}

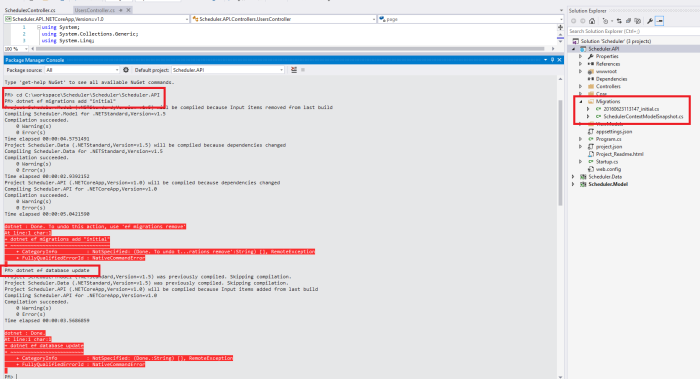
IApplicationEnvironment changed to IHostingEnvironment and also the way you add Entity Framework services to the application service provider. You may ask yourself what happens now that Entity Framework migrated to RC2? Do EF migrations work as used to? The answer is yes, there aren’t huge changes in the way you use EF migrations. I encountered though an issue while trying to add migrations so let me point it out. First of all make sure you have all the required dependencies and tools defined in order to use EF migrations. Then open the Package Manager Console and instead of running the old command dnx ef add migrations run the following:

dotnet ef migrations add initial

When I run the command I got the following error:
asp5-to-aspcore-13
It turns out that if you run the command from the Powershell 5 you wont get the error. If you still want to run commands from the Package Manager Console as I did the only thing to do is navigate to the project’s root first using a cd file_to_root command and then run the command. Here’s what I did.
asp5-to-aspcore-14
Then I run the database update command and the database was successfully created.
asp5-to-aspcore-15

Launching

There are two more changes I did before firing the application on IIS. Firstly I changed the launchSettings.json file under Properties as follow:

{
    "iisSettings": {
        "windowsAuthentication": false,
        "anonymousAuthentication": true,
        "iisExpress": {
            "applicationUrl": "http://localhost:9823/",
            "sslPort": 0
        }
    },
    "profiles": {
        "IIS Express": {
            "commandName": "IISExpress",
            "launchBrowser": true,
            "environmentVariables": {
                "ASPNETCORE_ENVIRONMENT": "Development"
            }
        },
        "$safeprojectname$": {
            "commandName": "Project",
            "launchBrowser": true,
            "launchUrl": "http://localhost:5000",
            "environmentVariables": {
                "ASPNETCORE_ENVIRONMENT": "Development"
            }
        }
    }
}

I have also modified the .xproj project file and replace the old DNX references with the new DotNet.

<?xml version="1.0" encoding="utf-8"?>
<Project ToolsVersion="14.0" DefaultTargets="Build" xmlns="http://schemas.microsoft.com/developer/msbuild/2003">
  <PropertyGroup>
    <VisualStudioVersion Condition="'$(VisualStudioVersion)' == ''">14.0</VisualStudioVersion>
    <VSToolsPath Condition="'$(VSToolsPath)' == ''">$(MSBuildExtensionsPath32)\Microsoft\VisualStudio\v$(VisualStudioVersion)</VSToolsPath>
  </PropertyGroup>
  <Import Project="$(VSToolsPath)\DotNet\Microsoft.DotNet.Props" Condition="'$(VSToolsPath)' != ''" />
  <PropertyGroup Label="Globals">
    <ProjectGuid>33f89712-732c-4800-9051-3d89a2e5a1d9</ProjectGuid>
    <RootNamespace>PhotoGallery</RootNamespace>
    <BaseIntermediateOutputPath Condition="'$(BaseIntermediateOutputPath)'=='' ">.\obj</BaseIntermediateOutputPath>
	<OutputPath Condition="'$(OutputPath)'=='' ">.\bin\</OutputPath>
	<TargetFrameworkVersion>v4.6</TargetFrameworkVersion>
  </PropertyGroup>
  <PropertyGroup>
    <SchemaVersion>2.0</SchemaVersion>
  </PropertyGroup>
  <ItemGroup>
    <DnxInvisibleFolder Include="bower_components\" />
  </ItemGroup>
  <Import Project="$(VSToolsPath)\DotNet.Web\Microsoft.DotNet.Web.targets" Condition="'$(VSToolsPath)' != ''" />
</Project>

Having done all these changes I was able to launch the app both from IIS and the console. In order to run the app from the console type the dotnet run command.
asp5-to-aspcore-16

Conclusion

That’s it, we have finally finished!
finaly-finished-migration
Migrating an ASP.NET 5 application to ASP.NET Core is kind of tricky but certainly not impossible. Now you can also create a brand new ASP.NET Core Web application through Visual Studio 2015 by selecting the respective template.
asp5-to-aspcore-17
As far as PhotoGallery SPA I used for this post, as I mentioned the master branch will always have the latest updates while the RC_1 keeps the ASP.NET 5 RC1 version. You can check the Upgrade from ASP.NET 5 to ASP.NET Core commit here. The full source code is available here with instructions to run the app in and outside of Visual Studio.
asp5-to-aspcore-18

In case you find my blog’s content interesting, register your email to receive notifications of new posts and follow chsakell’s Blog on its Facebook or Twitter accounts.

Facebook Twitter
.NET Web Application Development by Chris S.
facebook twitter-small

Building REST APIs using ASP.NET Core and Entity Framework Core

$
0
0

ASP.NET Core and Entity Framework Core are getting more and more attractive nowadays and this post will show you how to get the most of them in order to get started with building scalable and robust APIs. We have seen them in action on a previous post but now we have all the required tools and knowledge to explain things in more detail. One of the most key points we are going to show on this post is how to structure a cross platform API solution properly. On the previous post we used a single ASP.NET Core Web Application project to host all the different components of our application (Models, Data Repositories, API, Front-end) since cross-platform .NET Core libraries weren’t supported yet. This time though we will follow the Separation of Concerns design principle by spliting the application in different layers.

What this post is all about

The purpose of this post is to build the API infrastructure for an SPA Angular application that holds and manipulates schedule information. We will configure the database using Entity Framework Core (Code First – Migrations), create the Models, Repositories and the REST – MVC API as well. Despite the fact that we ‘ll build the application using VS 2015, the project will be able to run in and outside of it. Let’s denote the most important sections of this post.

  • Create a cross platform solution using the Separation of Concerns principle
  • Create the Models and Data Repositories
  • Apply EF Core migrations from a different assembly that the DbContext belongs
  • Build the API using REST architecture principles
  • Apply ViewModel validations using the FluentValidation Nuget Package
  • Apply a global Exception Handler for the API controllers

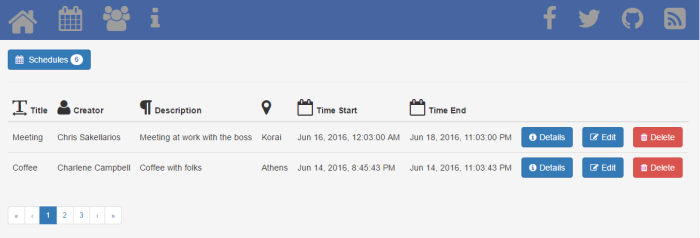
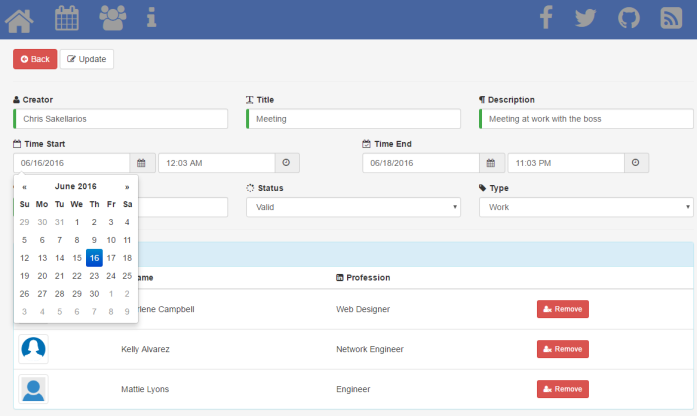
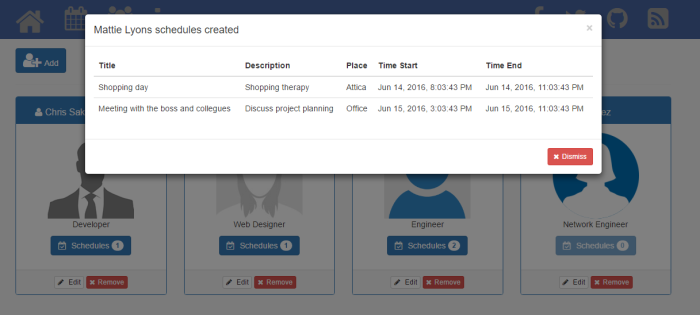
In the next post will build the associated Angular SPA that will make use of the API. The SPA will use the latest version of Angular, TypeScript and much more. More over, it’s going to apply several interesting features such as custom Modal popups, DateTime pickers, Form validations and animations. Just to keep you waiting for it let me show you some screenshots of the final SPA.
dotnet-core-api-03
dotnet-core-api-05
dotnet-core-api-06
Are you ready? Let’s start!
dotnet-core-api-14

Create a cross platform solution

Assuming you have already .NET Core installed on your machine, open VS 2015 and create a blank solution named Scheduler. Right click the solution and add two new projects of type Class Library (.NET Core). Name the first one Scheduler.Model and the second one Scheduler.Data.
dotnet-core-api-01
You can remove the default Class1 classes, you won’t need them. Continue by adding a new ASP.NET Core Web Application (.NET Core) project named Scheduler.API by selecting the Empty template.
dotnet-core-api-02

Create the Models and Data Repositories

Scheduler.Model and Scheduler.Data libraries are cross-platform projects and could be created outside VS as well. The most important file that this type of project has is the project.json. Let’s create first our models. Switch to Scheduler.Model and change the project.json file as follow:

{
  "version": "1.0.0-*",

  "dependencies": {
    "NETStandard.Library": "1.6.0"
  },

  "frameworks": {
    "netstandard1.6": {
      "imports": [
        "dnxcore50",
        "portable-net452+win81"
      ]
    }
  }
}

Add a .cs file named IEntityBase which will hold the base interface for our Entities.

public interface IEntityBase
{
    int Id { get; set; }
}

Create a folder named Entities and add the following classes:

public class Schedule : IEntityBase
{
    public Schedule()
    {
        Attendees = new List<Attendee>();
    }

    public int Id { get; set; }
    public string Title { get; set; }
    public string Description { get; set; }
    public DateTime TimeStart { get; set; }
    public DateTime TimeEnd { get; set; }
    public string Location { get; set; }
    public ScheduleType Type { get; set; }

    public ScheduleStatus Status { get; set; }
    public DateTime DateCreated { get; set; }
    public DateTime DateUpdated { get; set; }
    public User Creator { get; set; }
    public int CreatorId { get; set; }
    public ICollection<Attendee> Attendees { get; set; }
}
public class User : IEntityBase
{
    public User()
    {
        SchedulesCreated = new List<Schedule>();
        SchedulesAttended = new List<Attendee>();
    }
    public int Id { get; set; }
    public string Name { get; set; }
    public string Avatar { get; set; }
    public string Profession { get; set; }
    public ICollection<Schedule> SchedulesCreated { get; set; }
    public ICollection<Attendee> SchedulesAttended { get; set; }
}
public class Attendee : IEntityBase
{
    public int Id { get; set; }
    public int UserId { get; set; }
    public User User { get; set; }

    public int ScheduleId { get; set; }
    public Schedule Schedule { get; set; }
}
public enum ScheduleType
{
    Work = 1,
    Coffee = 2,
    Doctor = 3,
    Shopping = 4,
    Other = 5
}

public enum ScheduleStatus
{
    Valid = 1,
    Cancelled = 2
}

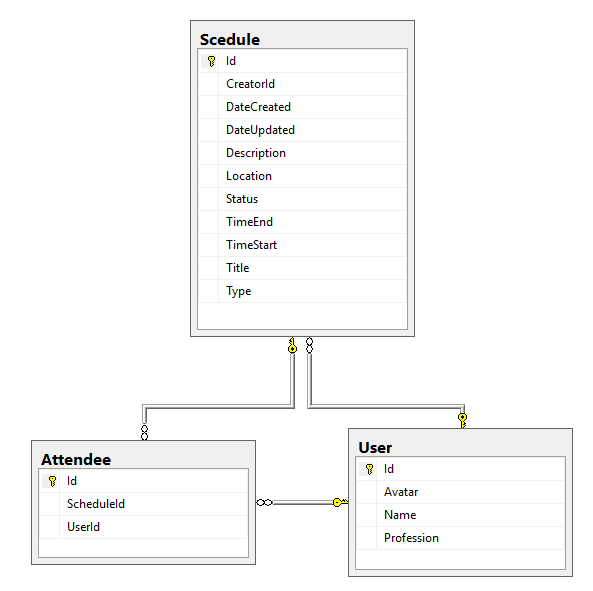
As you can see there are only three basic classes, Schedule, User and Attendee. Our SPA will display schedule information where a user may create many schedules One – Many relationship and attend many others Many – Many relationship. We will bootstrap the database later on using EF migrations but here’s the schema for your reference.
dotnet-core-api-07
Switch to Scheduler.Data project and change the project.json file as follow:

{
  "version": "1.0.0-*",

  "dependencies": {
    "Microsoft.EntityFrameworkCore": "1.0.0",
    "Microsoft.EntityFrameworkCore.Relational": "1.0.0",
    "NETStandard.Library": "1.6.0",
    "Scheduler.Model": "1.0.0-*",
    "System.Linq.Expressions": "4.1.0"
  },

  "frameworks": {
    "netstandard1.6": {
      "imports": [
        "dnxcore50",
        "portable-net452+win81"
      ]
    }
  }
}

We need Entity Framework Core on this project to set the DbContext class and a reference to the Scheduler.Model project. Add a folder named Abstract and create the following interfaces:

public interface IEntityBaseRepository<T> where T : class, IEntityBase, new()
{
    IEnumerable<T> AllIncluding(params Expression<Func<T, object>>[] includeProperties);
    IEnumerable<T> GetAll();
    int Count();
    T GetSingle(int id);
    T GetSingle(Expression<Func<T, bool>> predicate);
    T GetSingle(Expression<Func<T, bool>> predicate, params Expression<Func<T, object>>[] includeProperties);
    IEnumerable<T> FindBy(Expression<Func<T, bool>> predicate);
    void Add(T entity);
    void Update(T entity);
    void Delete(T entity);
    void DeleteWhere(Expression<Func<T, bool>> predicate);
    void Commit();
}
public interface IScheduleRepository : IEntityBaseRepository<Schedule> { }

public interface IUserRepository : IEntityBaseRepository<User> { }

public interface IAttendeeRepository : IEntityBaseRepository<Attendee> { }

Continue by creating the repositories in a new folder named Repositories.

public class EntityBaseRepository<T> : IEntityBaseRepository<T>
        where T : class, IEntityBase, new()
{

    private SchedulerContext _context;

    #region Properties
    public EntityBaseRepository(SchedulerContext context)
    {
        _context = context;
    }
    #endregion
    public virtual IEnumerable<T> GetAll()
    {
        return _context.Set<T>().AsEnumerable();
    }

    public virtual int Count()
    {
        return _context.Set<T>().Count();
    }
    public virtual IEnumerable<T> AllIncluding(params Expression<Func<T, object>>[] includeProperties)
    {
        IQueryable<T> query = _context.Set<T>();
        foreach (var includeProperty in includeProperties)
        {
            query = query.Include(includeProperty);
        }
        return query.AsEnumerable();
    }

    public T GetSingle(int id)
    {
        return _context.Set<T>().FirstOrDefault(x => x.Id == id);
    }

    public T GetSingle(Expression<Func<T, bool>> predicate)
    {
        return _context.Set<T>().FirstOrDefault(predicate);
    }

    public T GetSingle(Expression<Func<T, bool>> predicate, params Expression<Func<T, object>>[] includeProperties)
    {
        IQueryable<T> query = _context.Set<T>();
        foreach (var includeProperty in includeProperties)
        {
            query = query.Include(includeProperty);
        }

        return query.Where(predicate).FirstOrDefault();
    }

    public virtual IEnumerable<T> FindBy(Expression<Func<T, bool>> predicate)
    {
        return _context.Set<T>().Where(predicate);
    }

    public virtual void Add(T entity)
    {
        EntityEntry dbEntityEntry = _context.Entry<T>(entity);
        _context.Set<T>().Add(entity);
    }

    public virtual void Update(T entity)
    {
        EntityEntry dbEntityEntry = _context.Entry<T>(entity);
        dbEntityEntry.State = EntityState.Modified;
    }
    public virtual void Delete(T entity)
    {
        EntityEntry dbEntityEntry = _context.Entry<T>(entity);
        dbEntityEntry.State = EntityState.Deleted;
    }

    public virtual void DeleteWhere(Expression<Func<T, bool>> predicate)
    {
        IEnumerable<T> entities = _context.Set<T>().Where(predicate);

        foreach(var entity in entities)
        {
            _context.Entry<T>(entity).State = EntityState.Deleted;
        }
    }

    public virtual void Commit()
    {
        _context.SaveChanges();
    }
}
public class ScheduleRepository : EntityBaseRepository<Schedule>, IScheduleRepository
{
    public ScheduleRepository(SchedulerContext context)
        : base(context)
    { }
}
public class UserRepository : EntityBaseRepository<User>, IUserRepository
{
    public UserRepository(SchedulerContext context)
        : base(context)
    { }
}
public class AttendeeRepository : EntityBaseRepository<Attendee>, IAttendeeRepository
{
    public AttendeeRepository(SchedulerContext context)
        : base(context)
    { }
}

Since we want to use Entity Framework to access our database we need to create a respective DbContext class. Add the SchedulerContext class under the root of the Scheduler.Data project.

public class SchedulerContext : DbContext
{
    public DbSet<Schedule> Schedules { get; set; }
    public DbSet<User> Users { get; set; }
    public DbSet<Attendee> Attendees { get; set; }

    public SchedulerContext(DbContextOptions options) : base(options) { }

    protected override void OnModelCreating(ModelBuilder modelBuilder)
    {
        foreach (var relationship in modelBuilder.Model.GetEntityTypes().SelectMany(e => e.GetForeignKeys()))
        {
            relationship.DeleteBehavior = DeleteBehavior.Restrict;
        }


        modelBuilder.Entity<Schedule>()
            .ToTable("Schedule");

        modelBuilder.Entity<Schedule>()
            .Property(s => s.CreatorId)
            .IsRequired();

        modelBuilder.Entity<Schedule>()
            .Property(s => s.DateCreated)
            .HasDefaultValue(DateTime.Now);

        modelBuilder.Entity<Schedule>()
            .Property(s => s.DateUpdated)
            .HasDefaultValue(DateTime.Now);

        modelBuilder.Entity<Schedule>()
            .Property(s => s.Type)
            .HasDefaultValue(ScheduleType.Work);

        modelBuilder.Entity<Schedule>()
            .Property(s => s.Status)
            .HasDefaultValue(ScheduleStatus.Valid);

        modelBuilder.Entity<Schedule>()
            .HasOne(s => s.Creator)
            .WithMany(c => c.SchedulesCreated);

        modelBuilder.Entity<User>()
            .ToTable("User");

        modelBuilder.Entity<User>()
            .Property(u => u.Name)
            .HasMaxLength(100)
            .IsRequired();

        modelBuilder.Entity<Attendee>()
            .ToTable("Attendee");

        modelBuilder.Entity<Attendee>()
            .HasOne(a => a.User)
            .WithMany(u => u.SchedulesAttended)
            .HasForeignKey(a => a.UserId);

        modelBuilder.Entity<Attendee>()
            .HasOne(a => a.Schedule)
            .WithMany(s => s.Attendees)
            .HasForeignKey(a => a.ScheduleId);

    }
}

Before moving to the Scheduler.API and create the API Controllers let’s add a Database Initializer class that will init some mock data when the application fires for the first time. You can find the SchedulerDbInitializer class here.

Build the API using REST architecture principles

Switch to the Scheduler.API ASP.NET Core Web Application project and modify the project.json file as follow:

{
  "userSecretsId": "Scheduler",

  "dependencies": {
    "AutoMapper.Data": "1.0.0-beta1",
    "FluentValidation": "6.2.1-beta1",
    "Microsoft.NETCore.App": {
      "version": "1.0.0",
      "type": "platform"
    },
    "Microsoft.AspNetCore.Diagnostics.EntityFrameworkCore": "1.0.0",
    "Microsoft.EntityFrameworkCore": "1.0.0",
    "Microsoft.EntityFrameworkCore.SqlServer": "1.0.0",
    "Microsoft.EntityFrameworkCore.Tools": {
      "version": "1.0.0-preview2-final",
      "type": "build"
    },
    "Microsoft.AspNetCore.Server.IISIntegration": "1.0.0",
    "Microsoft.AspNetCore.Server.Kestrel": "1.0.0",
    "Microsoft.Extensions.Configuration": "1.0.0",
    "Microsoft.Extensions.Configuration.FileExtensions": "1.0.0",
    "Microsoft.Extensions.Configuration.Json": "1.0.0",
    "Microsoft.Extensions.Configuration.EnvironmentVariables": "1.0.0",
    "Scheduler.Data": "1.0.0-*",
    "Scheduler.Model": "1.0.0-*",
    "Microsoft.Extensions.Configuration.UserSecrets": "1.0.0",
    "Microsoft.AspNetCore.Mvc": "1.0.0",
    "Newtonsoft.Json": "9.0.1",
    "Microsoft.AspNetCore.StaticFiles": "1.0.0",
    "Microsoft.Extensions.FileProviders.Physical": "1.0.0",
    "Microsoft.AspNetCore.Diagnostics": "1.0.0"
  },

  "tools": {
    "Microsoft.AspNetCore.Server.IISIntegration.Tools": {
      "version": "1.0.0-preview2-final",
      "imports": "portable-net45+win8+dnxcore50"
    },
    "Microsoft.EntityFrameworkCore.Tools": {
      "version": "1.0.0-preview2-final",
      "imports": [
        "portable-net45+win8+dnxcore50",
        "portable-net45+win8"
      ]
    }
  },

  "frameworks": {
    "netcoreapp1.0": {
      "imports": [
        "dotnet5.6",
        "dnxcore50",
        "portable-net45+win8"
      ]
    }
  },

  "buildOptions": {
    "emitEntryPoint": true,
    "preserveCompilationContext": true
  },

  "runtimeOptions": {
    "gcServer": true,
    "gcConcurrent": true
  },

  "publishOptions": {
    "include": [
      "wwwroot",
      "web.config"
    ]
  },

  "scripts": {
    "postpublish": [ "dotnet publish-iis --publish-folder %publish:OutputPath% --framework %publish:FullTargetFramework%" ]
  }
}

We referenced the previous two projects and some tools related to Entity Framework cause we are going to use EF migrations to create the database. Of course we also referenced MVC Nuget Packages in order to incorporate the MVC services into the pipeline. Modify the Startup class..

public class Startup
    {
        private static string _applicationPath = string.Empty;
        private static string _contentRootPath = string.Empty;
        public IConfigurationRoot Configuration { get; set; }
        public Startup(IHostingEnvironment env)
        {
            _applicationPath = env.WebRootPath;
            _contentRootPath = env.ContentRootPath;
            // Setup configuration sources.

            var builder = new ConfigurationBuilder()
                .SetBasePath(_contentRootPath)
                .AddJsonFile("appsettings.json")
                .AddJsonFile($"appsettings.{env.EnvironmentName}.json", optional: true);

            if (env.IsDevelopment())
            {
                // This reads the configuration keys from the secret store.
                // For more details on using the user secret store see http://go.microsoft.com/fwlink/?LinkID=532709
                builder.AddUserSecrets();
            }

            builder.AddEnvironmentVariables();
            Configuration = builder.Build();
        }
        // This method gets called by the runtime. Use this method to add services to the container.
        // For more information on how to configure your application, visit http://go.microsoft.com/fwlink/?LinkID=398940
        public void ConfigureServices(IServiceCollection services)
        {
            services.AddDbContext<SchedulerContext>(options =>
                options.UseSqlServer(Configuration["Data:SchedulerConnection:ConnectionString"],
                b => b.MigrationsAssembly("Scheduler.API")));

            // Repositories
            services.AddScoped<IScheduleRepository, ScheduleRepository>();
            services.AddScoped<IUserRepository, UserRepository>();
            services.AddScoped<IAttendeeRepository, AttendeeRepository>();

            // Automapper Configuration
            AutoMapperConfiguration.Configure();

            // Enable Cors
            services.AddCors();

            // Add MVC services to the services container.
            services.AddMvc()
                .AddJsonOptions(opts =>
                {
                    // Force Camel Case to JSON
                    opts.SerializerSettings.ContractResolver = new CamelCasePropertyNamesContractResolver();
                });
        }

        // This method gets called by the runtime. Use this method to configure the HTTP request pipeline.
        public void Configure(IApplicationBuilder app)
        {
            app.UseStaticFiles();
            // Add MVC to the request pipeline.
            app.UseCors(builder =>
                builder.AllowAnyOrigin()
                .AllowAnyHeader()
                .AllowAnyMethod());

            app.UseExceptionHandler(
              builder =>
              {
                  builder.Run(
                    async context =>
                    {
                        context.Response.StatusCode = (int)HttpStatusCode.InternalServerError;
                        context.Response.Headers.Add("Access-Control-Allow-Origin", "*");

                        var error = context.Features.Get<IExceptionHandlerFeature>();
                        if (error != null)
                        {
                            context.Response.AddApplicationError(error.Error.Message);
                            await context.Response.WriteAsync(error.Error.Message).ConfigureAwait(false);
                        }
                    });
              });

            app.UseMvc(routes =>
            {
                routes.MapRoute(
                    name: "default",
                    template: "{controller=Home}/{action=Index}/{id?}");

                // Uncomment the following line to add a route for porting Web API 2 controllers.
                //routes.MapWebApiRoute("DefaultApi", "api/{controller}/{id?}");
            });

            SchedulerDbInitializer.Initialize(app.ApplicationServices);
        }
    }

We may haven’t created all the required classes (dont’ worry we will) for this to be compiled yet, but let’s point the most important parts. There is a mismatch between the project that the configuration file (appsettings.json) which holds the database connection string and the respective SchedulerDbContext class leaves. The appsettings.json file which we will create a little bit later is inside the API project while the DbContext class belongs to the Scheduler.Data. If we were to init EF migrations using the following command, we would fail because of the mismatch.

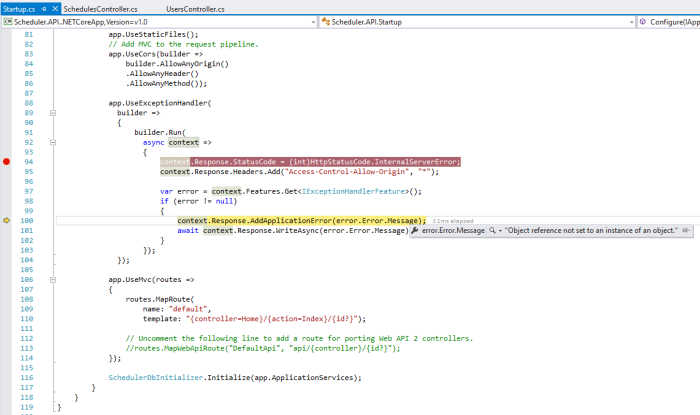
dotnet ef migrations add "initial"

What we need to do is to inform EF the assembly to be used for migrations..

services.AddDbContext<SchedulerContext>(options =>
     options.UseSqlServer(Configuration["Data:SchedulerConnection:ConnectionString"],
        b => b.MigrationsAssembly("Scheduler.API")));

We have added Cors services allowing all headers for all origins just for simplicity. Normally, you would allow only a few origins and headers as well. We need this cause the SPA we are going to create is going to be an entire different Web application built in Visual Studio Code.

app.UseCors(builder =>
    builder.AllowAnyOrigin()
    .AllowAnyHeader()
    .AllowAnyMethod());

One thing I always try to avoid is polluting my code with try/catch blocks. This is easy to accomplish in ASP.NET Core by adding a global Exception Handler into the pipeline.

app.UseExceptionHandler(
    builder =>
    {
        builder.Run(
        async context =>
        {
            context.Response.StatusCode = (int)HttpStatusCode.InternalServerError;
            context.Response.Headers.Add("Access-Control-Allow-Origin", "*");

            var error = context.Features.Get<IExceptionHandlerFeature>();
            if (error != null)
            {
                context.Response.AddApplicationError(error.Error.Message);
                await context.Response.WriteAsync(error.Error.Message).ConfigureAwait(false);
            }
        });
    });

Create an appsettings.json file at the root of the API application to hold you database connection string. Make sure you change it and reflect your environment.

{
  "Data": {
    "SchedulerConnection": {
      "ConnectionString": "Server=(localdb)\\v11.0;Database=SchedulerDb;Trusted_Connection=True;MultipleActiveResultSets=true"
    }
  }
}

Apply ViewModel validations and mappings

It’s good practise to send a parsed information to the front-end instead of using the database schema information. Add a new folder named ViewModels with the following three classes.

public class ScheduleViewModel : IValidatableObject
{
    public int Id { get; set; }
    public string Title { get; set; }
    public string Description { get; set; }
    public DateTime TimeStart { get; set; }
    public DateTime TimeEnd { get; set; }
    public string Location { get; set; }
    public string Type { get; set; }
    public string Status { get; set; }
    public DateTime DateCreated { get; set; }
    public DateTime DateUpdated { get; set; }
    public string Creator { get; set; }
    public int CreatorId { get; set; }
    public int[] Attendees { get; set; }

    public IEnumerable<ValidationResult> Validate(ValidationContext validationContext)
    {
        var validator = new ScheduleViewModelValidator();
        var result = validator.Validate(this);
        return result.Errors.Select(item => new ValidationResult(item.ErrorMessage, new[] { item.PropertyName }));
    }
}
public class UserViewModel : IValidatableObject
{
    public int Id { get; set; }
    public string Name { get; set; }
    public string Avatar { get; set; }
    public string Profession { get; set; }
    public int SchedulesCreated { get; set; }

    public IEnumerable<ValidationResult> Validate(ValidationContext validationContext)
    {
        var validator = new UserViewModelValidator();
        var result = validator.Validate(this);
        return result.Errors.Select(item => new ValidationResult(item.ErrorMessage, new[] { item.PropertyName }));
    }
}
public class ScheduleDetailsViewModel
{
    public int Id { get; set; }
    public string Title { get; set; }
    public string Description { get; set; }
    public DateTime TimeStart { get; set; }
    public DateTime TimeEnd { get; set; }
    public string Location { get; set; }
    public string Type { get; set; }
    public string Status { get; set; }
    public DateTime DateCreated { get; set; }
    public DateTime DateUpdated { get; set; }
    public string Creator { get; set; }
    public int CreatorId { get; set; }
    public ICollection<UserViewModel> Attendees { get; set; }
    // Lookups
    public string[] Statuses { get; set; }
    public string[] Types { get; set; }
}

When posting or updating ViewModels through HTTP POST / UPDATE requests to our API we want posted ViewModel data to pass through validations first. For this reason we will configure custom validations using FluentValidation. Add a folder named Validations inside the ViewModels one and create the following two validators.

public class UserViewModelValidator : AbstractValidator<UserViewModel>
{
    public UserViewModelValidator()
    {
        RuleFor(user => user.Name).NotEmpty().WithMessage("Name cannot be empty");
        RuleFor(user => user.Profession).NotEmpty().WithMessage("Profession cannot be empty");
        RuleFor(user => user.Avatar).NotEmpty().WithMessage("Profession cannot be empty");
    }
}
public class ScheduleViewModelValidator : AbstractValidator<ScheduleViewModel>
{
    public ScheduleViewModelValidator()
    {
        RuleFor(s => s.TimeEnd).Must((start, end) =>
        {
            return DateTimeIsGreater(start.TimeStart, end);
        }).WithMessage("Schedule's End time must be greater than Start time");
    }

    private bool DateTimeIsGreater(DateTime start, DateTime end)
    {
        return end > start;
    }
}

We will set front-end side validations using Angular but you should always run validations on the server as well. The ScheduleViewModelValidator ensures that the schedule’s end time is always greater than start time. The custom errors will be returned through the ModelState like this:

if (!ModelState.IsValid)
{
    return BadRequest(ModelState);
}

Add a new folder named Mappings inside the ViewModels and set the Domain to ViewModel mappings.

public class DomainToViewModelMappingProfile : Profile
{
    protected override void Configure()
    {
        Mapper.CreateMap<Schedule, ScheduleViewModel>()
            .ForMember(vm => vm.Creator,
                map => map.MapFrom(s => s.Creator.Name))
            .ForMember(vm => vm.Attendees, map =>
                map.MapFrom(s => s.Attendees.Select(a => a.UserId)));

        Mapper.CreateMap<Schedule, ScheduleDetailsViewModel>()
            .ForMember(vm => vm.Creator,
                map => map.MapFrom(s => s.Creator.Name))
            .ForMember(vm => vm.Attendees, map =>
                map.UseValue(new List<UserViewModel>()))
            .ForMember(vm => vm.Status, map =>
                map.MapFrom(s => ((ScheduleStatus)s.Status).ToString()))
            .ForMember(vm => vm.Type, map =>
                map.MapFrom(s => ((ScheduleType)s.Type).ToString()))
            .ForMember(vm => vm.Statuses, map =>
                map.UseValue(Enum.GetNames(typeof(ScheduleStatus)).ToArray()))
            .ForMember(vm => vm.Types, map =>
                map.UseValue(Enum.GetNames(typeof(ScheduleType)).ToArray()));

        Mapper.CreateMap<User, UserViewModel>()
            .ForMember(vm => vm.SchedulesCreated,
                map => map.MapFrom(u => u.SchedulesCreated.Count()));
    }
}
public class AutoMapperConfiguration
{
    public static void Configure()
    {
        Mapper.Initialize(x =>
        {
            x.AddProfile<DomainToViewModelMappingProfile>();
        });
    }
}

Add a new folder named Core at the root of the API application and create a helper class for supporting pagination in our SPA.

public class PaginationHeader
{
    public int CurrentPage { get; set; }
    public int ItemsPerPage { get; set; }
    public int TotalItems { get; set; }
    public int TotalPages { get; set; }

    public PaginationHeader(int currentPage, int itemsPerPage, int totalItems, int totalPages)
    {
        this.CurrentPage = currentPage;
        this.ItemsPerPage = itemsPerPage;
        this.TotalItems = totalItems;
        this.TotalPages = totalPages;
    }
}

I decided on this app to encapsulate pagination information in the request/response header and only. If the client wants to retrieve the 5 schedules of the second page, the request must have a “Pagination” header equal to “2,5”. All the required information the client needs to build a pagination bar will be contained inside a corresponding response header. The same applies for custom error messages that the server returns to the client e.g. if an exception occurs.. through the global exception handler. Add an Extensions class inside the Core folder to support the previous functionalities.

public static class Extensions
{
    /// <summary>
    /// Extension method to add pagination info to Response headers
    /// </summary>
    /// <param name="response"></param>
    /// <param name="currentPage"></param>
    /// <param name="itemsPerPage"></param>
    /// <param name="totalItems"></param>
    /// <param name="totalPages"></param>
    public static void AddPagination(this HttpResponse response, int currentPage, int itemsPerPage, int totalItems, int totalPages)
    {
        var paginationHeader = new PaginationHeader(currentPage, itemsPerPage, totalItems, totalPages);

        response.Headers.Add("Pagination",
            Newtonsoft.Json.JsonConvert.SerializeObject(paginationHeader));
        // CORS
        response.Headers.Add("access-control-expose-headers", "Pagination");
    }

    public static void AddApplicationError(this HttpResponse response, string message)
    {
        response.Headers.Add("Application-Error", message);
        // CORS
        response.Headers.Add("access-control-expose-headers", "Application-Error");
    }
}

The SPA that we ‘ll build on the next post will render images too so if you want to follow with me add an images folder inside the wwwroot folder and copy the images from here. The only thing remained is to create the API MVC Controller classes. Add them inside a new folder named Controllers.

[Route("api/[controller]")]
public class SchedulesController : Controller
{
    private IScheduleRepository _scheduleRepository;
    private IAttendeeRepository _attendeeRepository;
    private IUserRepository _userRepository;
    int page = 1;
    int pageSize = 4;
    public SchedulesController(IScheduleRepository scheduleRepository,
                                IAttendeeRepository attendeeRepository,
                                IUserRepository userRepository)
    {
        _scheduleRepository = scheduleRepository;
        _attendeeRepository = attendeeRepository;
        _userRepository = userRepository;
    }

    public IActionResult Get()
    {
        var pagination = Request.Headers["Pagination"];

        if (!string.IsNullOrEmpty(pagination))
        {
            string[] vals = pagination.ToString().Split(',');
            int.TryParse(vals[0], out page);
            int.TryParse(vals[1], out pageSize);
        }

        int currentPage = page;
        int currentPageSize = pageSize;
        var totalSchedules = _scheduleRepository.Count();
        var totalPages = (int)Math.Ceiling((double)totalSchedules / pageSize);

        IEnumerable<Schedule> _schedules = _scheduleRepository
            .AllIncluding(s => s.Creator, s => s.Attendees)
            .OrderBy(s => s.Id)
            .Skip((currentPage - 1) * currentPageSize)
            .Take(currentPageSize)
            .ToList();

        Response.AddPagination(page, pageSize, totalSchedules, totalPages);

        IEnumerable<ScheduleViewModel> _schedulesVM = Mapper.Map<IEnumerable<Schedule>, IEnumerable<ScheduleViewModel>>(_schedules);

        return new OkObjectResult(_schedulesVM);
    }

    [HttpGet("{id}", Name = "GetSchedule")]
    public IActionResult Get(int id)
    {
        Schedule _schedule = _scheduleRepository
            .GetSingle(s => s.Id == id, s => s.Creator, s => s.Attendees);

        if (_schedule != null)
        {
            ScheduleViewModel _scheduleVM = Mapper.Map<Schedule, ScheduleViewModel>(_schedule);
            return new OkObjectResult(_scheduleVM);
        }
        else
        {
            return NotFound();
        }
    }

    [HttpGet("{id}/details", Name = "GetScheduleDetails")]
    public IActionResult GetScheduleDetails(int id)
    {
        Schedule _schedule = _scheduleRepository
            .GetSingle(s => s.Id == id, s => s.Creator, s => s.Attendees);

        if (_schedule != null)
        {


            ScheduleDetailsViewModel _scheduleDetailsVM = Mapper.Map<Schedule, ScheduleDetailsViewModel>(_schedule);

            foreach (var attendee in _schedule.Attendees)
            {
                User _userDb = _userRepository.GetSingle(attendee.UserId);
                _scheduleDetailsVM.Attendees.Add(Mapper.Map<User, UserViewModel>(_userDb));
            }


            return new OkObjectResult(_scheduleDetailsVM);
        }
        else
        {
            return NotFound();
        }
    }

    [HttpPost]
    public IActionResult Create([FromBody]ScheduleViewModel schedule)
    {
        if (!ModelState.IsValid)
        {
            return BadRequest(ModelState);
        }

        Schedule _newSchedule = Mapper.Map<ScheduleViewModel, Schedule>(schedule);
        _newSchedule.DateCreated = DateTime.Now;

        _scheduleRepository.Add(_newSchedule);
        _scheduleRepository.Commit();

        foreach (var userId in schedule.Attendees)
        {
            _newSchedule.Attendees.Add(new Attendee { UserId = userId });
        }
        _scheduleRepository.Commit();

        schedule = Mapper.Map<Schedule, ScheduleViewModel>(_newSchedule);

        CreatedAtRouteResult result = CreatedAtRoute("GetSchedule", new { controller = "Schedules", id = schedule.Id }, schedule);
        return result;
    }

    [HttpPut("{id}")]
    public IActionResult Put(int id, [FromBody]ScheduleViewModel schedule)
    {
        if (!ModelState.IsValid)
        {
            return BadRequest(ModelState);
        }

        Schedule _scheduleDb = _scheduleRepository.GetSingle(id);

        if (_scheduleDb == null)
        {
            return NotFound();
        }
        else
        {
            _scheduleDb.Title = schedule.Title;
            _scheduleDb.Location = schedule.Location;
            _scheduleDb.Description = schedule.Description;
            _scheduleDb.Status = (ScheduleStatus)Enum.Parse(typeof(ScheduleStatus), schedule.Status);
            _scheduleDb.Type = (ScheduleType)Enum.Parse(typeof(ScheduleType), schedule.Type);
            _scheduleDb.TimeStart = schedule.TimeStart;
            _scheduleDb.TimeEnd = schedule.TimeEnd;

            // Remove current attendees
            _attendeeRepository.DeleteWhere(a => a.ScheduleId == id);

            foreach (var userId in schedule.Attendees)
            {
                _scheduleDb.Attendees.Add(new Attendee { ScheduleId = id, UserId = userId });
            }

            _scheduleRepository.Commit();
        }

        schedule = Mapper.Map<Schedule, ScheduleViewModel>(_scheduleDb);

        return new NoContentResult();
    }

    [HttpDelete("{id}", Name = "RemoveSchedule")]
    public IActionResult Delete(int id)
    {
        Schedule _scheduleDb = _scheduleRepository.GetSingle(id);

        if (_scheduleDb == null)
        {
            return new NotFoundResult();
        }
        else
        {
            _attendeeRepository.DeleteWhere(a => a.ScheduleId == id);
            _scheduleRepository.Delete(_scheduleDb);

            _scheduleRepository.Commit();

            return new NoContentResult();
        }
    }

    [HttpDelete("{id}/removeattendee/{attendee}")]
    public IActionResult Delete(int id, int attendee)
    {
        Schedule _scheduleDb = _scheduleRepository.GetSingle(id);

        if (_scheduleDb == null)
        {
            return new NotFoundResult();
        }
        else
        {
            _attendeeRepository.DeleteWhere(a => a.ScheduleId == id && a.UserId == attendee);

            _attendeeRepository.Commit();

            return new NoContentResult();
        }
    }
}
[Route("api/[controller]")]
public class UsersController : Controller
{
    private IUserRepository _userRepository;
    private IScheduleRepository _scheduleRepository;
    private IAttendeeRepository _attendeeRepository;

    int page = 1;
    int pageSize = 10;
    public UsersController(IUserRepository userRepository,
                            IScheduleRepository scheduleRepository,
                            IAttendeeRepository attendeeRepository)
    {
        _userRepository = userRepository;
        _scheduleRepository = scheduleRepository;
        _attendeeRepository = attendeeRepository;
    }

    public IActionResult Get()
    {
        var pagination = Request.Headers["Pagination"];

        if (!string.IsNullOrEmpty(pagination))
        {
            string[] vals = pagination.ToString().Split(',');
            int.TryParse(vals[0], out page);
            int.TryParse(vals[1], out pageSize);
        }

        int currentPage = page;
        int currentPageSize = pageSize;
        var totalUsers = _userRepository.Count();
        var totalPages = (int)Math.Ceiling((double)totalUsers / pageSize);

        IEnumerable<User> _users = _userRepository
            .AllIncluding(u => u.SchedulesCreated)
            .OrderBy(u => u.Id)
            .Skip((currentPage - 1) * currentPageSize)
            .Take(currentPageSize)
            .ToList();

        IEnumerable<UserViewModel> _usersVM = Mapper.Map<IEnumerable<User>, IEnumerable<UserViewModel>>(_users);

        Response.AddPagination(page, pageSize, totalUsers, totalPages);

        return new OkObjectResult(_usersVM);
    }

    [HttpGet("{id}", Name = "GetUser")]
    public IActionResult Get(int id)
    {
        User _user = _userRepository.GetSingle(u => u.Id == id, u => u.SchedulesCreated);

        if (_user != null)
        {
            UserViewModel _userVM = Mapper.Map<User, UserViewModel>(_user);
            return new OkObjectResult(_userVM);
        }
        else
        {
            return NotFound();
        }
    }

    [HttpGet("{id}/schedules", Name = "GetUserSchedules")]
    public IActionResult GetSchedules(int id)
    {
        IEnumerable<Schedule> _userSchedules = _scheduleRepository.FindBy(s => s.CreatorId == id);

        if (_userSchedules != null)
        {
            IEnumerable<ScheduleViewModel> _userSchedulesVM = Mapper.Map<IEnumerable<Schedule>, IEnumerable<ScheduleViewModel>>(_userSchedules);
            return new OkObjectResult(_userSchedulesVM);
        }
        else
        {
            return NotFound();
        }
    }

    [HttpPost]
    public IActionResult Create([FromBody]UserViewModel user)
    {

        if (!ModelState.IsValid)
        {
            return BadRequest(ModelState);
        }

        User _newUser = new User { Name = user.Name, Profession = user.Profession, Avatar = user.Avatar };

        _userRepository.Add(_newUser);
        _userRepository.Commit();

        user = Mapper.Map<User, UserViewModel>(_newUser);

        CreatedAtRouteResult result = CreatedAtRoute("GetUser", new { controller = "Users", id = user.Id }, user);
        return result;
    }

    [HttpPut("{id}")]
    public IActionResult Put(int id, [FromBody]UserViewModel user)
    {
        if (!ModelState.IsValid)
        {
            return BadRequest(ModelState);
        }

        User _userDb = _userRepository.GetSingle(id);

        if (_userDb == null)
        {
            return NotFound();
        }
        else
        {
            _userDb.Name = user.Name;
            _userDb.Profession = user.Profession;
            _userDb.Avatar = user.Avatar;
            _userRepository.Commit();
        }

        user = Mapper.Map<User, UserViewModel>(_userDb);

        return new NoContentResult();
    }

    [HttpDelete("{id}")]
    public IActionResult Delete(int id)
    {
        User _userDb = _userRepository.GetSingle(id);

        if (_userDb == null)
        {
            return new NotFoundResult();
        }
        else
        {
            IEnumerable<Attendee> _attendees = _attendeeRepository.FindBy(a => a.UserId == id);
            IEnumerable<Schedule> _schedules = _scheduleRepository.FindBy(s => s.CreatorId == id);

            foreach (var attendee in _attendees)
            {
                _attendeeRepository.Delete(attendee);
            }

            foreach (var schedule in _schedules)
            {
                _attendeeRepository.DeleteWhere(a => a.ScheduleId == schedule.Id);
                _scheduleRepository.Delete(schedule);
            }

            _userRepository.Delete(_userDb);

            _userRepository.Commit();

            return new NoContentResult();
        }
    }

}

At this point your application should compile without any errors. Before testing the API with HTTP requests we need to initialize the database. In order to accomplish this add migrations with the following command.

dotnet ef migrations add "initial"

For this command to run successfully you have two options. Either open a terminal/cmd, and navigate to the root of the Scheduler.API project or open Package Manager Console in Visual Studio. In case you choose the latter, you still need to navigate at the root of the API project by typing cd path_to_scheduler_api first..
Next run the command that creates the database.

dotnet ef database update

dotnet-core-api-08

Testing the API

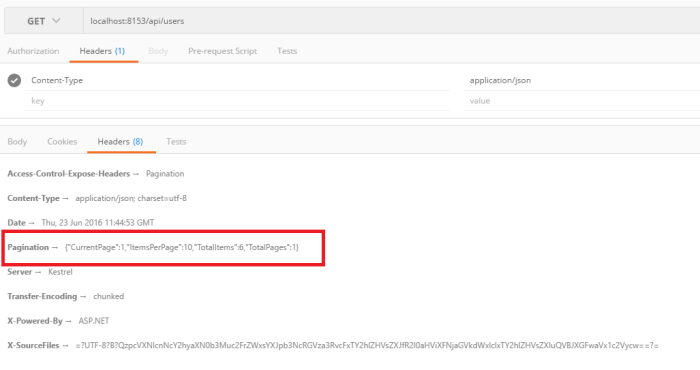
Fire the Web application either through Visual Studio or running dotnet run command from a command line. The database initializer we wrote before will init some mock data in the SchedulerDb database. Sending a simple GET request to http://localhost:your_port/api/users will fetch the first 6 users (if no pagination header the 10 is the pageSize). The response will also contain information for pagination.
dotnet-core-api-09
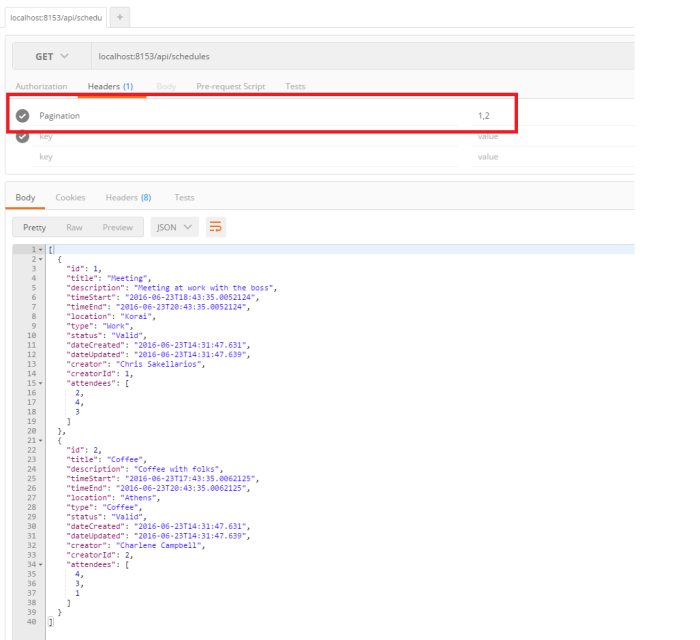
You can request the first two schedules by sending a request to http://localhost:your_port/api/schedules with a “Pagination” header equal to 1,2.
dotnet-core-api-10
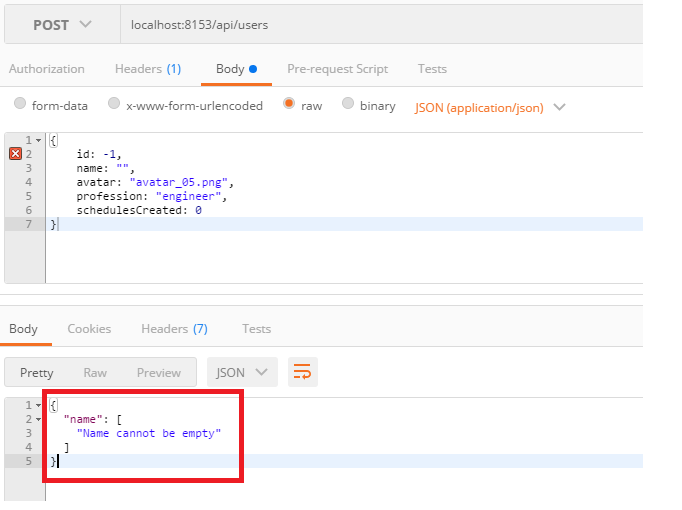
Two of the most important features our API has are the validation and error messages returned. This way, the client can display related messages to the user. Let’s try to create a user with an empty name by sending a POST request to api/users.
dotnet-core-api-11
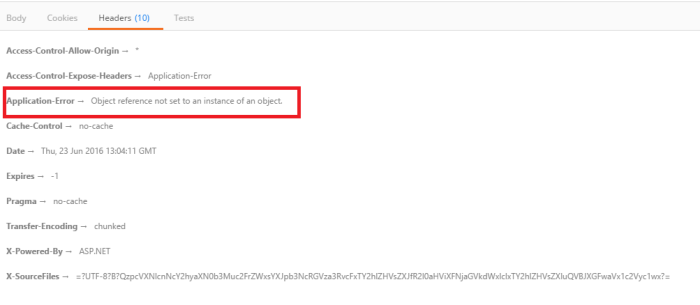
As you can see the controller returned the ModelState errors in the body of the request. I will cause an exception intentionally in order to check the error returned from the API in the response header. The global exception handler will catch the exception and add the error message in the configured header.
dotnet-core-api-12
dotnet-core-api-13

Conclusion

We have finally finished building an API using ASP.NET Core and Entity Framework Core. We separated models, data repositories and API in different .NET Core projects that are able to run outside of IIS and on different platforms. Keep in mind that this project will be used as the backend infrastructure of an interesting SPA built with the latest Angular version. We will build the SPA in the next post so stay tuned!

Source Code: You can find the source code for this project here where you will also find instructions on how to run the application in or outside Visual Studio.

In case you find my blog’s content interesting, register your email to receive notifications of new posts and follow chsakell’s Blog on its Facebook or Twitter accounts.

Facebook Twitter
.NET Web Application Development by Chris S.
facebook twitter-small

Angular 2 CRUD, modals, animations, pagination, datetimepicker and much more

$
0
0

Angular 2 and TypeScript have fetched client-side development to the next level but till recently most of web developers hesitated to start a production SPA with those two. The first reason was that Angular was still in development and the second one is that components that are commonly required in a production SPA were not yet available. Which are those components? DateTime pickers, custom Modal popups, animations and much more.. Components and plugins that make websites fluid and user-friendly. But this is old news now, Angular is very close to release its final version and community been familiarized with the new framework has produced a great ammount of such components.

What this post is all about

This post is another step by step walkthrough to build Angular 2 SPAs using TypeScript. I said another one, cause we have already seen such a post before. The difference though is that now we have all the knowledge and tools to create more structured, feature-enhanced and production level SPAs and this is what we will do on this post. The Schedule.SPA application that we are going to build will make use of all the previously mentioned components following the recommended Angular style guide as much as possible. As far as the back-end infrastructure (REST API) that our application will make use of, we have already built it in the previous post Building REST APIs using ASP.NET Core and Entity Framework Core. The source code for the API which was built using .NET Core can be found here where you will also find instructions how to run it. The SPA will display schedules and their related information (who created it, attendees, etc..). It will allow the user to manimulate many aspects of each schedule which means that we are going to see CRUD operations in action. Let’s see the in detail all the features that this SPA will incorporate.

  • HTTP CRUD operations
  • Routing and Navigation using the new Component Router
  • Custom Modal popup windows
  • Angular 2 animations
  • DateTime pickers
  • Notifications
  • Pagination through Request/Response headers
  • Angular Forms validation
  • Angular Directives
  • Angular Pipes

Not bad right..? Before start building it let us see the final product with a .gif (click to view in better quality).
angular-scheduler-spa

Start coding

One decision I ‘ve made for this app is to use Visual Studio Code rich text editor for development. While I used VS 2015 for developing the API, I still find it useless when it comes to TypeScript development. Lots of compile and build errors may make your life misserable. One the other hand, VS Code has a great intellisense features and a great integrated command line which allows you to run commands directly from the IDE. You can use though your text editor of your preference. First thing we need to do is configure the Angular – TypeScript application. Create a folder named Scheduler.SPA and open it in your favorite editor. Add the package.json file where we define all the packages we are going to use in our application.

{
  "version": "1.0.0",
  "name": "scheduler",
  "author": "Chris Sakellarios",
  "license": "MIT",
  "repository": "https://github.com/chsakell/angular2-features",
  "private": true,
  "dependencies": {
    "@angular/common": "2.0.0-rc.4",
    "@angular/compiler": "2.0.0-rc.4",
    "@angular/core": "2.0.0-rc.4",
    "@angular/forms": "0.2.0",
    "@angular/http": "2.0.0-rc.4",
    "@angular/platform-browser": "2.0.0-rc.4",
    "@angular/platform-browser-dynamic": "2.0.0-rc.4",
    "@angular/router": "3.0.0-beta.1",
    "@angular/router-deprecated": "2.0.0-rc.2",
    "@angular/upgrade": "2.0.0-rc.4",
    "angular2-in-memory-web-api": "0.0.14",
    "bootstrap": "^3.3.6",
    "bootstrap-datepicker": "^1.6.1",
    "bootstrap-timepicker": "^0.5.2",
    "core-js": "^2.4.0",
    "jquery": "^3.0.0",
    "lodash": "^4.13.1",
    "moment": "^2.13.0",
    "ng2-bootstrap": "^1.0.17",
    "ng2-bs3-modal": "^0.6.1",
    "ng2-datetime": "^1.1.0",
    "ng2-slim-loading-bar": "^1.2.3",
    "reflect-metadata": "^0.1.3",
    "rxjs": "5.0.0-beta.6",
    "systemjs": "0.19.27",
    "zone.js": "^0.6.12"
  },
  "devDependencies": {
    "concurrently": "^2.0.0",
    "del": "^2.2.0",
    "gulp": "^3.9.1",
    "gulp-tslint": "^5.0.0",
    "jquery": "^3.0.0",
    "lite-server": "^2.2.0",
    "typescript": "^1.8.10",
    "typings": "^1.0.4",
    "tslint": "^3.10.2"
  },
  "scripts": {
    "start": "tsc && concurrently \"npm run tsc:w\" \"npm run lite --baseDir ./app --port 8000\" ",
    "lite": "lite-server",
    "postinstall": "typings install",
    "tsc": "tsc",
    "tsc:w": "tsc -w",
    "typings": "typings"
  }
}

We declared all the Angular required packages (Github repo will always be updated when new version releases) and some others such as the bootstrap-datepicker and ng2-bootstrap which will help us incorporate some cool features in our SPA. When some part of our application make use of that type of packages I will let you know. Next add the systemjs.config.js SystemJS configuration file.

/**
 * System configuration for Angular 2 samples
 * Adjust as necessary for your application needs.
 */
(function (global) {
    // map tells the System loader where to look for things
    var map = {
        'app': 'app', // 'dist',
        '@angular': 'node_modules/@angular',
        'angular2-in-memory-web-api': 'node_modules/angular2-in-memory-web-api',
        'jquery': 'node_modules/jquery/',
        'lodash': 'node_modules/lodash/lodash.js',
        'moment': 'node_modules/moment/',
        'ng2-bootstrap': 'node_modules/ng2-bootstrap',
        'ng2-datetime': 'node_modules/ng2-datetime/',
        'ng2-slim-loading-bar': 'node_modules/ng2-slim-loading-bar',
        'ng2-bs3-modal': 'node_modules/ng2-bs3-modal',
        'rxjs': 'node_modules/rxjs',
        'symbol-observable': 'node_modules/symbol-observable'
    };
    // packages tells the System loader how to load when no filename and/or no extension
    var packages = {
        'app': { main: 'main.js', defaultExtension: 'js' },
        'rxjs': { defaultExtension: 'js' },
        'angular2-in-memory-web-api': { main: 'index.js', defaultExtension: 'js' },
        'moment': { main: 'moment.js', defaultExtension: 'js' },
        'ng2-bootstrap': { main: 'ng2-bootstrap.js', defaultExtension: 'js' },
        'ng2-datetime': { main: 'index.js', defaultExtension: 'js' },
        'ng2-slim-loading-bar': { defaultExtension: 'js' },
        'ng2-bs3-modal': { defaultExtension: 'js' },
        'symbol-observable': { main: 'index.js', defaultExtension: 'js' }
    };
    var ngPackageNames = [
        'common',
        'compiler',
        'core',
        'forms',
        'http',
        'platform-browser',
        'platform-browser-dynamic',
        'router',
        'router-deprecated',
        'upgrade',
    ];
    // Individual files (~300 requests):
    function packIndex(pkgName) {
        packages['@angular/' + pkgName] = { main: 'index.js', defaultExtension: 'js' };
    }
    // Bundled (~40 requests):
    function packUmd(pkgName) {
        packages['@angular/' + pkgName] = { main: '/bundles/' + pkgName + '.umd.js', defaultExtension: 'js' };
    }
    // Most environments should use UMD; some (Karma) need the individual index files
    var setPackageConfig = System.packageWithIndex ? packIndex : packUmd;
    // Add package entries for angular packages
    ngPackageNames.forEach(setPackageConfig);
    var config = {
        map: map,
        packages: packages
    };

    System.config(config);
})(this);

I ‘ll make a pause here just to ensure that you understand how SystemJS and the previous two files work together. Suppose that you want to use DateTime picker in your app. Searching the internet you find an NPM package saying that you need to run the following command to install it.

npm install ng2-datetime --save

What this command will do is download the package inside the node_modules folder and add it as a dependency in the package.json. To use that package in your application you need to import it in the component that needs its functionality like this.

import { NKDatetime } from 'ng2-datetime/ng2-datetime';

In most cases you will find the import statement on the package documentation. Is that all you need to use the package? No, cause SystemJS will make a request to http://localhost:your_port/ng2-datetime/ng2-datetime which of course doesn’t exist.
angular-crud-modal-animation-01
Modules are dynamically loaded using SystemJS and the first thing to do is to inform SystemJS where to look when a request to ng2-datetime dispatches the server. This is done through the map object in the systemjs.config.js as follow.

// map tells the System loader where to look for things
var map = {
    'app': 'app', // 'dist',
    '@angular': 'node_modules/@angular',
    'angular2-in-memory-web-api': 'node_modules/angular2-in-memory-web-api',
    'jquery': 'node_modules/jquery/',
    'lodash': 'node_modules/lodash/lodash.js',
    'moment': 'node_modules/moment/',
    'ng2-bootstrap': 'node_modules/ng2-bootstrap',
    'ng2-datetime': 'node_modules/ng2-datetime/',
    'ng2-slim-loading-bar': 'node_modules/ng2-slim-loading-bar',
    'ng2-bs3-modal': 'node_modules/ng2-bs3-modal',
    'rxjs': 'node_modules/rxjs',
    'symbol-observable': 'node_modules/symbol-observable'
};

From now on each time a request to ng2-datetime reaches the server, SystemJS will map the request to node_modules/ng2-datetime which actually exists since we have installed the package. Are we ready yet? No, we still need to inform SystemJS what file name to load and the default extension. This is done using the packages object in the systemjs.config.js.

// packages tells the System loader how to load when no filename and/or no extension
var packages = {
    'app': { main: 'main.js', defaultExtension: 'js' },
    'rxjs': { defaultExtension: 'js' },
    'angular2-in-memory-web-api': { main: 'index.js', defaultExtension: 'js' },
    'moment': { main: 'moment.js', defaultExtension: 'js' },
    'ng2-bootstrap': { main: 'ng2-bootstrap.js', defaultExtension: 'js' },
    'ng2-datetime': { main: 'index.js', defaultExtension: 'js' },
    'ng2-slim-loading-bar': { defaultExtension: 'js' },
    'ng2-bs3-modal': { defaultExtension: 'js' },
    'symbol-observable': { main: 'index.js', defaultExtension: 'js' }
    };

Our SPA is a TypeScript application so go ahead and add a tsconfig.json file.

{
  "compilerOptions": {
    "target": "es5",
    "module": "commonjs",
    "moduleResolution": "node",
    "sourceMap": true,
    "emitDecoratorMetadata": true,
    "experimentalDecorators": true,
    "removeComments": false,
    "noImplicitAny": false
  }
}

This file will be used by the tsc command when transpiling TypeScript to pure ES5 JavaScript. We also need a typings.json file.

{
  "globalDependencies": {
    "core-js": "registry:dt/core-js#0.0.0+20160602141332",
    "jasmine": "registry:dt/jasmine#2.2.0+20160621224255",
    "jquery": "registry:dt/jquery#1.10.0+20160417213236",
    "node": "registry:dt/node#6.0.0+20160621231320"
  },
  "dependencies": {
    "lodash": "registry:npm/lodash#4.0.0+20160416211519"
  }
}

Those are mostly Angular dependencies plus jquery and lodash that our SPA will make use of. We are going to use some client-side external libraries such as alertify.js and font-awesome. Add a bower.json file and set its contents as follow.

{
  "name": "scheduler.spa",
  "private": true,
  "dependencies": {
    "alertify.js" : "0.3.11",
    "bootstrap": "^3.3.6",
    "font-awesome": "latest"
  }
}

At this point we are all set configuring the SPA so go ahead and run the following commands:

npm install
bower install

npm install will also run typings install as a postinstall event. Before start typing the TypeScript code add the index.html page as well.

<!DOCTYPE html>
<html>
<head>
    <base href="/">
    <meta charset="utf-8" />
    <title>Scheduler</title>
    <meta charset="UTF-8">
    <meta name="viewport" content="width=device-width, initial-scale=1">

    <link rel="stylesheet" href="node_modules/bootstrap/dist/css/bootstrap.min.css">
    <link rel="stylesheet" href="node_modules/bootstrap-timepicker/css/bootstrap-timepicker.min.css">
    <link rel="stylesheet" href="node_modules/bootstrap-datepicker/dist/css/bootstrap-datepicker.min.css">
    <link href="bower_components/font-awesome/css/font-awesome.min.css" rel="stylesheet" />
    <link href="bower_components/alertify.js/themes/alertify.core.css" rel="stylesheet" />
    <link href="bower_components/alertify.js/themes/alertify.bootstrap.css" rel="stylesheet" />
    <link rel="stylesheet" type="text/css" href="node_modules/ng2-slim-loading-bar/ng2-slim-loading-bar.css">
    <link rel="stylesheet" href="../assets/css/styles.css" />

    <script src="bower_components/jquery/dist/jquery.min.js"></script>
    <script src="node_modules/bootstrap/dist/js/bootstrap.min.js"></script>
    <script src="bower_components/alertify.js/lib/alertify.min.js"></script>

    <script src="node_modules/bootstrap-datepicker/dist/js/bootstrap-datepicker.min.js"></script>
    <script src="node_modules/bootstrap-timepicker/js/bootstrap-timepicker.min.js "></script>

    <!-- 1. Load libraries -->
     <!-- Polyfill(s) for older browsers -->
    <script src="node_modules/core-js/client/shim.min.js"></script>
    <script src="node_modules/zone.js/dist/zone.js"></script>
    <script src="node_modules/reflect-metadata/Reflect.js"></script>
    <script src="node_modules/systemjs/dist/system.src.js"></script>
    <!-- 2. Configure SystemJS -->
    <script src="systemjs.config.js"></script>
    <script>
      System.import('app').catch(function(err){ console.error(err); });
    </script>
</head>
<body>
    <scheduler>
        <div class="loader"></div>
    </scheduler>
</body>
</html>

Angular & TypeScript in action

Add a folder named app at the root of the application and create four subfolders named home, schedules, users and shared. The home folder is responsible to display a landing page, the schedules and users are the basic features in the SPA and the latter shared will contain any component that will be used across the entire app, such as data service or utility services. I will start pasting the code from bottom to top, in other words from the files that bootstrap the application to those that implement certain features. Don’t worry if we haven’t implement all the required components while showing the code, we will during the process. I will however been giving you information regarding any component that haven’t implemented yet.

Bootstrapping the app

Add the main.ts file under app.

import { bootstrap } from '@angular/platform-browser-dynamic';

import { AppComponent } from './app.component';
import { APP_ROUTER_PROVIDERS } from './app.routes';

bootstrap(AppComponent, [APP_ROUTER_PROVIDERS]).then(
    success => console.log('AppComponent bootstrapped!'),
    error => console.log(error)
);

I am sure you are familiar with the above code. The app will be bootstrapped with an AppComponent but the most important part of the code is the APP_ROUTER_PROVIDERS. Those are all the routes for the SPA defined in an app.routes.ts file under app folder. Go ahead and create that file.

import { provideRouter  } from '@angular/router';

import { HomeComponent } from './home/home.component';
import { UserListComponent } from './users/user-list.component';
import { ScheduleRoutes } from './schedules/schedule.routes';

export const routes = [
    ...ScheduleRoutes,
    { path: 'users', component: UserListComponent },
    { path: '', component: HomeComponent }
];

export const APP_ROUTER_PROVIDERS = [
  provideRouter(routes)
];

This is how we use the new Component Router. At the moment you can understand that http://localhost:your_port/ will activate the HomeComponent and http://localhost:your_port/users the UserListComponent which display all users. If you wonder what ScheduleRoutes is, it’s nothing more than same type of routes but defined in the appropriate folder/feature (schedules). We continue with the AppComponent in a app.component.ts file under app folder.

import { Component, OnInit, ViewContainerRef } from '@angular/core';
import { ROUTER_DIRECTIVES, Router } from '@angular/router';

// Add the RxJS Observable operators we need in this app.
import './rxjs-operators';

import { APP_PROVIDERS } from './app.providers';

import { SlimLoadingBar } from 'ng2-slim-loading-bar/ng2-slim-loading-bar';

@Component({
    selector: 'scheduler',
    templateUrl: 'app/app.component.html',
    directives: [ROUTER_DIRECTIVES, SlimLoadingBar],
    providers: [APP_PROVIDERS]
})
export class AppComponent {

    constructor() { }
}

This is the very first component that actually activated through the bootstrap process we defined before using the routes we configured. There are three key points for this component: The first one has to do with the rxjs operators. RxJS is a huge library and it’ s good practice to import only those modules that you actually need, not all the library cause otherwise you will pay a too slow application startup penalty. We will define any operators that we need in a rxjs-operators.ts file under app folder. In this SPA we will use several services (custom or Angular’s) and it’s good pattern to define them an a single file, in our case in an app.providers.ts file. Adding them in the providers property of the root component AppComponent will make those services available to all of its children. Same applies for the SlimLoadingBar directive which is a directive installed using npm. You can search the ng2-slim-loading-bar keyword and you will find that we have followed the process described before regarding NPM packages. Add the following two files under app folder.

// Statics
import 'rxjs/add/observable/throw';

// Operators
import 'rxjs/add/operator/catch';
import 'rxjs/add/operator/debounceTime';
import 'rxjs/add/operator/distinctUntilChanged';
import 'rxjs/add/operator/map';
import 'rxjs/add/operator/switchMap';
import 'rxjs/add/operator/toPromise';
import { bind } from '@angular/core';
import { HTTP_PROVIDERS } from '@angular/http';
import { FORM_PROVIDERS, LocationStrategy, HashLocationStrategy } from '@angular/common';

import { DataService } from './shared/services/data.service';
import { ConfigService } from './shared/utils/config.service';
import { ItemsService } from './shared/utils/items.service';
import { NotificationService } from './shared/utils/notification.service';

import {SlimLoadingBarService} from 'ng2-slim-loading-bar/ng2-slim-loading-bar';

export const APP_PROVIDERS = [
    ConfigService,
    DataService,
    ItemsService,
    NotificationService,
    FORM_PROVIDERS,
    HTTP_PROVIDERS,
    SlimLoadingBarService
];

Beside some Angular’s modules we can see that we have added some @Injectable() services that we will create later on. The DataService holds the CRUD operations for sending HTTP request to the API, the ItemsService defines custom methods for manipulating mostly arrays using the lodash library and last but not least the NotificationService has methods to display notifications to the user. The AppComponent is the root component which means has a router-outlet element on its template where other children components are rendered. Add the app.component.html file under app folder.

<!-- Navigation -->
<nav class="navbar navbar-inverse navbar-fixed-top" role="navigation">
    <div class="container">
        <!-- Brand and toggle get grouped for better mobile display -->
        <div class="navbar-header">
            <button type="button" class="navbar-toggle" data-toggle="collapse" data-target="#bs-example-navbar-collapse-1">
                <span class="sr-only">Toggle navigation</span>
                <span class="icon-bar"></span>
                <span class="icon-bar"></span>
                <span class="icon-bar"></span>
            </button>
            <a class="navbar-brand" [routerLink]="['/']">
                <i class="fa fa-home fa-3x" aria-hidden="true"></i>
            </a>
        </div>
        <!-- Collect the nav links, forms, and other content for toggling -->
        <div class="collapse navbar-collapse" id="bs-example-navbar-collapse-1">
            <ul class="nav navbar-nav">
                <li>
                    <a [routerLink]="['/schedules']"><i class="fa fa-calendar fa-3x" aria-hidden="true"></i></a>
                </li>
                <li>
                    <a [routerLink]="['/users']"><i class="fa fa-users fa-3x" aria-hidden="true"></i></a>
                </li>
                <li>
                    <a href="#"><i class="fa fa-info fa-3x" aria-hidden="true"></i></a>
                </li>
            </ul>
            <ul class="nav navbar-nav navbar-right">
                <li>
                    <a href="https://www.facebook.com/chsakells.blog" target="_blank">
                        <i class="fa fa-facebook fa-3x" aria-hidden="true"></i>
                    </a>
                </li>
                <li>
                    <a href="https://twitter.com/chsakellsBlog" target="_blank">
                        <i class="fa fa-twitter fa-3x" aria-hidden="true"></i>
                    </a>
                </li>
                <li>
                    <a href="https://github.com/chsakell" target="_blank">
                        <i class="fa fa-github fa-3x" aria-hidden="true"></i>
                    </a>
                </li>
                <li>
                    <a href="https://chsakell.com" target="_blank">
                        <i class="fa fa-rss-square fa-3x" aria-hidden="true"></i>
                    </a>
                </li>
            </ul>
        </div>
        <!-- /.navbar-collapse -->
    </div>
    <!-- /.container -->
</nav>
<br/>
<!-- Page Content -->
<div class="container">
    <router-outlet></router-outlet>
</div>
<footer class="navbar navbar-fixed-bottom">
    <div class="text-center">
        <h4 class="white">
            <a href="https://chsakell.com/" target="_blank">chsakell's Blog</a>
            <i>Anything around ASP.NET MVC,Web API, WCF, Entity Framework & Angular</i>
        </h4>
    </div>
</footer>
<ng2-slim-loading-bar></ng2-slim-loading-bar>

Shared services & interfaces

Before implementing the Users and Schedules features we ‘ll create any service or interface is going to be used across the app. Create a folder named shared under the app and add the interfaces.ts TypeScript file.

export interface IUser {
    id: number;
    name: string;
    avatar: string;
    profession: string;
    schedulesCreated: number;
}

export interface ISchedule {
     id: number;
     title: string;
     description: string;
     timeStart: Date;
     timeEnd: Date;
     location: string;
     type: string;
     status: string;
     dateCreated: Date;
     dateUpdated: Date;
     creator: string;
     creatorId: number;
     attendees: number[];
}

export interface IScheduleDetails {
     id: number;
     title: string;
     description: string;
     timeStart: Date;
     timeEnd: Date;
     location: string;
     type: string;
     status: string;
     dateCreated: Date;
     dateUpdated: Date;
     creator: string;
     creatorId: number;
     attendees: IUser[];
     statuses: string[];
     types: string[];
}

export interface Pagination {
    CurrentPage : number;
    ItemsPerPage : number;
    TotalItems : number;
    TotalPages: number;
}

export class PaginatedResult<T> {
    result :  T;
    pagination : Pagination;
}

export interface Predicate<T> {
    (item: T): boolean
}

In case you have read the Building REST APIs using .NET and Entity Framework Core you will be aware with most of the classes defined on the previous file. They are the TypeScript models that matches the API’s ViewModels. The last interface that I defined is my favorite one. The Predicate interface is a predicate which allows us to pass generic predicates in TypeScript functions. For example we ‘ll see later on the following function.

removeItems<T>(array: Array<T>, predicate: Predicate<T>) {
    _.remove(array, predicate);
}

This is extremely powerfull. What this function can do? It can remove any item from an array that fulfills a certain predicate. Assuming that you have an array of type IUser and you want to remove any user item that has id<0 you would write..

this.itemsService.removeItems<IUser>(this.users, x => x.id < 0);

Add a pipes folder under shared and create a DateTime related pipe.

import { Pipe, PipeTransform } from '@angular/core';

@Pipe({
    name: 'dateFormat'
})

export class DateFormatPipe implements PipeTransform {
    transform(value: any, args: any[]): any {

        if (args && args[0] === 'local') {
            return new Date(value).toLocaleString();
        }
        else if (value) {
            return new Date(value);
        }
        return value;
    }
}

The pipe simply converts a date to a JavaScript datetime that Angular understands. It can be used either inside an html template..

{{schedule.timeStart | dateFormat | date:'medium'}}

.. or programatically..

this.scheduleDetails.timeStart = new DateFormatPipe().transform(schedule.timeStart, ['local'])

We proceed with the directives. Add a folder named directives under shared. The first one is a simple one that toggles the background color of an element when the mouse enters or leaves. It ‘s very similar to the one described at official’s Angular’s website.

import { Directive, ElementRef, HostListener, Input } from '@angular/core';
@Directive({
    selector: '[highlight]'
 })
export class HighlightDirective {
    private _defaultColor = 'beige';
    private el: HTMLElement;

    constructor(el: ElementRef) {
        this.el = el.nativeElement;
    }

    @Input('highlight') highlightColor: string;

    @HostListener('mouseenter') onMouseEnter() {
        this.highlight(this.highlightColor || this._defaultColor);
    }
    @HostListener('mouseleave') onMouseLeave() {
        this.highlight(null);
    }

    private highlight(color: string) {
        this.el.style.backgroundColor = color;
    }
}

The second one though is an exciting one. The home page has a carousel with each slide having a font-awesome icon on its left.
angular-crud-modal-animation-02
The thing is that when you reduce the width of the browser the font-image moves on top giving a bad user experience.
angular-crud-modal-animation-03
What I want is the font-awesome icon to hide when the browser reaches a certain width and more over I want this width to be customizable. I believe I have just opened the gates for responsive web design using Angular 2.. Add the following MobileHide directive in a mobile-hide.directive.ts file under shared/directives folder.

import { Directive, ElementRef, HostListener, Input } from '@angular/core';
@Directive({
    selector: '[mobileHide]',
    host: {
        '(window:resize)': 'onResize($event)'
    }
 })
export class MobileHideDirective {
    private _defaultMaxWidth: number = 768;
    private el: HTMLElement;

    constructor(el: ElementRef) {
        this.el = el.nativeElement;
    }

    @Input('mobileHide') mobileHide: number;

    onResize(event:Event) {
        var window : any = event.target;
        var currentWidth = window.innerWidth;
        if(currentWidth < (this.mobileHide || this._defaultMaxWidth))
        {
            this.el.style.display = 'none';
        }
        else
        {
            this.el.style.display = 'block';
        }
    }
}

What this directive does is bind to window.resize event and when triggered check browser’s width: if width is less that the one defined or the default one then hides the element, otherwise shows it. You can apply this directive on the dom like this.

<div mobileHide="772" class="col-md-2 col-sm-2 col-xs-12">
   <span class="fa-stack fa-4x">
    <i class="fa fa-square fa-stack-2x text-primary"></i>
    <i class="fa fa-code fa-stack-1x fa-inverse" style="color:#FFC107"></i>
   </span>
</div>

The div element will be hidden when browser’s width is less than 772px..
angular-scheduler-spa-02
You can extend this directive by creating a new Input parameter which represents a class and instead of hiding the element apply a different class!

Shared services

@Injectable() services that are going to be used across many components in our application will also be placed inside the shared folder. We will separate them though in two different types, core and utilities. Add two folders named services and utils under the shared folder. We will place all core services under services and utilities under utitlities. The most important core service in our SPA is the one responsible to send HTTP requests to the API, the DataService. Add the data.service.ts under the services folder.

import { Injectable } from '@angular/core';
import { Http, Response, Headers } from '@angular/http';
//Grab everything with import 'rxjs/Rx';
import { Observable } from 'rxjs/Observable';
import {Observer} from 'rxjs/Observer';
import 'rxjs/add/operator/map';
import 'rxjs/add/operator/catch';

import { IUser, ISchedule, IScheduleDetails, Pagination, PaginatedResult } from '../interfaces';
import { ItemsService } from '../utils/items.service';
import { ConfigService } from '../utils/config.service';

@Injectable()
export class DataService {

    _baseUrl: string = '';

    constructor(private http: Http,
        private itemsService: ItemsService,
        private configService: ConfigService) {
        this._baseUrl = configService.getApiURI();
    }

    getUsers(): Observable<IUser[]> {
        return this.http.get(this._baseUrl + 'users')
            .map((res: Response) => {
                return res.json();
            })
            .catch(this.handleError);
    }

    getUserSchedules(id: number): Observable<ISchedule[]> {
        return this.http.get(this._baseUrl + 'users/' + id + '/schedules')
            .map((res: Response) => {
                return res.json();
            })
            .catch(this.handleError);
    }

    createUser(user: IUser): Observable<IUser> {

        let headers = new Headers();
        headers.append('Content-Type', 'application/json');

        return this.http.post(this._baseUrl + 'users/', JSON.stringify(user), {
            headers: headers
        })
            .map((res: Response) => {
                return res.json();
            })
            .catch(this.handleError);
    }

    updateUser(user: IUser): Observable<void> {

        let headers = new Headers();
        headers.append('Content-Type', 'application/json');

        return this.http.put(this._baseUrl + 'users/' + user.id, JSON.stringify(user), {
            headers: headers
        })
            .map((res: Response) => {
                return;
            })
            .catch(this.handleError);
    }

    deleteUser(id: number): Observable<void> {
        return this.http.delete(this._baseUrl + 'users/' + id)
            .map((res: Response) => {
                return;
            })
            .catch(this.handleError);
    }

    getSchedules(page?: number, itemsPerPage?: number): Observable<PaginatedResult<ISchedule[]>> {
        var peginatedResult: PaginatedResult<ISchedule[]> = new PaginatedResult<ISchedule[]>();

        let headers = new Headers();
        if (page != null && itemsPerPage != null) {
            headers.append('Pagination', page + ',' + itemsPerPage);
        }

        return this.http.get(this._baseUrl + 'schedules', {
            headers: headers
        })
            .map((res: Response) => {
                console.log(res.headers.keys());
                peginatedResult.result = res.json();

                if (res.headers.get("Pagination") != null) {
                    //var pagination = JSON.parse(res.headers.get("Pagination"));
                    var paginationHeader: Pagination = this.itemsService.getSerialized<Pagination>(JSON.parse(res.headers.get("Pagination")));
                    console.log(paginationHeader);
                    peginatedResult.pagination = paginationHeader;
                }
                return peginatedResult;
            })
            .catch(this.handleError);
    }

    getSchedule(id: number): Observable<Schedule> {
        return this.http.get(this._baseUrl + 'schedules/' + id)
            .map((res: Response) => {
                return res.json();
            })
            .catch(this.handleError);
    }

    getScheduleDetails(id: number): Observable<IScheduleDetails> {
        return this.http.get(this._baseUrl + 'schedules/' + id + '/details')
            .map((res: Response) => {
                return res.json();
            })
            .catch(this.handleError);
    }

    updateSchedule(schedule: ISchedule): Observable<void> {

        let headers = new Headers();
        headers.append('Content-Type', 'application/json');

        return this.http.put(this._baseUrl + 'schedules/' + schedule.id, JSON.stringify(schedule), {
            headers: headers
        })
            .map((res: Response) => {
                return;
            })
            .catch(this.handleError);
    }

    deleteSchedule(id: number): Observable<void> {
        return this.http.delete(this._baseUrl + 'schedules/' + id)
            .map((res: Response) => {
                return;
            })
            .catch(this.handleError);
    }

    deleteScheduleAttendee(id: number, attendee: number) {

        return this.http.delete(this._baseUrl + 'schedules/' + id + '/removeattendee/' + attendee)
            .map((res: Response) => {
                return;
            })
            .catch(this.handleError);
    }

    private handleError(error: any) {
        var applicationError = error.headers.get('Application-Error');
        var serverError = error.json();
        var modelStateErrors: string = '';

        if (!serverError.type) {
            console.log(serverError);
            for (var key in serverError) {
                if (serverError[key])
                    modelStateErrors += serverError[key] + '\n';
            }
        }

        modelStateErrors = modelStateErrors = '' ? null : modelStateErrors;

        return Observable.throw(applicationError || modelStateErrors || 'Server error');
    }
}

The service implements several CRUD operations targeting the API we have built on a previous post. It uses the ConfigService in order to get the API’s URI and the ItemsService to parse JSON objects to typed ones (we ‘ll see it later). Another important function that this service provides is the handleError which can read response errors either from the ModelState or the Application-Error header. The simplest util service is the ConfigService which has only one method to get the API’s URI. Add it under the utils folder.

import { Injectable } from '@angular/core';

@Injectable()
export class ConfigService {

    _apiURI : string;

    constructor() {
        this._apiURI = 'http://localhost:5000/api/';
     }

     getApiURI() {
         return this._apiURI;
     }

     getApiHost() {
         return this._apiURI.replace('api/','');
     }
}

Make sure to change this URI to reflect your back-end API’s URI. It’ s going to be different when you host the API from the console using the dotnet run command and different when you run the application through Visual Studio. The most interesting util service is the ItemsService. I don’t know any client-side application that doesn’t have to deal with array of items and that’s why we need that service. Let’s view the code first. Add it under the utils folder.

import { Injectable } from '@angular/core';
import { Predicate } from '../interfaces'

import * as _ from 'lodash';

@Injectable()
export class ItemsService {

    constructor() { }

    /*
    Removes an item from an array using the lodash library
    */
    removeItemFromArray<T>(array: Array<T>, item: any) {
        _.remove(array, function (current) {
            //console.log(current);
            return JSON.stringify(current) === JSON.stringify(item);
        });
    }

    removeItems<T>(array: Array<T>, predicate: Predicate<T>) {
        _.remove(array, predicate);
    }

    /*
    Finds a specific item in an array using a predicate and repsaces it
    */
    setItem<T>(array: Array<T>, predicate: Predicate<T>, item: T) {
        var _oldItem = _.find(array, predicate);
        if(_oldItem){
            var index = _.indexOf(array, _oldItem);
            array.splice(index, 1, item);
        } else {
            array.push(item);
        }
    }

    /*
    Adds an item to zero index
    */
    addItemToStart<T>(array: Array<T>, item: any) {
        array.splice(0, 0, item);
    }

    /*
    From an array of type T, select all values of type R for property
    */
    getPropertyValues<T,R>(array: Array<T>, property : string) : R
    {
        var result = _.map(array, property);
        return <R><any>result;
    }

    /*
    Util method to serialize a string to a specific Type
    */
    getSerialized<T>(arg: any): T {
        return <T>JSON.parse(JSON.stringify(arg));
    }
}

We can see extensive use of TypeScript in compination with the lodash library. All those functions are used inside the app so you will be able to see how they actually work. Let’s view though some examples right now. The setItem(array: Array, predicate: Predicate, item: T) method can replace a certain item in a typed array of T. For example if there is an array of type IUser that has a user item with id=-1 and you need to replace it with a new IUser, you can simply write..

this.itemsService.setItem<IUser>(this.users, (u) => u.id == -1, _user);

Here we passed the array of IUser, the predicate which is what items to be replaced and the preplacement new item value. Continue by adding the NotificationService and the MappingService which are pretty much self-explanatory, under the utils folder.

import { Injectable } from '@angular/core';
import { Predicate } from '../interfaces'

declare var alertify: any;

@Injectable()
export class NotificationService {
    private _notifier: any = alertify;

    constructor() { }

    /*
    Opens a confirmation dialog using the alertify.js lib
    */
    openConfirmationDialog(message: string, okCallback: () => any) {
        this._notifier.confirm(message, function (e) {
            if (e) {
                okCallback();
            } else {
            }
        });
    }

    /*
    Prints a success message using the alertify.js lib
    */
    printSuccessMessage(message: string) {

        this._notifier.success(message);
    }

    /*
    Prints an error message using the alertify.js lib
    */
    printErrorMessage(message: string) {
        this._notifier.error(message);
    }
}
import { Injectable } from '@angular/core';

import { ISchedule, IScheduleDetails, IUser } from '../interfaces';
import  { ItemsService } from './items.service'

@Injectable()
export class MappingService {

    constructor(private itemsService : ItemsService) { }

    mapScheduleDetailsToSchedule(scheduleDetails: IScheduleDetails): ISchedule {
        var schedule: ISchedule = {
            id: scheduleDetails.id,
            title: scheduleDetails.title,
            description: scheduleDetails.description,
            timeStart: scheduleDetails.timeStart,
            timeEnd: scheduleDetails.timeEnd,
            location: scheduleDetails.location,
            type: scheduleDetails.type,
            status: scheduleDetails.status,
            dateCreated: scheduleDetails.dateCreated,
            dateUpdated: scheduleDetails.dateUpdated,
            creator: scheduleDetails.creator,
            creatorId: scheduleDetails.creatorId,
            attendees: this.itemsService.getPropertyValues<IUser, number[]>(scheduleDetails.attendees, 'id')
        }

        return schedule;
    }

}

Features

Time to implement the SPA’s features starting from the simplest one, the HomeComponent which is responsible to render a landing page. Add a folder named home under app and create the HomeComponent in a home.component.ts file.

import { Component, OnInit, trigger, state, style, animate, transition } from '@angular/core';

import { MobileHideDirective } from '../shared/directives/mobile-hide.directive';

declare let componentHandler: any;

@Component({
    moduleId: module.id,
    templateUrl: 'home.component.html',
    directives: [MobileHideDirective],
    animations: [
        trigger('flyInOut', [
            state('in', style({ opacity: 1, transform: 'translateX(0)' })),
            transition('void => *', [
                style({
                    opacity: 0,
                    transform: 'translateX(-100%)'
                }),
                animate('0.6s ease-in')
            ]),
            transition('* => void', [
                animate('0.2s 10 ease-out', style({
                    opacity: 0,
                    transform: 'translateX(100%)'
                }))
            ])
        ])
    ]
})
export class HomeComponent {

    constructor() {

    }
}

Despite that this is the simplest component in our SPA it still make use of some interesting Angular features. The first one is the Angular animations and the second is the the MobileHideDirective directive we created before in order to hide the font-awesome icons when browser’s width is less than 772px. The animation will make the template appear from left to right. Let’s view the template’s code and a preview of what the animation looks like.

<div @flyInOut="'in'">

    <div class="container content">
        <div id="carousel-example-generic" class="carousel slide" data-ride="carousel">
            <!-- Indicators -->
            <ol class="carousel-indicators">
                <li data-target="#carousel-example-generic" data-slide-to="0" class="active"></li>
                <li data-target="#carousel-example-generic" data-slide-to="1"></li>
                <li data-target="#carousel-example-generic" data-slide-to="2"></li>
            </ol>
            <!-- Wrapper for slides -->
            <div class="carousel-inner">
                <div class="item active">
                    <div class="row">
                        <div class="col-xs-12">
                            <div class="thumbnail adjust1">
                                <div mobileHide="772" class="col-md-2 col-sm-2 col-xs-12">
                                    <span class="fa-stack fa-4x">
                                      <i class="fa fa-square fa-stack-2x text-primary"></i>
                                      <i class="fa fa-html5 fa-stack-1x fa-inverse" style="color:#FFC107"></i>
                                    </span>
                                </div>
                                <div class="col-md-10 col-sm-10 col-xs-12">
                                    <div class="caption">
                                        <p class="text-info lead adjust2">ASP.NET Core</p>
                                        <p><span class="glyphicon glyphicon-thumbs-up"></span> ASP.NET Core is a new open-source
                                            and cross-platform framework for building modern cloud based internet connected
                                            applications, such as web apps, IoT apps and mobile backends.</p>
                                        <blockquote class="adjust2">
                                            <p>Microsoft Corp.</p> <small><cite title="Source Title"><i class="glyphicon glyphicon-globe"></i> https://docs.asp.net/en/latest/</cite></small>                                            </blockquote>
                                    </div>
                                </div>
                            </div>
                        </div>
                    </div>
                </div>
                <div class="item">
                    <div class="row">
                        <div class="col-xs-12">
                            <div class="thumbnail adjust1">
                                <div mobileHide="772" class="col-md-2 col-sm-2 col-xs-12">
                                    <span class="fa-stack fa-4x">
                                        <i class="fa fa-square fa-stack-2x text-primary"></i>
                                        <i class="fa fa-code fa-stack-1x fa-inverse" style="color:#FFC107"></i>
                                    </span>
                                </div>
                                <div class="col-md-10 col-sm-10 col-xs-12">
                                    <div class="caption">
                                        <p class="text-info lead adjust2">Angular 2</p>
                                        <p><span class="glyphicon glyphicon-thumbs-up"></span> Learn one way to build applications
                                            with Angular and reuse your code and abilities to build apps for any deployment
                                            target. For web, mobile web, native mobile and native desktop.</p>
                                        <blockquote class="adjust2">
                                            <p>Google</p> <small><cite title="Source Title"><i class="glyphicon glyphicon-globe"></i>https://angular.io/</cite></small>                                            </blockquote>
                                    </div>
                                </div>
                            </div>
                        </div>
                    </div>
                </div>
                <div class="item">
                    <div class="row">
                        <div class="col-xs-12">
                            <div class="thumbnail adjust1">
                                <div mobileHide="772" class="col-md-2 col-sm-2 col-xs-12">
                                    <span class="fa-stack fa-4x">
                                      <i class="fa fa-square fa-stack-2x text-primary"></i>
                                      <i class="fa fa-rss fa-stack-1x fa-inverse" style="color:#FFC107"></i>
                                    </span>
                                </div>
                                <div class="col-md-10 col-sm-10 col-xs-12">
                                    <div class="caption">
                                        <p class="text-info lead adjust2">chsakell's Blog</p>
                                        <p><span class="glyphicon glyphicon-thumbs-up"></span> Anything around ASP.NET MVC,Web
                                            API, WCF, Entity Framework & Angular.</p>
                                        <blockquote class="adjust2">
                                            <p>Chris Sakellarios</p> <small><cite title="Source Title"><i class="glyphicon glyphicon-globe"></i> https://chsakell.com</cite></small>                                            </blockquote>
                                    </div>
                                </div>
                            </div>
                        </div>
                    </div>
                </div>
            </div>
            <!-- Controls -->
            <a class="left carousel-control" href="#carousel-example-generic" data-slide="prev"> <span class="glyphicon glyphicon-chevron-left"></span> </a>
            <a class="right carousel-control" href="#carousel-example-generic" data-slide="next"> <span class="glyphicon glyphicon-chevron-right"></span> </a>
        </div>
    </div>

    <hr>
    <!-- Title -->
    <div class="row">
        <div class="col-lg-12">
            <h3>Latest Features</h3>
        </div>
    </div>
    <!-- /.row -->
    <!-- Page Features -->
    <div class="row text-center">
        <div class="col-md-3 col-sm-6 hero-feature">
            <div class="thumbnail">
                <span class="fa-stack fa-5x">
                    <i class="fa fa-square fa-stack-2x text-primary"></i>
                    <i class="fa fa-html5 fa-stack-1x fa-inverse"></i>
                </span>
                <div class="caption">
                    <h3>ASP.NET Core</h3>
                    <p>ASP.NET Core is a significant redesign of ASP.NET.</p>
                    <p>
                        <a href="https://docs.asp.net/en/latest/" target="_blank" class="btn btn-primary">More..</a>
                    </p>
                </div>
            </div>
        </div>
        <div class="col-md-3 col-sm-6 hero-feature">
            <div class="thumbnail">
                <span class="fa-stack fa-5x">
                    <i class="fa fa-square fa-stack-2x text-primary"></i>
                    <i class="fa fa-database fa-stack-1x fa-inverse"></i>
                </span>
                <div class="caption">
                    <h3>EF Core</h3>
                    <p>A cross-platform version of Entity Framework.</p>
                    <p>
                        <a href="https://docs.efproject.net/en/latest/" target="_blank" class="btn btn-primary">More..</a>
                    </p>
                </div>
            </div>
        </div>
        <div class="col-md-3 col-sm-6 hero-feature">
            <div class="thumbnail">
                <span class="fa-stack fa-5x">
                    <i class="fa fa-square fa-stack-2x text-primary"></i>
                    <i class="fa fa-code fa-stack-1x fa-inverse"></i>
                </span>
                <div class="caption">
                    <h3>Angular</h3>
                    <p>Angular is a platform for building mobile and desktop web apps.</p>
                    <p>
                        <a href="https://angular.io/" target="_blank" class="btn btn-primary">More..</a>
                    </p>
                </div>
            </div>
        </div>
        <div class="col-md-3 col-sm-6 hero-feature">
            <div class="thumbnail">
                <span class="fa-stack fa-5x">
                    <i class="fa fa-square fa-stack-2x text-primary"></i>
                    <i class="fa fa-terminal fa-stack-1x fa-inverse"></i>
                </span>
                <div class="caption">
                    <h3>TypeScript</h3>
                    <p>A free and open source programming language.</p>
                    <p>
                        <a href="https://www.typescriptlang.org/" target="_blank" class="btn btn-primary">More..</a>
                    </p>
                </div>
            </div>
        </div>
    </div>
    <!-- /.row -->
    <hr>
    <!-- Footer -->
    <footer>
        <div class="row">
            <div class="col-lg-12">
                <p>Copyright &copy; <a href="https://chsakell.com" target="_blank">chsakell's Blog</a></p>
            </div>
        </div>
    </footer>
</div>

angular-scheduler-spa-03
Add a folder named Schedules. This feature will have two distinct routes, one to display all the schedules in a table and another one to edit a specific schedule. Add a schedule.routes.ts file under schedules folder.

import { RouterConfig }          from '@angular/router';

import { ScheduleListComponent } from './schedule-list.component';
import { ScheduleEditComponent } from './schedule-edit.component';

export const ScheduleRoutes: RouterConfig = [
    { path: 'schedules', component: ScheduleListComponent },
    { path: 'schedules/:id/edit', component: ScheduleEditComponent }
];

Now you can see where the ScheduleRoutes route configuration came from, in the app.routes.ts file. The ScheduleListComponent is a quite complex one. Add the schedule-list.component.ts under schedules as well.

import { Component, OnInit, ViewChild, Input, Output,
    trigger,
    state,
    style,
    animate,
    transition } from '@angular/core';
import { ROUTER_DIRECTIVES } from '@angular/router';

import {SlimLoadingBarService} from 'ng2-slim-loading-bar/ng2-slim-loading-bar';
import { MODAL_DIRECTIVES, ModalComponent } from 'ng2-bs3-modal/ng2-bs3-modal';
import {PAGINATION_DIRECTIVES, PaginationComponent } from 'ng2-bootstrap';

import { DataService } from '../shared/services/data.service';
import { ItemsService } from '../shared/utils/items.service';
import { NotificationService } from '../shared/utils/notification.service';
import { ConfigService } from '../shared/utils/config.service';
import { ISchedule, IScheduleDetails, Pagination, PaginatedResult } from '../shared/interfaces';
import { DateFormatPipe } from '../shared/pipes/date-format.pipe';

@Component({
    moduleId: module.id,
    selector: 'app-schedules',
    templateUrl: 'schedule-list.component.html',
    directives: [ROUTER_DIRECTIVES, MODAL_DIRECTIVES, PAGINATION_DIRECTIVES],
    pipes: [DateFormatPipe],
    animations: [
        trigger('flyInOut', [
            state('in', style({ opacity: 1, transform: 'translateX(0)' })),
            transition('void => *', [
                style({
                    opacity: 0,
                    transform: 'translateX(-100%)'
                }),
                animate('0.5s ease-in')
            ]),
            transition('* => void', [
                animate('0.2s 10 ease-out', style({
                    opacity: 0,
                    transform: 'translateX(100%)'
                }))
            ])
        ])
    ]
})
export class ScheduleListComponent implements OnInit {

    schedules: ISchedule[];
    apiHost: string;

    public itemsPerPage: number = 2;
    public totalItems: number = 0;
    public currentPage: number = 1;

    // Modal properties
    @ViewChild('modal')
    modal: ModalComponent;
    items: string[] = ['item1', 'item2', 'item3'];
    selected: string;
    output: string;
    selectedScheduleId: number;
    scheduleDetails: IScheduleDetails;
    selectedScheduleLoaded: boolean = false;
    index: number = 0;
    backdropOptions = [true, false, 'static'];
    animation: boolean = true;
    keyboard: boolean = true;
    backdrop: string | boolean = true;

    constructor(private slimLoader: SlimLoadingBarService,
        private dataService: DataService,
        private itemsService: ItemsService,
        private notificationService: NotificationService,
        private configService: ConfigService) { }

    ngOnInit() {
        this.apiHost = this.configService.getApiHost();
        this.loadSchedules();
    }

    loadSchedules() {
        this.slimLoader.start();

        this.dataService.getSchedules(this.currentPage, this.itemsPerPage)
            .subscribe((res: PaginatedResult<ISchedule[]>) => {
                this.schedules = res.result;// schedules;
                this.totalItems = res.pagination.TotalItems;
                this.slimLoader.complete();
            },
            error => {
                this.slimLoader.complete();
                this.notificationService.printErrorMessage('Failed to load schedules. ' + error);
            });
    }

    pageChanged(event: any): void {
        this.currentPage = event.page;
        this.loadSchedules();
        //console.log('Page changed to: ' + event.page);
        //console.log('Number items per page: ' + event.itemsPerPage);
    };

    removeSchedule(schedule: ISchedule) {
        this.notificationService.openConfirmationDialog('Are you sure you want to delete this schedule?',
            () => {
                this.slimLoader.start();
                this.dataService.deleteSchedule(schedule.id)
                    .subscribe(() => {
                        this.itemsService.removeItemFromArray<ISchedule>(this.schedules, schedule);
                        this.notificationService.printSuccessMessage(schedule.title + ' has been deleted.');
                        this.slimLoader.complete();
                    },
                    error => {
                        this.slimLoader.complete();
                        this.notificationService.printErrorMessage('Failed to delete ' + schedule.title + ' ' + error);
                    });
            });
    }

    viewScheduleDetails(id: number) {
        this.selectedScheduleId = id;
        this.modal.open('lg');
        console.log('test');
    }

    closed() {
        this.output = '(closed) ' + this.selected;
    }

    dismissed() {
        this.output = '(dismissed)';
    }

    opened() {
        this.slimLoader.start();
        this.dataService.getScheduleDetails(this.selectedScheduleId)
            .subscribe((schedule: IScheduleDetails) => {
                this.scheduleDetails = this.itemsService.getSerialized<IScheduleDetails>(schedule);
                // Convert date times to readable format
                this.scheduleDetails.timeStart = new DateFormatPipe().transform(schedule.timeStart, ['local']);
                this.scheduleDetails.timeEnd = new DateFormatPipe().transform(schedule.timeEnd, ['local']);
                this.slimLoader.complete();
                this.selectedScheduleLoaded = true;
            },
            error => {
                this.slimLoader.complete();
                this.notificationService.printErrorMessage('Failed to load schedule. ' + error);
            });

        this.output = '(opened)';
    }
}

Firstly, the component loads the schedules passing the current page and the number of items per page on the service call. The PaginatedResult response, contains the items plus the pagination information. The component uses PAGINATION_DIRECTIVES and PaginationComponent modules from ng2-bootstrap to render a pagination bar under the schedules table..

 <pagination [boundaryLinks]="true" [totalItems]="totalItems" [itemsPerPage]="itemsPerPage" [(ngModel)]="currentPage" class="pagination-sm"
        previousText="&lsaquo;" nextText="&rsaquo;" firstText="&laquo;" lastText="&raquo;" (pageChanged)="pageChanged($event)"></pagination>

The next important feature on this component is the custom modal popup it uses to display schedule’s details. It makes use of the MODAL_DIRECTIVES and ModalComponent modules from ng2-bs3-modal. This plugin requires that you place a modal directive in your template and bind the model properties you wish to display on its template body. You also need to use the @ViewChild(‘modal’) for this to work. Let’s view the entire schedule-list.component.html template and a small preview.


<button class="btn btn-primary" type="button" *ngIf="schedules">
   <i class="fa fa-calendar" aria-hidden="true"></i> Schedules
   <span class="badge">{{totalItems}}</span>
</button>

<hr/>

<div  @flyInOut="'in'">
    <table class="table table-hover">
        <thead>
            <tr>
                <th><i class="fa fa-text-width fa-2x" aria-hidden="true"></i>Title</th>
                <th><i class="fa fa-user fa-2x" aria-hidden="true"></i>Creator</th>
                <th><i class="fa fa-paragraph fa-2x" aria-hidden="true"></i>Description</th>
                <th><i class="fa fa-map-marker fa-2x" aria-hidden="true"></i></th>
                <th><i class="fa fa-calendar-o fa-2x" aria-hidden="true"></i>Time Start</th>
                <th><i class="fa fa-calendar-o fa-2x" aria-hidden="true"></i>Time End</th>
                <th></th>
                <th></th>
                <th></th>
            </tr>
        </thead>
        <tbody>
            <tr *ngFor="let schedule of schedules">
                <td> {{schedule.title}}</td>
                <td>{{schedule.creator}}</td>
                <td>{{schedule.description}}</td>
                <td>{{schedule.location}}</td>
                <td>{{schedule.timeStart | dateFormat | date:'medium'}}</td>
                <td>{{schedule.timeEnd | dateFormat | date:'medium'}}</td>
                <td><button class="btn btn-primary" (click)="viewScheduleDetails(schedule.id)">
            <i class="fa fa-info-circle" aria-hidden="true"></i>Details</button>
                </td>
                <td><a class="btn btn-primary" [routerLink]="['/schedules',schedule.id,'edit']"><i class="fa fa-pencil-square-o" aria-hidden="true"></i>Edit</a></td>
                <td>
                    <button class="btn btn-danger" (click)="removeSchedule(schedule)"><i class="fa fa-trash" aria-hidden="true"></i>Delete</button>
                </td>
            </tr>
        </tbody>
    </table>

    <pagination [boundaryLinks]="true" [totalItems]="totalItems" [itemsPerPage]="itemsPerPage" [(ngModel)]="currentPage" class="pagination-sm"
        previousText="&lsaquo;" nextText="&rsaquo;" firstText="&laquo;" lastText="&raquo;" (pageChanged)="pageChanged($event)"></pagination>
</div>
<modal [animation]="animation" [keyboard]="keyboard" [backdrop]="backdrop" (onClose)="closed()" (onDismiss)="dismissed()"
    (onOpen)="opened()" #modal>
    <modal-header [show-close]="true">
        <h4 class="modal-title" *ngIf="selectedScheduleLoaded">{{scheduleDetails.title}} details</h4>
    </modal-header>
    <modal-body *ngIf="selectedScheduleLoaded">
        <form method="post">
            <div class="form-group">
                <div class="row">
                    <div class="col-md-4">
                        <label class="control-label"><i class="fa fa-user" aria-hidden="true"></i>Creator</label>
                        <input type="text" class="form-control" [(ngModel)]="scheduleDetails.creator" disabled />
                    </div>

                    <div class="col-md-4">
                        <label class="control-label"><i class="fa fa-text-width" aria-hidden="true"></i>Title</label>
                        <input type="text" class="form-control" [(ngModel)]="scheduleDetails.title" disabled />
                    </div>

                    <div class="col-md-4">
                        <label class="control-label"><i class="fa fa-paragraph" aria-hidden="true"></i>Description</label>
                        <input type="text" class="form-control" [(ngModel)]="scheduleDetails.description" disabled />
                    </div>
                </div>
            </div>

            <div class="form-group">
                <div class="row">
                    <div class="col-xs-6">
                        <label class="control-label"><i class="fa fa-calendar-o" aria-hidden="true"></i>Time Start</label>
                        <input type="text" class="form-control" [(ngModel)]="scheduleDetails.timeStart" disabled />
                    </div>

                    <div class="col-xs-6">
                        <label class="control-label"><i class="fa fa-calendar-check-o" aria-hidden="true"></i>Time End</label>
                        <input type="text" class="form-control" [(ngModel)]="scheduleDetails.timeEnd" disabled />
                    </div>
                </div>
            </div>

            <div class="form-group">
                <div class="row">
                    <div class="col-md-4">
                        <label class="control-label"><i class="fa fa-map-marker" aria-hidden="true"></i>Location</label>
                        <input type="text" class="form-control" [(ngModel)]="scheduleDetails.location" disabled />
                    </div>

                    <div class="col-md-4 selectContainer">
                        <label class="control-label"><i class="fa fa-spinner" aria-hidden="true"></i>Status</label>
                        <input type="text" class="form-control" [(ngModel)]="scheduleDetails.status" disabled />
                    </div>
                    <div class="col-md-4 selectContainer">
                        <label class="control-label"><i class="fa fa-tag" aria-hidden="true"></i>Type</label>
                        <input type="text" class="form-control" [(ngModel)]="scheduleDetails.type" disabled />
                    </div>
                </div>
            </div>
            <hr/>
            <div class="panel panel-info">
                <!-- Default panel contents -->
                <div class="panel-heading">Attendes</div>

                <!-- Table -->
                <table class="table table-hover">
                    <thead>
                        <tr>
                            <th></th>
                            <th><i class="fa fa-user" aria-hidden="true"></i>Name</th>
                            <th><i class="fa fa-linkedin-square" aria-hidden="true"></i>Profession</th>
                        </tr>
                    </thead>
                    <tbody>
                        <tr *ngFor="let attendee of scheduleDetails.attendees">
                            <td [style.valign]="'middle'">
                                <img class="img-thumbnail img-small" src="{{apiHost}}images/{{attendee.avatar}}" alt="attendee.name" />
                            </td>
                            <td [style.valign]="'middle'">{{attendee.name}}</td>
                            <td [style.valign]="'middle'">{{attendee.profession}}</td>
                        </tr>
                    </tbody>
                </table>
            </div>
        </form>
    </modal-body>
    <modal-footer [show-default-buttons]="false">
        <button class="btn btn-danger btn-sm pull-right" (click)="modal.close()">
            <i class="fa fa-times" aria-hidden="true"></i>Dismiss</button>
    </modal-footer>
</modal>

angular-scheduler-spa-04
The ScheduleEditComponent is responsible to edit the details of a single Schedule. The interface used for this component is the IScheduleDetails which encapsulates all schedule’s details (creator, attendees, etc..). Add the schedule-edit.component.ts file under the schedules folder.

import { Component, OnInit } from '@angular/core';
import { Router, ActivatedRoute } from '@angular/router';
import { FORM_DIRECTIVES, NgForm } from '@angular/common';

import { DataService } from '../shared/services/data.service';
import { ItemsService } from '../shared/utils/items.service';
import { NotificationService } from '../shared/utils/notification.service';
import { ConfigService } from '../shared/utils/config.service';
import { MappingService } from '../shared/utils/mapping.service';
import { ISchedule, IScheduleDetails, IUser } from '../shared/interfaces';
import { DateFormatPipe } from '../shared/pipes/date-format.pipe';

import {SlimLoadingBarService} from 'ng2-slim-loading-bar/ng2-slim-loading-bar';
import { NKDatetime } from 'ng2-datetime/ng2-datetime';

@Component({
    moduleId: module.id,
    selector: 'app-schedule-edit',
    templateUrl: 'schedule-edit.component.html',
    directives: [NKDatetime, FORM_DIRECTIVES],
    providers: [MappingService],
    pipes: [DateFormatPipe]
})
export class ScheduleEditComponent implements OnInit {
    apiHost: string;
    id: number;
    schedule: IScheduleDetails;
    scheduleLoaded: boolean = false;
    statuses: string[];
    types: string[];
    private sub: any;

    constructor(private route: ActivatedRoute,
        private router: Router,
        private dataService: DataService,
        private itemsService: ItemsService,
        private notificationService: NotificationService,
        private configService: ConfigService,
        private mappingService: MappingService,
        private slimLoader: SlimLoadingBarService) { }

    ngOnInit() {
        // (+) converts string 'id' to a number
	    this.id = +this.route.snapshot.params['id'];
        this.apiHost = this.configService.getApiHost();
        this.loadScheduleDetails();
    }

    loadScheduleDetails() {
        this.slimLoader.start();
        this.dataService.getScheduleDetails(this.id)
            .subscribe((schedule: IScheduleDetails) => {
                this.schedule = this.itemsService.getSerialized<IScheduleDetails>(schedule);
                this.scheduleLoaded = true;
                // Convert date times to readable format
                this.schedule.timeStart = new Date(this.schedule.timeStart.toString()); // new DateFormatPipe().transform(schedule.timeStart, ['local']);
                this.schedule.timeEnd = new Date(this.schedule.timeEnd.toString()); //new DateFormatPipe().transform(schedule.timeEnd, ['local']);
                this.statuses = this.schedule.statuses;
                this.types = this.schedule.types;

                this.slimLoader.complete();
            },
            error => {
                this.slimLoader.complete();
                this.notificationService.printErrorMessage('Failed to load schedule. ' + error);
            });
    }

    updateSchedule(editScheduleForm: NgForm) {
        console.log(editScheduleForm.value);

        var scheduleMapped = this.mappingService.mapScheduleDetailsToSchedule(this.schedule);

        this.slimLoader.start();
        this.dataService.updateSchedule(scheduleMapped)
            .subscribe(() => {
                this.notificationService.printSuccessMessage('Schedule has been updated');
                this.slimLoader.complete();
            },
            error => {
                this.slimLoader.complete();
                this.notificationService.printErrorMessage('Failed to update schedule. ' + error);
            });
    }

    removeAttendee(attendee: IUser) {
        this.notificationService.openConfirmationDialog('Are you sure you want to remove '
            + attendee.name + ' from this schedule?',
            () => {
                this.slimLoader.start();
                this.dataService.deleteScheduleAttendee(this.schedule.id, attendee.id)
                    .subscribe(() => {
                        this.itemsService.removeItemFromArray<IUser>(this.schedule.attendees, attendee);
                        this.notificationService.printSuccessMessage(attendee.name + ' will not attend the schedule.');
                        this.slimLoader.complete();
                    },
                    error => {
                        this.slimLoader.complete();
                        this.notificationService.printErrorMessage('Failed to remove ' + attendee.name + ' ' + error);
                    });
            });
    }

    back() {
        this.router.navigate(['/schedules']);
    }

}

I have highlighted only the Form related modules imports because the interesting part about this component is the validations it carries on the template schedule-edit.component.html.

<form #editScheduleForm="ngForm" *ngIf="scheduleLoaded" (ngSubmit)="updateSchedule(editScheduleForm)" novalidate>

    <div class="alert alert-danger" [hidden]="editScheduleForm.valid">
        <ul *ngIf="creator.dirty && !creator.valid">
            <li *ngIf="creator.errors.required">Creator name is required</li>
            <li *ngIf="creator.errors.pattern">Creator name should have 5-50 characters</li>
        </ul>
        <ul *ngIf="title.dirty && !title.valid">
            <li *ngIf="title.errors.required">Title is required</li>
            <li *ngIf="title.errors.pattern">Title should have 5-20 characters</li>
        </ul>
        <ul *ngIf="description.dirty && !description.valid">
            <li *ngIf="description.errors.required">Description is required</li>
            <li *ngIf="description.errors.pattern">Description should have at least 10 characters</li>
        </ul>
        <ul *ngIf="location.dirty && !location.valid">
            <li *ngIf="location.errors.required">Location is required</li>
        </ul>
    </div>

    <button type="button" class="btn btn-danger" (click)="back()">
        <i class="fa fa-arrow-circle-left" aria-hidden="true"></i>Back</button>
    <button type="submit" [disabled]="!editScheduleForm.valid" class="btn btn-default">
        <i class="fa fa-pencil-square-o" aria-hidden="true"></i>Update</button>

    <hr/>

    <div class="form-group">
        <div class="row">
            <div class="col-md-4">
                <label class="control-label"><i class="fa fa-user" aria-hidden="true"></i>Creator</label>
                <input type="text" class="form-control" [(ngModel)]="schedule.creator" ngControl="creator" #creator="ngForm" required pattern=".{5,50}"
                />
            </div>

            <div class="col-md-4">
                <label class="control-label"><i class="fa fa-text-width" aria-hidden="true"></i>Title</label>
                <input type="text" class="form-control" [(ngModel)]="schedule.title" ngControl="title" #title="ngForm" required pattern=".{5,20}"
                />
            </div>

            <div class="col-md-4">
                <label class="control-label"><i class="fa fa-paragraph" aria-hidden="true"></i>Description</label>
                <input type="text" class="form-control" [(ngModel)]="schedule.description" ngControl="description" #description="ngForm"
                    required pattern=".{10,}" />
            </div>
        </div>
    </div>

    <div class="form-group">
        <div class="row">
            <div class="col-xs-6">
                <label class="control-label"><i class="fa fa-calendar-o" aria-hidden="true"></i>Time Start</label>
                <datetime [(ngModel)]="schedule.timeStart" [timepicker]="{icon: 'fa fa-clock-o'}" [datepicker]="{icon: 'fa fa-calendar', autoclose : true, orientation : 'bottom'}"
                    ngControl="timeStart" #timeStart="ngForm"></datetime>
                <!--<input type="text" class="form-control" [(ngModel)]="schedule.timeStart" required />-->
            </div>

            <div class="col-xs-6">
                <label class="control-label"><i class="fa fa-calendar-check-o" aria-hidden="true"></i>Time End</label>
                <!--<input type="text" class="form-control" [(ngModel)]="schedule.timeEnd" required />-->
                <datetime [(ngModel)]="schedule.timeEnd" [timepicker]="{icon: 'fa fa-clock-o'}" [datepicker]="{icon: 'fa fa-calendar', autoclose : true, orientation : 'bottom' }"
                    ngControl="timeEnd" #timeEnd="ngForm"></datetime>
            </div>
        </div>
    </div>

    <div class="form-group">
        <div class="row">
            <div class="col-md-4">
                <label class="control-label"><i class="fa fa-map-marker" aria-hidden="true"></i>Location</label>
                <input type="text" class="form-control" [(ngModel)]="schedule.location" ngControl="location" #location="ngForm" required
                />
            </div>

            <div class="col-md-4 selectContainer">
                <label class="control-label"><i class="fa fa-spinner" aria-hidden="true"></i>Status</label>
                <select class="form-control" [ngModel]="schedule.status">
                    <option *ngFor="let status of statuses" [value]="status">{{status}}</option>
                </select>
            </div>
            <div class="col-md-4 selectContainer">
                <label class="control-label"><i class="fa fa-tag" aria-hidden="true"></i>Type</label>
                <select class="form-control" [ngModel]="schedule.type">
                    <option *ngFor="let type of types" [value]="type">{{type}}</option>
                </select>
            </div>
        </div>
    </div>
    <hr/>
    <div class="panel panel-info">
        <!-- Default panel contents -->
        <div class="panel-heading">Attendes</div>

        <!-- Table -->
        <table class="table table-hover">
            <thead>
                <tr>
                    <th></th>
                    <th><i class="fa fa-user" aria-hidden="true"></i>Name</th>
                    <th><i class="fa fa-linkedin-square" aria-hidden="true"></i>Profession</th>
                    <th></th>
                </tr>
            </thead>
            <tbody>
                <tr *ngFor="let attendee of schedule.attendees">
                    <td [style.valign]="'middle'">
                        <img class="img-thumbnail img-small" src="{{apiHost}}images/{{attendee.avatar}}" alt="attendee.name" />
                    </td>
                    <td [style.valign]="'middle'">{{attendee.name}}</td>
                    <td [style.valign]="'middle'">{{attendee.profession}}</td>
                    <td [style.valign]="'middle'">
                        <button type="button" class="btn btn-danger btn-sm" (click)="removeAttendee(attendee)"><i class="fa fa-user-times" aria-hidden="true"></i>Remove</button>
                    </td>
                </tr>
            </tbody>
        </table>
    </div>
</form>

angular-crud-modal-animation-04
Don’t forget that we have also set server-side validations, so if you try to edit a schedule and set the start time to be greater than the end time you should receive an error that was encapsulated by the server in the response message, either on the header or the body.
angular-crud-modal-animation-05
The Users feature is an interesting one as well. I have decided on this one to display each user as a card element instead of using a table. This required to create a user-card custom element which encapsulates all the logic not only for rendering but also manipulating user’s data (CRUD ops..). Add a folder named Users under app and create the UserCardComponent.

import { Component, Input, Output, OnInit, ViewContainerRef, EventEmitter, ViewChild,
    trigger,
    state,
    style,
    animate,
    transition  } from '@angular/core';

import {SlimLoadingBarService} from 'ng2-slim-loading-bar/ng2-slim-loading-bar';
import { MODAL_DIRECTIVES, ModalComponent } from 'ng2-bs3-modal/ng2-bs3-modal';

import { IUser, ISchedule } from '../shared/interfaces';
import { DataService } from '../shared/services/data.service';
import { ItemsService } from '../shared/utils/items.service';
import { NotificationService } from '../shared/utils/notification.service';
import { ConfigService } from '../shared/utils/config.service';
import { DateFormatPipe } from '../shared/pipes/date-format.pipe';
import { HighlightDirective } from '../shared/directives/highlight.directive';

@Component({
    moduleId: module.id,
    selector: 'user-card',
    templateUrl: 'user-card.component.html',
    directives: [MODAL_DIRECTIVES, HighlightDirective],
    pipes: [DateFormatPipe],
    animations: [
        trigger('flyInOut', [
            state('in', style({ opacity: 1, transform: 'translateX(0)' })),
            transition('void => *', [
                style({
                    opacity: 0,
                    transform: 'translateX(-100%)'
                }),
                animate('0.5s ease-in')
            ]),
            transition('* => void', [
                animate('0.2s 10 ease-out', style({
                    opacity: 0,
                    transform: 'translateX(100%)'
                }))
            ])
        ])
    ]
})
export class UserCardComponent implements OnInit {

    @Input() user: IUser;
    @Output() removeUser = new EventEmitter();
    @Output() userCreated = new EventEmitter();

    edittedUser: IUser;
    onEdit: boolean = false;
    apiHost: string;
    // Modal properties
    @ViewChild('modal')
    modal: ModalComponent;
    items: string[] = ['item1', 'item2', 'item3'];
    selected: string;
    output: string;
    userSchedules: ISchedule[];
    userSchedulesLoaded: boolean = false;
    index: number = 0;
    backdropOptions = [true, false, 'static'];
    animation: boolean = true;
    keyboard: boolean = true;
    backdrop: string | boolean = true;

    constructor(private itemsService: ItemsService,
        private notificationService: NotificationService,
        private slimLoader: SlimLoadingBarService,
        private dataService: DataService,
        private configService: ConfigService) { }

    ngOnInit() {
        this.apiHost = this.configService.getApiHost();
        this.edittedUser = this.itemsService.getSerialized<IUser>(this.user);
        if (this.user.id < 0)
            this.editUser();
    }

    editUser() {
        this.onEdit = !this.onEdit;
        this.edittedUser = this.itemsService.getSerialized<IUser>(this.user);
        // <IUser>JSON.parse(JSON.stringify(this.user)); // todo Utils..
    }

    createUser() {
        this.slimLoader.start();
        this.dataService.createUser(this.edittedUser)
            .subscribe((userCreated) => {
                this.user = this.itemsService.getSerialized<IUser>(userCreated);
                this.edittedUser = this.itemsService.getSerialized<IUser>(this.user);
                this.onEdit = false;

                this.userCreated.emit({ value: userCreated });
                this.slimLoader.complete();
            },
            error => {
                this.notificationService.printErrorMessage('Failed to created user');
                this.notificationService.printErrorMessage(error);
                this.slimLoader.complete();
            });
    }

    updateUser() {
        this.slimLoader.start();
        this.dataService.updateUser(this.edittedUser)
            .subscribe(() => {
                this.user = this.edittedUser;
                this.onEdit = !this.onEdit;
                this.notificationService.printSuccessMessage(this.user.name + ' has been updated');
                this.slimLoader.complete();
            },
            error => {
                this.notificationService.printErrorMessage('Failed to edit user');
                this.notificationService.printErrorMessage(error);
                this.slimLoader.complete();
            });
    }

    openRemoveModal() {
        this.notificationService.openConfirmationDialog('Are you sure you want to remove '
            + this.user.name + '?',
            () => {
                this.slimLoader.start();
                this.dataService.deleteUser(this.user.id)
                    .subscribe(
                    res => {
                        this.removeUser.emit({
                            value: this.user
                        });
                        this.slimLoader.complete();
                        this.slimLoader.complete();
                    }, error => {
                        this.notificationService.printErrorMessage(error);
                        this.slimLoader.complete();
                    })
            });
    }

    viewSchedules(user: IUser) {
        console.log(user);
        this.modal.open('lg');
    }

    closed() {
        this.output = '(closed) ' + this.selected;
    }

    dismissed() {
        this.output = '(dismissed)';
    }

    opened() {
        this.slimLoader.start();
        this.dataService.getUserSchedules(this.edittedUser.id)
            .subscribe((schedules: ISchedule[]) => {
                this.userSchedules = schedules;
                console.log(this.userSchedules);
                this.userSchedulesLoaded = true;
                this.slimLoader.complete();
            },
            error => {
                this.slimLoader.complete();
                this.notificationService.printErrorMessage('Failed to load users. ' + error);
            });
        this.output = '(opened)';
    }

    isUserValid(): boolean {
        return !(this.edittedUser.name.trim() === "")
            && !(this.edittedUser.profession.trim() === "");
    }

}

The logic about the modal and the animations should be familiar to you at this point. The new feature to notice on this component are the @Input() and @Output() properties. The first one is used so that the host component which is the UserListComponent pass the user item foreach user in a array of IUser items. The two @Output() properties are required so that a user-card can inform the host component that something happend, in our case that a user created or removed. Why? It’s a matter of Separation of Concerns. The list of users is maintained by the UserListComponent and a single UserCardComponent knows nothing about it. That’s why when something happens the UserListComponent needs to be informed and update the user list respectively. Here’s the user-card.component.html.

<div class="panel panel-primary" [ngClass]="{shadowCard: onEdit}" @flyInOut="'in'">
    <div class="panel-heading">
        <h3 class="panel-title pull-left" [class.hidden]="onEdit"><i class="fa fa-user" aria-hidden="true"></i>{{edittedUser.name}}</h3>
        <input [(ngModel)]="edittedUser.name" [class.hidden]="!onEdit" [style.color]="'brown'" required class="form-control" />
        <div class="clearfix"></div>
    </div>

    <div highlight="whitesmoke" class="panel-body">
        <div class="">
            <img src="{{apiHost}}images/{{edittedUser.avatar}}" class="img-avatar" alt="">
            <div class="caption">
                <p>
                    <span [class.hidden]="onEdit">{{edittedUser.profession}}</span>
                </p>
                <p [hidden]="!onEdit">
                    <input [(ngModel)]="edittedUser.profession" class="form-control" required />
                </p>
                <p>
                    <button class="btn btn-primary" (click)="viewSchedules(edittedUser)" [disabled]="edittedUser.schedulesCreated === 0">
                    <i class="fa fa-calendar-check-o" aria-hidden="true"></i> Schedules <span class="badge">
                        {{edittedUser.schedulesCreated}}</span>
                    </button>
                </p>
            </div>
        </div>
    </div>
    <div class="panel-footer">
        <div [class.hidden]="edittedUser.id < 0">
            <button class="btn btn-default btn-xs" (click)="editUser()">
                <i class="fa fa-pencil" aria-hidden="true"></i>
                    {{onEdit === false ? "Edit" : "Cancel"}}
                </button>
            <button class="btn btn-default btn-xs" [class.hidden]="!onEdit" (click)="updateUser()" [disabled]="!isUserValid()">
                <i class="fa fa-pencil-square-o" aria-hidden="true"></i>Update</button>
            <button class="btn btn-danger btn-xs" (click)="openRemoveModal()">
                <i class="fa fa-times" aria-hidden="true"></i>Remove</button>
        </div>
        <div [class.hidden]="!(edittedUser.id < 0)">
            <button class="btn btn-default btn-xs" [class.hidden]="!onEdit" (click)="createUser()" [disabled]="!isUserValid()">
                <i class="fa fa-plus" aria-hidden="true"></i>Create</button>
        </div>
    </div>
</div>

<modal [animation]="animation" [keyboard]="keyboard" [backdrop]="backdrop" (onClose)="closed()" (onDismiss)="dismissed()"
    (onOpen)="opened()" #modal>
    <modal-header [show-close]="true">
        <h4 class="modal-title">{{edittedUser.name}} schedules created</h4>
    </modal-header>
    <modal-body>
        <table class="table table-hover" *ngIf="userSchedulesLoaded">
            <thead>
                <tr>
                    <th>Title</th>
                    <th>Description</th>
                    <th>Place</th>
                    <th>Time Start</th>
                    <th>Time End</th>
                </tr>
            </thead>
            <tbody>
                <tr *ngFor="let schedule of userSchedules">
                    <td> {{schedule.title}}</td>
                    <td>{{schedule.description}}</td>
                    <td>{{schedule.location}}</td>
                    <td>{{schedule.timeStart | dateFormat | date:'medium'}}</td>
                    <td>{{schedule.timeEnd | dateFormat | date:'medium'}}</td>
                </tr>
            </tbody>
        </table>
    </modal-body>
    <modal-footer [show-default-buttons]="false">
        <button class="btn btn-danger btn-sm pull-right" (click)="modal.close()">
            <i class="fa fa-times" aria-hidden="true"></i>Dismiss</button>
    </modal-footer>
</modal>

Also add the user-list.component.ts and notice the usage of the ItemsService for manipulating items.

import { Component, OnInit } from '@angular/core';

import {SlimLoadingBarService} from 'ng2-slim-loading-bar/ng2-slim-loading-bar';

import { DataService } from '../shared/services/data.service';
import { ItemsService } from '../shared/utils/items.service';
import { NotificationService } from '../shared/utils/notification.service';
import { IUser } from '../shared/interfaces';
import { UserCardComponent } from './user-card.component';

@Component({
    moduleId: module.id,
    selector: 'users',
    templateUrl: 'user-list.component.html',
    directives: [UserCardComponent]
})
export class UserListComponent implements OnInit {

    users: IUser[];
    addingUser: boolean = false;

    constructor(private dataService: DataService,
        private itemsService: ItemsService,
        private notificationService: NotificationService,
        private slimLoader: SlimLoadingBarService) { }

    ngOnInit() {
        this.slimLoader.start();
        this.dataService.getUsers()
            .subscribe((users: IUser[]) => {
                this.users = users;
                this.slimLoader.complete();
            },
            error => {
                this.slimLoader.complete();
                this.notificationService.printErrorMessage('Failed to load users. ' + error);
            });
    }

    removeUser(user: any) {
        var _user: IUser = this.itemsService.getSerialized<IUser>(user.value);
        this.itemsService.removeItemFromArray<IUser>(this.users, _user);
        // inform user
        this.notificationService.printSuccessMessage(_user.name + ' has been removed');
    }

    userCreated(user: any) {
        var _user: IUser = this.itemsService.getSerialized<IUser>(user.value);
        this.addingUser = false;
        // inform user
        this.notificationService.printSuccessMessage(_user.name + ' has been created');
        console.log(_user.id);
        this.itemsService.setItem<IUser>(this.users, (u) => u.id == -1, _user);
        // todo fix user with id:-1
    }

    addUser() {
        this.addingUser = true;
        var newUser = { id: -1, name: '', avatar: 'avatar_05.png', profession: '', schedulesCreated: 0 };
        this.itemsService.addItemToStart<IUser>(this.users, newUser);
        //this.users.splice(0, 0, newUser);
    }

    cancelAddUser() {
        this.addingUser = false;
        this.itemsService.removeItems<IUser>(this.users, x => x.id < 0);
    }
}

The removeUser and userCreated are the events triggered from child UserCardComponent components. When those events are triggered, the action has already finished in API/Database level and what remains is to update the client-side list. Here’s the template for the UserListComponent.

<button [class.hidden]="addingUser" class="btn btn-primary" (click)="addUser()">
    <i class="fa fa-user-plus fa-2x" aria-hidden="true"></i>Add</button>
<button [class.hidden]="!addingUser" class="btn btn-danger" (click)="cancelAddUser()">
    <i class="fa fa-ban fa-2x" aria-hidden="true"></i>Cancel</button>

<hr/>

<div class="row text-center">
    <div class="col-md-3 col-sm-6 hero-feature" *ngFor="let user of users">
        <user-card [user]="user" (removeUser)="removeUser($event);" (userCreated)="userCreated($event);"></user-card>
    </div>
</div>

The SPA uses some custom stylesheet styles.css which you can find here. Add it in a new folder named assets/styles under the root of the application. At this point you should be able to run the SPA. Make sure you have set the API first and configure the API’s endpoint in the ConfigService to point it properly. Fire the app by running the following command.

npm start

Conclusion

That’s it we have finished! We have seen many Angular 2 features on this SPA but I believe the more exciting one was how TypeScript can ease client-side development. We saw typed predicates, array manipulation using lodash and last but not least how to install and use 3rd party libraries in our app using SystemJS.

Source Code: You can find the source code for this project here where you will also find instructions on how to run the application.

In case you find my blog’s content interesting, register your email to receive notifications of new posts and follow chsakell’s Blog on its Facebook or Twitter accounts.

Facebook Twitter
.NET Web Application Development by Chris S.
facebook twitter-small

Building hybrid mobile apps using Ionic 2 and Firebase

$
0
0

Mobile application development has been dramatically changed in the last years with more and more frameworks trying to stand on the front-line and convience developers that they are their best option for building hybrid mobile applications with the smallest effort. One of the top frameworks on the market right now is Ionic and more specifically Ionic 2 which is a complete re-write and re-design from scratch of the first version. In case you are an Angular developer you will find Ionic framework exciting since you can leverage all your knowledge and easily build mobile apps by using Ionic’s components, which are nothing more but Angular components.

What is this post all about

We have seen several Angular or .NET related posts and apps on this blog and it’s time for us to see a mobile app as well. The purpose of this post is to build an hybrid mobile app using Ionic 2, Angular 2 and Firebase. Yes, you ‘ve just read Firebase. You don’t have to know anything about Firebase to follow with me because I ‘ll guide you through step by step. The reason why I chose Firebase is because I wanted you, at the end of this post to build and run the app on your mobile phone immediatly. Right now, there are some tutorials regarding Ionic 2 but most of them describe the basics of building mobile apps such as how to setup the app or use a specific component. The app we are going to build here will use features that you see in famous apps such as LinkedIn or Facebook. Which are those features? Let’s enumerate some of them.

  1. Network availability detection
  2. Offline application operation
  3. SQLite database support
  4. Event notifications
  5. Camera features
  6. File uploading
  7. Open browsers

.. and much more.. Before start setting up the required environmnet for the app let us see a preview.
ionic2-angular2-firebase-00
I hope you enjoy this journey as much as I did. Go grub some coffee and let’s start!

Firebase setup

So what exactly is Firebase? In a nutchel Firebase is the platform that will give us out of the box a database to store our data, a storage location to store our blobs or files such as user profile pictures and last but not least, the authentication infrustructure for the users to sign in the app. In other words.. Firebase has everything our app needs and it’s free! All you need is a Google account in order to login. One of the most important reasons that Firebase is that popular is it’s event based mechanisms which apparently is crusial for mobile apps. Think the example of the Facebook app. You create a post and some of your friends start posting comments on that. All of your friends receive the updates instantly on their app. Yes, Firebase can do that too. Using it’s API each of your Angular components can subsribe to a specific database location (we ‘ll explain little bit later) and every time an update happens on that location, such as a comment added, all subscribers get the update instantly. The first thing we need to do in order to start using Firebase is to create a project. Go ahead and Sing In in Firebase using your Google account.
ionic2-angular2-firebase-01
After signing in, click the Go to console button and press CREATE NEW PROJECT.
ionic2-angular2-firebase-02
Name the project ForumApp and choose your country.
ionic2-angular2-firebase-03
Firebase will create the project and redirect you into the console where you can see all the available options in Firebase. We will be using mostly the Auth, Database and Storage services.
ionic2-angular2-firebase-04
The USERS tab on the Auth page display all users that have been registered in the project. You can either create a Firebase user through the ADD USER button or using the API as we are going to see later on. For the moment don’t do anything, just take a look.
ionic2-angular2-firebase-05
In my case there’s only one user registered. I have registered this user through the mobile app and not from the website. Firebase allow you to authenticate application users using several providers such as Github, Facebook or Twitter. To view all available providers click the SIGN-IN METHOD tab. Our application will use the Email/Password provider so we need to enable it. Click on that provider, enable it and save.
ionic2-angular2-firebase-06
Click Database from the left menu. Here is where our data will be stored in a JSON format. YES I ‘ve just said JSON. Your data in firebase is going to be a large JSON object which means that in case you have only relational database background this is going to be a real strange experience. Forget anything about foreign keys or complicated queries. It’s only a javascript object and Firebase’s API will help you run queries on that. Here’s how my database look’s like.
ionic2-angular2-firebase-07
Each node represents kind of corresponding table in a relational database but this time since it’s a Javascript object, it can also contain other nested javascript objects. Notice for example the way we are going to store the voting information on a comment entity. A Comment has a Unique identifier such as -KPhOmvtsJ6qTcIszuUE and a key named votes which in turn is a JavaScript object containing which user voted Up (true)) or Down (false)). Here the user with uid YohF9NsbfLTcezZDdTEa7BiEFui1 has voted Up for the specific comment. With this design you know how many and which users have voted for a specific comment and more over prevent a user to vote more tha one times. Each node or key in the database is a Firebase location that can be referenced. It’s very important to understand this concept because queries or event listeners require Firebase locations, the so called references. You can read more about references here. Before switching to the Storage page we need to set the access level in our database. Press the RULES tab in the Database page. By default only authenticated users may read or write in our database. Change the Rules object as follow:

{
"rules": {
".read": "auth != null",
".write": "auth != null",
    "statistics" : {
    "threads": {
    // /statistics/threads is readable by the world
    ".read": true,
    // /statistics/threads is writable by the world
    ".write": true
    }
    },
    "threads" : {
        // /threads is readable by the world
    ".read": true,
    // /threads is writable by the world
    ".write": true
    }
}
}

What the above rule means is that statistics/threads and threads locations are readable/writable by un-authenticated users but comments aren’t. Application’s users will be able to upload pictures but we need to setup this on Firebase first. Click the Storage menu button and set the Rules as follow:

service firebase.storage {
  match /b/forumapp-your_id.appspot.com/o {
    match /{allPaths=**} {
      allow read;
      allow write: if request.auth != null;
    }
  }
}

Make sure to replace the your_id with your’s. Each user will upload his/her profile picture under an images folder, with a sub-folder named equal to user’s uid.
ionic2-angular2-firebase-09
We these rules all users may view other user’s images but only authenticated can upload. We are done setting up Firebase, time for the good stuff.

Ionic 2 – The Forum App

In order to start developing Ionic mobile apps, you need to install it first. After installing NodeJS (in case you haven’t already) run the following command.

npm install -g ionic@beta

Later on the post we will be adding Cordova plugins in our app for accessing native mobile features so go ahead and run the following command as well.

npm install -g cordova

We ‘ll start a brand new Ionic 2 project using Ionic’s CLI command start with a blank template parameter. Go to your working directory and run the command.

ionic start forum-app blank --v2

Ionic will create a blank project in a folder named forum-app which you may open with your IDE envrironment of your preference. I personally use Visual Studio Code which I find great for both client-side and mobile development. Your starting project should look like this.
ionic2-angular2-firebase-10
App folder is the one we will be focusing mostly. The plugins folders is where Cordova plugins are being installed. One thing I want you to immediatly do is to update ionic-native package inside the package.json file because ionic-cli may not use the latest version by default. This would result not finding some modules. Update it as follow.

"dependencies": {
    "@angular/common": "2.0.0-rc.4",
    "@angular/compiler": "2.0.0-rc.4",
    "@angular/core": "2.0.0-rc.4",
    "@angular/platform-browser": "2.0.0-rc.4",
    "@angular/platform-browser-dynamic": "2.0.0-rc.4",
    "@angular/http": "2.0.0-rc.4",
    "@angular/forms": "0.2.0",
    "es6-shim": "0.35.1",
    "ionic-angular": "2.0.0-beta.11",
    "ionic-native": "1.3.17",
    "ionicons": "3.0.0",
    "reflect-metadata": "0.1.8",
    "rxjs": "5.0.0-beta.6",
    "zone.js": "0.6.12"
  }

I changed mine from 1.3.10 to 1.3.17. Make sure your re-run npm install to update the package. In case you wonder, Ionic Native is a set of ES5/ES6/TypeScript wrappers for Cordova/PhoneGap plugins which will help us a lot for accessing native features in our device.
Now let’s start talking about our app. The Forum mobile app is an app where users can create Threads and then add Comments. A thread belongs to a specific category which you may change as you wish. Comments may also have Up and Down votes. A user may add a thread to his/her favorites collection. We want users to be able to upload profile pictures either using their mobile Camera or their Photo albums. We also want to add a specific View that displays info regarding the Forum app. Only authenticated users can view/create Threads or Comments or in other words, only authenticated users may use the Forum app. With that said we should already start thinking about the views we need to create in our app. I can tell that we need at least three Tabs, one to display all Threads, another one for user’s profile info a last one for the app’s info. Each tab in Ionic can have nested views and hence the first one that initialy renders the threads, will allow the user to navigate and view a thread’s comments or create a new Thread or Comment.
ionic2-angular2-firebase-11
We mentioned that only authenticated users may use the app so we need to provide a way for them to register and login as well. There will be two pages for this purpose, a Login and a Register one. Those pages will not be sub-views of a specific Tab but injected by a root component under certain circumstances. More over, we ‘ll use a Menu for signing out from the app.
ionic2-angular2-firebase-12
Add an app.html page under the app folder and paste the following code.

<ion-menu [content]="content">
    <ion-toolbar>
        <ion-title>Menu</ion-title>
    </ion-toolbar>
    <ion-content>
        <ion-list no-border>
            <ion-list-header>
                Account
            </ion-list-header>

            <ion-item (click)="openPage('signup')" *ngIf="!isUserLoggedIn()">
                <ion-icon name='person-add' item-left></ion-icon>
                Register
                <ion-icon name='arrow-dropright' item-right secondary></ion-icon>
            </ion-item>
            <ion-item (click)="signout()" *ngIf="isUserLoggedIn()">
                <ion-icon name='log-out' item-left></ion-icon>
                Sign out
                <ion-icon name='arrow-dropright' item-right secondary></ion-icon>
            </ion-item>
        </ion-list>

    </ion-content>
</ion-menu>
<ion-nav #content [root]="rootPage"></ion-nav>

The idea here is to make the menu component accessible by all tabs. The ion-nav‘s rootPage will be either the TabsPage component or the LoginPage. I won’t show you the entire app.ts code yet cause it contains native related code and you will be confused. The app.ts file is the one that bootstraps the Ionic app. Here’s part of it..

export class ForumApp implements OnInit {
  @ViewChild('content') nav: Nav;

  private rootPage: any;
  private loginPage: LoginPage;

  connectSubscription: Subscription;

  constructor(platform: Platform,
    private dataService: DataService,
    private authService: AuthService,
    private sqliteService: SqliteService,
    private menu: MenuController,
    private events: Events) {
    var self = this;
    this.rootPage = TabsPage;
    // Code ommited

    ngOnInit() {
    var self = this;
    // This watches for Authentication events
    this.authService.onAuthStateChanged(function (user) {
      if (user === null) {
        self.menu.close();
        self.nav.setRoot(LoginPage);
      }
    });
  }
  // Code ommited

We can see that the app fires having the TabsPage as root but in case it detects that user is unauthenticated, sets the LoginPage as the root.

Tabs

Let’s create the TabsPage component as well. Create a folder named tabs under pages and add the tabs.html template first.

<ion-tabs #forumTabs [selectedIndex]="0" (click)="clicked()">
    <ion-tab tabIcon="chatboxes" #content tabTitle="Threads" [root]="threadsPage" tabBadge="{{newThreads}}" tabBadgeStyle="danger"></ion-tab>
    <ion-tab tabIcon="person" #content tabTitle="Profile" [root]="profilePage"></ion-tab>
    <ion-tab tabIcon="information-circle" #content tabTitle="About" [root]="aboutPage"></ion-tab>
</ion-tabs>

We have three tabs on our app, one to display threads, one to display user’s info and another one for application’s info. Threads tab has a tabBadge in order to inform the user that new threads have been added in Firebase at real time. When this tab displays the badge, which means that there are new threads added, when clicked should publish a threads:add event so that any subscribers (ThreadsPage) do what they have to do.
Add the tabs.ts file under the tabs folder as well.

import {Component, OnInit, ViewChild } from '@angular/core';
import { NavController, Events, Tabs } from 'ionic-angular';

import {ThreadsPage} from '../threads/threads';
import {ProfilePage} from '../profile/profile';
import {AboutPage} from '../about/about';
import { AuthService } from '../../shared/services/auth.service';

@Component({
    templateUrl: 'build/pages/tabs/tabs.html'
})
export class TabsPage implements OnInit {
    @ViewChild('forumTabs') tabRef: Tabs;

    private threadsPage: any;
    private profilePage: any;
    private aboutPage: any;

    private newThreads: string = '';
    private selectedTab: number = -1;

    constructor(private navCtrl: NavController,
        private authService: AuthService,
        public events: Events) {
        // this tells the tabs component which Pages
        // should be each tab's root Page
        this.threadsPage = ThreadsPage;
        this.profilePage = ProfilePage;
        this.aboutPage = AboutPage;
    }

    ngOnInit() {
        this.startListening();
    }

    startListening() {
        var self = this;

        self.events.subscribe('thread:created', (threadData) => {
            if (self.newThreads === '') {
                self.newThreads = '1';
            } else {
                self.newThreads = (+self.newThreads + 1).toString();
            }
        });

        self.events.subscribe('threads:viewed', (threadData) => {
            self.newThreads = '';
        });
    }

    clicked() {
        var self = this;

        if (self.newThreads !== '') {
            self.events.publish('threads:add');
            self.newThreads = '';
        }
    }
}

And some custom stylesheets in tabs.scss..

ion-tabbar {
  background: #f4f4f4;
}

Services

Our app is not only an Ionic app but an Angular as well. It will make use of some shared @Injectable() services and Component Directives as well. We will create them firstly so we can start getting familiar with the Firebase API. Add a folder named shared under app and create the interfaces.ts file.

export interface IThread {
    key: string;
    title: string;
    question: string;
    category: string;
    dateCreated: string;
    user: IUser;
    comments: number;
}

export interface IComment {
    key?: string;
    thread: string;
    text: string;
    user: IUser;
    dateCreated: string;
    votesUp: number;
    votesDown: number;
}

export interface UserCredentials {
    email: string;
    password: string;
}

export interface IUser {
    uid: string;
    username: string;
}

export interface Predicate<T> {
    (item: T): boolean;
}

Take a look at the models that we are going to use in the Forum app, they are pretty self-explanatory. Here’s how a Thread object is being represented in Firebase.
ionic2-angular2-firebase-13
For communicating with Firebase we will be using References to specific locations or keys in our database object. The API cals almost always return a Promise with an object called DataSnapshot which in turn we need to map in one of our model entities we created before. For this reason, add a folder named services under shared and add the mappings.service.ts file.

import { Injectable } from '@angular/core';

import { IThread, IComment } from '../interfaces';
import { ItemsService } from '../services/items.service';

@Injectable()
export class MappingsService {

    constructor(private itemsService: ItemsService) { }

    getThreads(snapshot: any): Array<IThread> {
        let threads: Array<IThread> = [];
        if (snapshot.val() == null)
            return threads;

        let list = snapshot.val();

        Object.keys(snapshot.val()).map((key: any) => {
            let thread: any = list[key];
            threads.push({
                key: key,
                title: thread.title,
                question: thread.question,
                category: thread.category,
                dateCreated: thread.dateCreated,
                user: { uid: thread.user.uid, username: thread.user.username },
                comments: thread.comments == null ? 0 : thread.comments
            });
        });

        return threads;
    }

    getThread(snapshot: any, key: string): IThread {

        let thread: IThread = {
            key: key,
            title: snapshot.title,
            question: snapshot.question,
            category: snapshot.category,
            dateCreated: snapshot.dateCreated,
            user: snapshot.user,
            comments: snapshot.comments == null ? 0 : snapshot.comments
        };

        return thread;
    }

    getComments(snapshot: any): Array<IComment> {
        let comments: Array<IComment>= [];
        if (snapshot.val() == null)
            return comments;

        let list = snapshot.val();

        Object.keys(snapshot.val()).map((key: any) => {
            let comment: any = list[key];

            this.itemsService.groupByBoolean(comment.votes, true);

            comments.push({
                key: key,
                text: comment.text,
                thread: comment.thread,
                dateCreated: comment.dateCreated,
                user: comment.user,
                votesUp: this.itemsService.groupByBoolean(comment.votes, true),
                votesDown: this.itemsService.groupByBoolean(comment.votes, false)
            });
        });

        return comments;
    }

    getComment(snapshot: any, commentKey: string): IComment {
        let comment: IComment;

        if (snapshot.val() == null)
            return null;

        let snapshotComment = snapshot.val();
        console.log(snapshotComment);
        comment = {
            key: commentKey,
            text: snapshotComment.text,
            thread: snapshotComment.thread,
            dateCreated: snapshotComment.dateCreated,
            user: snapshotComment.user,
            votesUp: this.itemsService.groupByBoolean(snapshotComment.votes, true),
            votesDown: this.itemsService.groupByBoolean(snapshotComment.votes, false)
        };

        return comment;
    }

}

The ItemsService is a service that contains lodash utility functions in Typescript. Add the items.service.ts under services folder as well.

import { Injectable } from '@angular/core';
import { Predicate } from '../interfaces';

import * as _ from 'lodash';

@Injectable()
export class ItemsService {

    constructor() { }

    getKeys(object): string[] {
        return _.keysIn(object);
    }

    reversedItems<T>(array: T[]): T[] {
        return <T[]>_.reverse(array);
    }

    groupByBoolean(object, value: boolean): number {
        let result: number = 0;
        if (object == null)
            return result;

        _.map(_.shuffle(object), function (val) {
            if (val === value)
                result++;
        });

        return result;
    }


    includesItem<T>(array: Array<T>, predicate: Predicate<T>) {
        let result = _.filter(array, predicate);
        return result.length > 0;
    }

    /*
    Finds a specific item in an array using a predicate and replaces it
    */
    setItem<T>(array: Array<T>, predicate: Predicate<T>, item: T) {
        var _oldItem = _.find(array, predicate);
        if (_oldItem) {
            var index = _.indexOf(array, _oldItem);
            array.splice(index, 1, item);
        } else {
            array.push(item);
        }
    }
}

You need to add lodash and jquery packages as dependencies in the package.json file.

"dependencies": {
    "@angular/common": "2.0.0-rc.4",
    "@angular/compiler": "2.0.0-rc.4",
    "@angular/core": "2.0.0-rc.4",
    "@angular/platform-browser": "2.0.0-rc.4",
    "@angular/platform-browser-dynamic": "2.0.0-rc.4",
    "@angular/http": "2.0.0-rc.4",
    "@angular/forms": "0.2.0",
    "angular2-moment": "^0.8.2",
    "es6-shim": "^0.35.0",
    "ionic-angular": "2.0.0-beta.11",
    "ionic-native": "1.3.16",
    "ionicons": "3.0.0",
    "jquery": "^3.1.0",
    "lodash": "^4.14.1",
    "reflect-metadata": "^0.1.3",
    "rxjs": "5.0.0-beta.6",
    "zone.js": "^0.6.12"
  }

.. and also install lodash typings in typings.json as follow.

{
  "dependencies": {
    "lodash": "registry:npm/lodash#4.0.0+20160416211519"
  },
  "devDependencies": {},
  "globalDependencies": {
    "jquery": "registry:dt/jquery#1.10.0+20160417213236",
    "es6-shim": "registry:dt/es6-shim#0.31.2+20160602141504"
  }
}

Run npm install and typings install to install new packages. Time for the most important service in our Forum app, the one that is responsible for retreiving data from Firebase. Add the data.service.ts inside the services folder. Instead of pasting all the code here, I will explain the important functions one by one. You can copy the entire data.service.ts contents from the repository. At this point I will strongly recommend you to study the firebase.database.Reference API. First, we declare any Firebase references we will use in the app.

declare var firebase: any;

@Injectable()
export class DataService {
    databaseRef: any = firebase.database();
    usersRef: any = firebase.database().ref('users');
    threadsRef: any = firebase.database().ref('threads');
    commentsRef: any = firebase.database().ref('comments');
    statisticsRef: any = firebase.database().ref('statistics');
    storageRef: any = firebase.storage().ref();
    connectionRef: any = firebase.database().ref('.info/connected');

Self-explanatory I believe. The connectionRef is how Firebase let us detect client’s connection state. We will use this in the ThreadsPage initialization logic, in order to check if the user can communicate with Firebase or not. If not, we ‘ll try to fetch SQLite data from app’s database and keep working in Offline mode till network connected event fires. But something missing here.. The firebase object needs to know where your project is, in other words your project’s settings in order to understand the previous references. Login in Firebase and go to your project’s console. Over there you will find an Add Firebase to your web app button.
ionic2-angular2-firebase-14
Click the button and copy its contents.
ionic2-angular2-firebase-15
Now open www/index.html and change the body contents as follow. Make sure you replace your copied settings from the previous step.

<body>
  <ion-app></ion-app>


  <script src="https://www.gstatic.com/firebasejs/3.2.1/firebase.js"></script>
  <script>
  // Initialize Firebase
  var config = {
    apiKey: "your_api_key",
    authDomain: "your_auth_domain",
    databaseURL: "your_database_url",
    storageBucket: "your_storage_bucket",
  };
  firebase.initializeApp(config);
</script>


  <!-- cordova.js required for cordova apps -->
  <script src="cordova.js"></script>
  <!-- Polyfill needed for platforms without Promise and Collection support -->
  <script src="build/js/es6-shim.min.js"></script>
  <!-- Zone.js and Reflect-metadata  -->
  <script src="build/js/Reflect.js"></script>
  <script src="build/js/zone.js"></script>
  <!-- the bundle which is built from the app's source code -->
  <script src="build/js/app.bundle.js"></script>
</body>

Now back to data.service.ts. The InitData function initializes the first Thread for you, just for demonstration purposes. The transaction method will check if there is any value set in the statistics/threads location. If not, it will set the statistics/threads value equal to 1 (return 1) and when successfully committed, it will push the new thread. The push method generates a unique key which will be used later as the key property of an IThread. We commit the new thread using the setWithPriority method so that each thread has a priority depending on the order added.

private InitData() {
        let self = this;
        // Set statistics/threads = 1 for the first time only
        self.getStatisticsRef().child('threads').transaction(function (currentRank) {
            console.log(currentRank);
            if (currentRank === null) {
                console.log(currentRank);
                return 1;
            }
        }, function (error, committed, snapshot) {
            if (error) {
                console.log('Transaction failed abnormally!', error);
            } else if (!committed) {
                console.log('We aborted the transaction because there is already one thread.');
            } else {
                console.log('Threads number initialized!');

                let thread: IThread = {
                    key: null,
                    title: 'Welcome to Forum!',
                    question: 'Congratulations! It seems that you have successfully setup the Forum app.',
                    category: 'welcome',
                    dateCreated: new Date().toString(),
                    user: { uid: 'default', username: 'Administrator' },
                    comments: 0
                };

                let firstThreadRef = self.threadsRef.push();
                firstThreadRef.setWithPriority(thread, 1).then(function(dataShapshot) {
                    console.log('Congratulations! You have created the first thread!');
                });
            }
            console.log('committed', snapshot.val());
        }, false);
    }

The reason why we used transaction here is because in case you try to deploy the Forum app in your browser using the ionic serve –lab command, three different instances will be initialized, one for each platform. If we remove the transaction, there is a possibility that all of them will try to push the new thread which mean you will end up having three threads and an invalid statistics/threads value equal to 1, because when all of three checked the location, the value was null.

Disclaimer: I have used priorities in order to sort and support pagination when retrieving Threads later in a simple way. This is not the best way because in case you break the statistics/threads value or remove a thread from Firebase you are going to get strange results. But let’s keep some things simple on this app and focus mostly on the features rather than the implementation.

CheckFirebaseConnection is the one that listens in a specific Firebase location and check the client’s connecton status.

checkFirebaseConnection() {
        try {
            var self = this;
            var connectedRef = self.getConnectionRef();
            connectedRef.on('value', function (snap) {
                console.log(snap.val());
                if (snap.val() === true) {
                    console.log('Firebase: Connected:');
                    self.connected = true;
                } else {
                    console.log('Firebase: No connection:');
                    self.connected = false;
                }
            });
        } catch (error) {
            self.connected = false;
        }
    }

    isFirebaseConnected() {
        return this.connected;
    }

The submitThread function is simple to understand. It creates a new reference on Firebase and commits the new thread in the same way we saw before. It also updates the current number of threads in statistics/threads location which means that before invoking this method we need to check the current number of threads and increase it by one. You may wonder why do we have to keep a location such as the statistics/threads anyway? The thing is that this is how you work in an NoSQL environment. You may have to keep copies of your values in multiple places so you don’t have to retrieve all the data each time. If we disn’t have statistics/threads we would have to get all the threads dataSnapnot and enumerate them to get their length. Another example we are going to see later on, is the way we know who created a comment. A comment has a user object with the unique user’s identifier plus his/her username. If that user changes the username, you will have to update all those references.

submitThread(thread: IThread, priority: number) {
    var newThreadRef = this.threadsRef.push();
    this.statisticsRef.child('threads').set(priority);
    console.log(priority);
    return newThreadRef.setWithPriority(thread, priority);
}

We call the set method to store user’s favorite threads in the addThreadToFavorites method. The method will create a key-value pair under the user’s unique key. This is how we know the favorite threads for a specific user. If a thread belongs to his/her favorites, then a threadKey – true value pair exists under that user’s object.

addThreadToFavorites(userKey: string, threadKey: string) {
        return this.usersRef.child(userKey + '/favorites/' + threadKey).set(true);
 }

ionic2-angular2-firebase-16
We read user’s favorite threads using the getFavoriteThreads method which accepts user’s unique identifier.

getFavoriteThreads(user: string) {
        return this.usersRef.child(user + '/favorites/').once('value');
    }

Commiting a new comment works in a similar way. The submitComment method accepts the thread’s key under which the comment was created and the comment itself. Mind that before calling this method we have already called the push method on the commentsRef so that we have the new generated key available. We make sure to update the number of comments existing under the specific thread.

submitComment(threadKey: string, comment: IComment) {
        this.commentsRef.child(comment.key).set(comment);

        return this.threadsRef.child(threadKey + '/comments').once('value')
            .then((snapshot) => {
                let numberOfComments = snapshot == null ? 0 : snapshot.val();
                this.threadsRef.child(threadKey + '/comments').set(numberOfComments + 1);
            });
    }

ionic2-angular2-firebase-17
Let’s see how a user can submit a vote for a comment. There are two options, Up or Down and the value is stored under the respective comment. We have the voteComment function that accepts the unique comment’s key, user’s uid and true or false for Up and Down votes respectively.

voteComment(commentKey: string, like: boolean, user: string): any {
    let commentRef = this.commentsRef.child(commentKey + '/votes/' + user);
    return commentRef.set(like);
    }

In this way, if a user press again the same value (Up or Down) nothing changes.
ionic2-angular2-firebase-18
There are two more important functions in the DataService that I would like to explain. The first one is the getUserThreads which fetches threads created by a specific user. It uses the orderByChild method to locate the threads/user/uid key in compination with the equalTo method to match only a specific key.

getUserThreads(userUid: string) {
        return this.threadsRef.orderByChild('user/uid').equalTo(userUid).once('value');
    }

Same applies for the getUserComments function that fetches all comments created by a user.

getUserComments(userUid: string) {
        return this.commentsRef.orderByChild('user/uid').equalTo(userUid).once('value');
    }

Add the auth.service.ts file under the services folder. The AuthService uses the firebase.auth.Auth Firebase interface for authenticating users in Firebase. Mind that there are several providers you can sign in with, such as Github or Google but we will use the signInWithEmailAndPassword method.

import { Injectable } from '@angular/core';
import { Observable } from 'rxjs/Observable';

import { UserCredentials } from '../interfaces';

declare var firebase: any;

@Injectable()
export class AuthService {

    usersRef: any = firebase.database().ref('users');

    constructor() { }

    registerUser(user: UserCredentials) {
        return firebase.auth().createUserWithEmailAndPassword(user.email, user.password);
    }

    signInUser(email: string, password: string) {
        return firebase.auth().signInWithEmailAndPassword(email, password);
    }

    signOut() {
        return firebase.auth().signOut();
    }

    addUser(username: string, dateOfBirth: string, uid: string) {
        this.usersRef.child(uid).update({
            username: username,
            dateOfBirth: dateOfBirth
        });
    }

    getLoggedInUser() {
        return firebase.auth().currentUser;
    }

    onAuthStateChanged(callback) {
        return firebase.auth().onAuthStateChanged(callback);
    }

}

There’s another one service we need to create, the SqliteService which is responsible for manipulating local data in the mobile device when working in offline mode. But let’s ignore native components at the moment and keep setting core components. Add the app.providers.ts file under the app folder. This file exports all services to be available in our Angular app.

import { HTTP_PROVIDERS } from '@angular/http';

import { AuthService } from './shared/services/auth.service';
import { DataService } from './shared/services/data.service';
import { SqliteService } from './shared/services/sqlite.service';
import { MappingsService } from './shared/services/mappings.service';
import { ItemsService } from './shared/services/items.service';

export const APP_PROVIDERS = [
    AuthService,
    DataService,
    ItemsService,
    SqliteService,
    MappingsService,
    HTTP_PROVIDERS
];

Component Directives

We will create an ThreadComponent to display threads in the ThreadsPage list. Each thread will be responsible to listen for events that only happens upon that, which in our case will be the number of comments added. Add a new folder named directives under shared and create the thread.component.ts.

import { Component, EventEmitter, OnInit, OnDestroy, Input, Output } from '@angular/core';

import { IThread } from '../interfaces';
import { UserAvatarComponent } from '../../shared/directives/user-avatar.component';
import { DataService } from '../services/data.service';

@Component({
    selector: 'forum-thread',
    templateUrl: 'build/shared/directives/thread.component.html',
    directives: [UserAvatarComponent]
})
export class ThreadComponent implements OnInit, OnDestroy {
    @Input() thread: IThread;
    @Output() onViewComments = new EventEmitter<string>();

    constructor(private dataService: DataService) { }

    ngOnInit() {
        var self = this;
        self.dataService.getThreadsRef().child(self.thread.key).on('child_changed', self.onCommentAdded);
    }

    ngOnDestroy() {
         console.log('destroying..');
        var self = this;
        self.dataService.getThreadsRef().child(self.thread.key).off('child_changed', self.onCommentAdded);
    }

    // Notice function declarion to keep the right this reference
    public onCommentAdded = (childSnapshot, prevChildKey) => {
       console.log(childSnapshot.val());
        var self = this;
        // Attention: only number of comments is supposed to changed.
        // Otherwise you should run some checks..
        self.thread.comments = childSnapshot.val();
    }

    viewComments(key: string) {
        this.onViewComments.emit(key);
    }

}

The on and off functions starts and stops listening for data changes at a particular location. This is how each thread will automatically update the number of comments posted on that thread at real time. Firebase will send the update to all connected users immediatly.
ionic2-angular2-firebase-19
Another importan function is the viewComments which informs the parent component (ThreadsPage) to open the CommentsPage for the specific thread. Add the thread.component.html template for this component in the same folder

<ion-item text-wrap>
    <ion-card>

        <ion-item>
            <ion-avatar item-left>
                <forum-user-avatar [user]="thread.user"></forum-user-avatar>
            </ion-avatar>
            <h2>{{thread.user.username}}</h2>
            <p>{{thread.dateCreated | date:'medium'}}</p>
        </ion-item>

        <div class="thread-card-title wordwrap">
            {{thread.title}}
        </div>
        <div class="thread-card-question wordwrap left-border-primary">
            {{thread.question}}
        </div>

        <ion-row class="left-border-primary">
            <ion-col>
                <button primary clear small (click)="viewComments(thread.key)">
        <ion-icon name="quote"></ion-icon>
        <div>{{thread.comments}} Comments</div>
      </button>
            </ion-col>
            <ion-col center text-center>
                <ion-note>
                    {{thread.category}}
                </ion-note>
            </ion-col>
        </ion-row>
    </ion-card>
</ion-item>

You may have noticed that this component uses an element forum-user-avatar. It’s another component we are going to create and will be responsible for rendering user’s profile picture uploaded in Firebase’s storage. Add the user-avatar.component.ts under the directives folder.

import { Component, Input, OnInit } from '@angular/core';
import { PhotoViewer } from 'ionic-native';

import { IUser } from '../interfaces';
import { DataService } from '../services/data.service';

@Component({
    selector: 'forum-user-avatar',
    template: ` <img *ngIf="imageLoaded" src="{{imageUrl}}" (click)="zoom()">`
})
export class UserAvatarComponent implements OnInit {
    @Input() user: IUser;
    imageLoaded: boolean = false;
    imageUrl: string;

    constructor(private dataService: DataService) { }

    ngOnInit() {
        var self = this;
        let firebaseConnected: boolean = self.dataService.isFirebaseConnected();
        if (self.user.uid === 'default' || !firebaseConnected) {
            self.imageUrl = 'images/profile.png';
            self.imageLoaded = true;
        } else {
            self.dataService.getStorageRef().child('images/' + self.user.uid + '/profile.png').getDownloadURL().then(function (url) {
                self.imageUrl = url.split('?')[0] + '?alt=media' + '&t=' + (new Date().getTime());
                self.imageLoaded = true;
            });
        }
    }

    zoom() {
        PhotoViewer.show(this.imageUrl, this.user.username, { share: false });
    }

    getUserImage() {
        var self = this;

        return self.dataService.getStorageRef().child('images/' + self.user.uid + '/profile.png').getDownloadURL();
    }
}

This component accepts an @Input() parameter and set’s the imageUrl property. We would like though this image to be zoomed when clicked. It is high time for us to see the first native feature in the Forum app. We are going to use the Photo Viewer Ionic Native plugin to accomplish our goal. First thing we need to do is run the following command and install the cordova plugin.

ionic plugin add com-sarriaroman-photoviewer

Inside the component we import the PhotoViewer Typescript wrapper from ionic-native and we bind the click event to call the static show method. That’s all needed!

Login & Register on Firebase

Users should be authenticated in order to view/add threads and comments so let’s procceed with those views first. Add a folder named signup under pages. In Ionic, it’s common to create three files foreach page. One .ts Angular Component which holds the logic, one .html to hold the template and a .scss file for setting stylesheets. Go ahead and create the signup.ts, signup.html and signup.scss files under the signup folder. The SignupPage requires basic information from user. More specifically a unique email address and a password that are required from Firebase itself to create the account and some other data we would like to keep, such as a username and date of birth. We would also like to add validation logic in the signup page and for this we ‘ll use Angular Forms. Let’s have a preview of this page first.
ionic2-angular2-firebase-20
Set the signup.ts contents as follow:

import { Component, OnInit } from '@angular/core';
import { Modal, NavController, ViewController, LoadingController, ToastController } from 'ionic-angular';
import {FORM_DIRECTIVES, FormBuilder, FormGroup, Validators, AbstractControl} from '@angular/forms';

import { IThread, UserCredentials } from '../../shared/interfaces';
import { DataService } from '../../shared/services/data.service';
import { AuthService } from '../../shared/services/auth.service';
import { CheckedValidator } from '../../shared/validators/checked.validator';
import { EmailValidator } from '../../shared/validators/email.validator';

@Component({
    templateUrl: 'build/pages/signup/signup.html',
    directives: [FORM_DIRECTIVES]
})
export class SignupPage implements OnInit {

    createFirebaseAccountForm: FormGroup;
    username: AbstractControl;
    email: AbstractControl;
    password: AbstractControl;
    dateOfBirth: AbstractControl;
    terms: AbstractControl;

    constructor(private nav: NavController,
        private loadingCtrl: LoadingController,
        private toastCtrl: ToastController,
        private viewCtrl: ViewController,
        private fb: FormBuilder,
        private dataService: DataService,
        private authService: AuthService) { }

    ngOnInit() {
        this.createFirebaseAccountForm = this.fb.group({
            'username': ['', Validators.compose([Validators.required, Validators.minLength(8)])],
            'email': ['', Validators.compose([Validators.required, EmailValidator.isValid])],
            'password': ['', Validators.compose([Validators.required, Validators.minLength(5)])],
            'dateOfBirth': [new Date().toISOString().slice(0, 10), Validators.compose([Validators.required])],
            'terms': [false, CheckedValidator.isChecked]
        });

        this.username = this.createFirebaseAccountForm.controls['username'];
        this.email = this.createFirebaseAccountForm.controls['email'];
        this.password = this.createFirebaseAccountForm.controls['password'];
        this.dateOfBirth = this.createFirebaseAccountForm.controls['dateOfBirth'];
        this.terms = this.createFirebaseAccountForm.controls['terms'];
    }

    getFormattedDate(): string {
        let now = new Date();
        let mm = now.getMonth() + 1;
        let dd = now.getDate();

        let formattedDate = [now.getFullYear(), !mm[1] && '0', mm, !dd[1] && '0', dd].join('-');
        return formattedDate;
    }

    onSubmit(signupForm: any): void {
        var self = this;

        if (this.createFirebaseAccountForm.valid) {

            let loader = this.loadingCtrl.create({
                content: 'Creating account...',
                dismissOnPageChange: true
            });

            let newUser: UserCredentials = {
                email: signupForm.email,
                password: signupForm.password
            };

            loader.present();

            this.authService.registerUser(newUser)
                .then(function (result) {
                    self.authService.addUser(signupForm.username, signupForm.dateOfBirth, self.authService.getLoggedInUser().uid);
                    loader.dismiss()
                        .then(() => {
                            self.viewCtrl.dismiss({
                                user: newUser
                            }).then(() => {
                                let toast = self.toastCtrl.create({
                                    message: 'Account created successfully',
                                    duration: 4000,
                                    position: 'top'
                                });
                                toast.present();
                                self.CreateAndUploadDefaultImage();
                            });
                        });
                }).catch(function (error) {
                    // Handle Errors here.
                    var errorCode = error.code;
                    var errorMessage = error.message;
                    console.error(error);
                    loader.dismiss().then(() => {
                        let toast = self.toastCtrl.create({
                            message: errorMessage,
                            duration: 4000,
                            position: 'top'
                        });
                        toast.present();
                    });
                });
        }
    }

    CreateAndUploadDefaultImage() {
        let self = this;
        let imageData = 'images/profile.png';

        var xhr = new XMLHttpRequest();
        xhr.open('GET', imageData, true);
        xhr.responseType = 'blob';
        xhr.onload = function (e) {
            if (this.status === 200) {
                var myBlob = this.response;
                // myBlob is now the blob that the object URL pointed to.
                self.startUploading(myBlob);
            }
        };
        xhr.send();
    }

    startUploading(file) {

        let self = this;
        let uid = self.authService.getLoggedInUser().uid;
        let progress: number = 0;
        // display loader
        let loader = this.loadingCtrl.create({
            content: 'Uploading default image..',
        });
        loader.present();

        // Upload file and metadata to the object 'images/mountains.jpg'
        var metadata = {
            contentType: 'image/png',
            name: 'profile.png',
            cacheControl: 'no-cache',
        };

        var uploadTask = self.dataService.getStorageRef().child('images/' + uid + '/profile.png').put(file, metadata);

        // Listen for state changes, errors, and completion of the upload.
        uploadTask.on('state_changed',
            function (snapshot) {
                // Get task progress, including the number of bytes uploaded and the total number of bytes to be uploaded
                progress = (snapshot.bytesTransferred / snapshot.totalBytes) * 100;
            }, function (error) {
                loader.dismiss().then(() => {
                    switch (error.code) {
                        case 'storage/unauthorized':
                            // User doesn't have permission to access the object
                            break;

                        case 'storage/canceled':
                            // User canceled the upload
                            break;

                        case 'storage/unknown':
                            // Unknown error occurred, inspect error.serverResponse
                            break;
                    }
                });
            }, function () {
                loader.dismiss().then(() => {
                    // Upload completed successfully, now we can get the download URL
                    var downloadURL = uploadTask.snapshot.downloadURL;
                    self.dataService.setUserImage(uid);
                });
            });
    }

}

I know. Lot’s of stuff to explain here. I will start with the Angular Custom validators. We set a custom validator to ensure that a checkbox is checked and another one to validate an email address.

this.createFirebaseAccountForm = this.fb.group({
    'username': ['', Validators.compose([Validators.required, Validators.minLength(8)])],
    'email': ['', Validators.compose([Validators.required, EmailValidator.isValid])],
    'password': ['', Validators.compose([Validators.required, Validators.minLength(5)])],
    'dateOfBirth': [new Date().toISOString().slice(0, 10), Validators.compose([Validators.required])],
    'terms': [false, CheckedValidator.isChecked]
});

We need to create the EmailValidator and the CheckedValidator validators. Add a folder named validators under the shared folder and create the following two files, email.validator.ts, checked.validator.ts.

import { FormControl } from '@angular/forms';

interface ValidationResult {
    [key: string]: boolean;
}

export class EmailValidator {

    public static isValid(control: FormControl): ValidationResult {
        var emailReg = /^(([^<>()\[\]\\.,;:\s@"]+(\.[^<>()\[\]\\.,;:\s@"]+)*)|(".+"))@((\[[0-9]{1,3}\.[0-9]{1,3}\.[0-9]{1,3}\.[0-9]{1,3}])|(([a-zA-Z\-0-9]+\.)+[a-zA-Z]{2,}))$/;

        let valid = emailReg.test(control.value);

        if (!valid) {
            return { isValid: true };
        }
        return null;
    }
}
import { FormControl } from '@angular/forms';

interface ValidationResult {
    [key: string]: boolean;
}

export class CheckedValidator {

    public static isChecked(control: FormControl): ValidationResult {
        var valid = control.value === false || control.value === 'false';
        if (valid) {
            return { isChecked: true };
        }
        return null;
    }
}

Here’s the contents of signup.html template. Notice how we check if the custom validators return true.

<ion-header>
    <ion-navbar>
        <ion-title>Signup</ion-title>
    </ion-navbar>
</ion-header>
<ion-content padding>
    <form [formGroup]="createFirebaseAccountForm" (ngSubmit)="onSubmit(createFirebaseAccountForm.value)">
        <ion-list>
            <ion-list-header>
                Firebase account
            </ion-list-header>
            <ion-item [class.error]="!email.valid && email.touched">
                <ion-label floating>Email address</ion-label>
                <ion-input type="text" value="" [formControl]="email"></ion-input>
            </ion-item>
            <div *ngIf="email.hasError('required') && email.touched" class="error-box">* Email is required.</div>
            <div *ngIf="email.hasError('isValid') && email.touched" class="error-box">* Enter a valid email address.</div>
            <ion-item [class.error]="!password.valid && password.touched">
                <ion-label floating>Password</ion-label>
                <ion-input type="password" value="" [formControl]="password"></ion-input>
            </ion-item>
            <div *ngIf="password.hasError('required') && password.touched" class="error-box">* Password is required.</div>
            <div *ngIf="password.hasError('minlength') && password.touched" class="error-box">* Minimum password length is 5.</div>
        </ion-list>
        <ion-list>
            <ion-list-header>
                Basic info
            </ion-list-header>
            <ion-item [class.error]="!username.valid && username.touched">
                <ion-label floating>Username</ion-label>
                <ion-input type="text" value="" [formControl]="username"></ion-input>
            </ion-item>
            <div *ngIf="username.hasError('required') && username.touched" class="error-box">* Username is required.</div>
            <div *ngIf="username.hasError('minlength') && username.touched" class="error-box">* Minimum password length is 8.</div>
            <ion-item>
                <ion-label>Date of Birth</ion-label>
                <ion-datetime displayFormat="MMM DD YYYY" [formControl]="dateOfBirth"></ion-datetime>
            </ion-item>
            <ion-item>
                <ion-label>I accept terms of use</ion-label>
                <ion-toggle [formControl]="terms"></ion-toggle>
            </ion-item>
            <div *ngIf="terms.hasError('isChecked') && terms.touched" class="error-box">* You need to accept the terms of use.</div>
        </ion-list>
        <button type="submit" class="custom-button" [disabled]="!createFirebaseAccountForm.valid" block>Confirm</button>
    </form>
</ion-content>

The SignupPage component make use of two ionic components to notify user that something is happening or happened. The first one is the Toast which displays a message when registration process is completed.

let toast = self.toastCtrl.create({
    message: 'Account created successfully',
    duration: 4000,
    position: 'top'
});
toast.present();

You need to inject ToastController in the component’s constructor. The same applies for the Loading component which displays an overlay while registration is being processed.

let loader = this.loadingCtrl.create({
    content: 'Creating account...',
    dismissOnPageChange: true
});

loader.present();

ionic2-angular2-firebase-22
There are two more important functions in the signup.ts, the CreateAndUploadDefaultImage() and the startUploading. The first one reads a local file named avatar.png which exists under www/images folder. Copy the image file from here and paste it inside the www/images folder (or another one of your choice, just make sure to name it profile.png). The startUploading method uses the method described here and uploads a default image on the Firebase storage that we set at the start of this post. We will use the same method to upload files captured by the mobile’s Camera or picked from the mobile’s photo album later on the Profile page.
The Login page is much simpler than the signup. Add the login.ts and the login.html files under a new folder named login in pages.

import { Component, OnInit } from '@angular/core';
import { Modal, NavController, ViewController, LoadingController, ToastController } from 'ionic-angular';
import {FORM_DIRECTIVES, FormBuilder, FormGroup, Validators, AbstractControl} from '@angular/forms';

import { TabsPage } from '../tabs/tabs';
import { SignupPage } from '../signup/signup';
import { IThread, UserCredentials } from '../../shared/interfaces';
import { DataService } from '../../shared/services/data.service';
import { AuthService } from '../../shared/services/auth.service';

@Component({
    templateUrl: 'build/pages/login/login.html',
    directives: [FORM_DIRECTIVES]
})
export class LoginPage implements OnInit {

    loginFirebaseAccountForm: FormGroup;
    email: AbstractControl;
    password: AbstractControl;

    constructor(private nav: NavController,
        private loadingCtrl: LoadingController,
        private toastCtrl: ToastController,
        private fb: FormBuilder,
        private dataService: DataService,
        private authService: AuthService) { }

    ngOnInit() {
        this.loginFirebaseAccountForm = this.fb.group({
            'email': ['', Validators.compose([Validators.required])],
            'password': ['', Validators.compose([Validators.required, Validators.minLength(5)])]
        });

        this.email = this.loginFirebaseAccountForm.controls['email'];
        this.password = this.loginFirebaseAccountForm.controls['password'];
    }

    onSubmit(signInForm: any): void {
        var self = this;
        if (this.loginFirebaseAccountForm.valid) {

            let loader = this.loadingCtrl.create({
                content: 'Signing in firebase..',
                dismissOnPageChange: true
            });

            loader.present();

            let user: UserCredentials = {
                email: signInForm.email,
                password: signInForm.password
            };

            console.log(user);
            this.authService.signInUser(user.email, user.password)
                .then(function (result) {
                    self.nav.setRoot(TabsPage);
                }).catch(function (error) {
                    // Handle Errors here.
                    var errorCode = error.code;
                    var errorMessage = error.message;
                    loader.dismiss().then(() => {
                        let toast = self.toastCtrl.create({
                            message: errorMessage,
                            duration: 4000,
                            position: 'top'
                        });
                        toast.present();
                    });
                });
        }
    }

    register() {
        this.nav.push(SignupPage);
    }
}
<ion-header>
    <ion-navbar hideBackButton>
        <ion-title>Login</ion-title>
    </ion-navbar>
</ion-header>
<ion-content padding>
    <form [formGroup]="loginFirebaseAccountForm" (ngSubmit)="onSubmit(loginFirebaseAccountForm.value)">
        <ion-item [class.error]="!email.valid && email.touched">
            <ion-label floating>Email address</ion-label>
            <ion-input type="text" value="" [formControl]="email"></ion-input>
        </ion-item>
        <div *ngIf="email.hasError('required') && email.touched" class="error-box">* Email is required.</div>
        <div *ngIf="email.hasError('pattern') && email.touched" class="error-box">* Enter a valid email address.</div>
        <ion-item [class.error]="!password.valid && password.touched">
            <ion-label floating>Password</ion-label>
            <ion-input type="password" value="" [formControl]="password"></ion-input>
        </ion-item>
        <div *ngIf="password.hasError('required') && password.touched" class="error-box">* Password is required.</div>
        <div *ngIf="password.hasError('minlength') && password.touched" class="error-box">* Minimum password length is 5.</div>
        <br/><br/>
        <button type="submit" class="custom-button" [disabled]="!loginFirebaseAccountForm.valid" block>Sign in</button>
        <br/>
        <button clear (click)="register()">
            <ion-icon name='flame'></ion-icon>
            Register a firebase account</button>
        <ion-card padding>
            <img src="images/firebase.png" />
            <ion-card-content>
                <ion-card-title>
                    Built on Firebase
                </ion-card-title>
                <p>
                    Create a Firebase profile for free and use your email and password to sign in to Forum-App
                </p>
            </ion-card-content>
        </ion-card>
    </form>
</ion-content>

Nothing that we haven’t seen already here. Just simple validation logic and a call to the AuthService signInUser method. Notice however that in a successfull login we make sure to set the root of the NavController to the TabsPage. I recommend you to spend some time reading the basics of the Nav API as well.

Threads Page

This page is responsible to display all threads existing in Firebase ordered by priority. The thread with the largest priority is being displayed first. Add a threads folder under pages and create the threads.html template first.

<ion-header>
  <ion-navbar no-border-bottom>
    <button menuToggle>
      <ion-icon name='menu'></ion-icon>
    </button>
    <ion-segment [(ngModel)]="segment" (ionChange)="filterThreads(segment)">
      <ion-segment-button value="all">
        All
      </ion-segment-button>
      <ion-segment-button value="favorites">
        Favorites
      </ion-segment-button>
    </ion-segment>

    <ion-buttons end>
      <button *ngIf="!internetConnected" (click)="notify('Working offline..')">
        <ion-icon name="warning"></ion-icon>
      </button>
      <button (click)="createThread()" *ngIf="internetConnected">
        <ion-icon name="add"></ion-icon>
      </button>
    </ion-buttons>
  </ion-navbar>

  <ion-toolbar no-border-top>
    <ion-searchbar primary [(ngModel)]="queryText" (ionInput)="searchThreads()" placeholder="Search for a thread..">
    </ion-searchbar>
  </ion-toolbar>
</ion-header>

<ion-content>

  <ion-refresher (ionRefresh)="reloadThreads($event)" *ngIf="segment=='all'">
    <ion-refresher-content></ion-refresher-content>
  </ion-refresher>

  <div *ngIf="loading">
    <img src="images/ring.gif" style="display:block; margin:auto" />
  </div>

  <ion-list *ngIf="!loading">
    <forum-thread *ngFor="let thread of threads" [thread]="thread" (onViewComments)="viewComments($event)"></forum-thread>
  </ion-list>

  <ion-infinite-scroll (ionInfinite)="fetchNextThreads($event)" threshold="10px" *ngIf="(start > 0) && (queryText.trim().length == 0) && segment=='all' && internetConnected">
    <ion-infinite-scroll-content></ion-infinite-scroll-content>
  </ion-infinite-scroll>
</ion-content>

There are 4 basic parts in the template. The first one is the ion-segment which is just a container for buttons. The segment allows the user to change between all and his/her favorite threads. They are just buttons, nothing more. The second important component in the template is the ion-toolbar which allows the user to search in public (only, not favorites) threads.
ionic2-angular2-firebase-21
We also use an ion-refresher element for refreshing the entire list. The truth is that we don’t need this functionality that much because we will bind events on Firebase which will notify the app each time a new thread is being added. Then we have an ion-list that renders the currently loaded threads and last but not least an ion-infinite-scroll element. This component will allow us to support pagination and every time the user scrolls and reaches the bottom of the page, the next batch of threads will be loaded from firebase. For this to work we need to keep track the priority of the last thread loaded in our application (and that’s why we used priorities..). For simplicity the refresher and the infinite scroll components will be enabled only when the ‘All’ segment button is pressed and the user is connected to the network. That’s why you see some *ngIf conditions on the template. Once again get the entire source-code of the threads.ts file here. I will explain the most important methods of the ThreadsPage component. We need the ViewChild from @angular/core and the ionic Content so we can scroll up and down the ion-content. We import the NavController, the ThreadCreatePage and ThreadCommentsPage so we can push those pages on the stack while being always at the Threads tab. We also import all our custom services for both online (Firebase) and offline (SQLite) CRUD operations. We also import Events from ionic for sending and responding to application-level events across the Forum app. One case where we are going to use Events is get notified in case of network disconnection or re-connection.

import { Component, OnInit, ViewChild } from '@angular/core';
import { NavController, ModalController, ToastController, Content, Events } from 'ionic-angular';

import { ThreadComponent } from '../../shared/directives/thread.component';
import { UserAvatarComponent } from '../../shared/directives/user-avatar.component';
import { IThread } from '../../shared/interfaces';
import { ThreadCreatePage } from '../thread-create/thread-create';
import { ThreadCommentsPage } from '../thread-comments/thread-comments';
import { LoginPage } from '../login/login';
import { AuthService } from '../../shared/services/auth.service';
import { DataService } from '../../shared/services/data.service';
import { MappingsService } from '../../shared/services/mappings.service';
import { ItemsService } from '../../shared/services/items.service';
import { SqliteService } from '../../shared/services/sqlite.service';

First thing we need to do, is decide whether we are connected in Firebase or not and fetch the data from internet of the SQLite database respectively. This is what ngOnInit() and checkFirebase() are for.

ngOnInit() {
    var self = this;
    self.segment = 'all';
    self.events.subscribe('network:connected', self.networkConnected);
    self.events.subscribe('threads:add', self.addNewThreads);

    self.checkFirebase();
  }
checkFirebase() {
    let self = this;
    if (!self.dataService.isFirebaseConnected()) {
      setTimeout(function () {
        console.log('Retry : ' + self.firebaseConnectionAttempts);
        self.firebaseConnectionAttempts++;
        if (self.firebaseConnectionAttempts < 5) {
          self.checkFirebase();
        } else {
          self.internetConnected = false;
          self.dataService.goOffline();
          self.loadSqliteThreads();
        }
      }, 1000);
    } else {
      console.log('Firebase connection found (threads.ts) - attempt: ' + self.firebaseConnectionAttempts);
      self.dataService.getStatisticsRef().on('child_changed', self.onThreadAdded);
      if (self.authService.getLoggedInUser() === null) {
        //
      } else {
        self.loadThreads(true);
      }
    }
  }

checkFirebase waits for at least five seconds before decides to load data from the database. DataService listens to a specific location in Firebase that check the client’s connection status which is returned by the isFirebaseConnected() function.
There are three key variables on this component:

public threads: Array<IThread> = [];
public newThreads: Array<IThread> = [];
public favoriteThreadKeys: string[];

Variable threads holds items that are being displayed in the ion-list. Either is the ‘All’ segment button selected or the ‘Favorites’, this variable should hold the right data. Variable newThreads holds new items added from other users and is being populated instantly because of the following listening event:

self.dataService.getStatisticsRef().on('child_changed', self.onThreadAdded);

What this line of code does, is start listening changes in the statistics/threads Firebase location which we populate only when we add a new thread. And because we set it equal to new thread’s priority here is the onThreadAdded function as well.

// Notice function declarion to keep the right this reference
  public onThreadAdded = (childSnapshot, prevChildKey) => {
    let priority = childSnapshot.val(); // priority..
    var self = this;
    self.events.publish('thread:created');
    // fetch new thread..
    self.dataService.getThreadsRef().orderByPriority().equalTo(priority).once('value').then(function (dataSnapshot) {
      let key = Object.keys(dataSnapshot.val())[0];
      let newThread: IThread = self.mappingsService.getThread(dataSnapshot.val()[key], key);
      self.newThreads.push(newThread);
    });
  }

This function retrieves the new created thread, adds it in the newThreads and publish a thread:created event. The TabsPage component which holds the tabs, is subscribed to this event in order to display a badge on the Threads tab. Here’s how how it looks like: On the right you can see that I change the statistics/threads value on purpose, so that the app thinks someone has created a new thread..
ionic2-angular2-firebase-23
We also subscribe to a threads:add event in order to add all new threads that have been created mostly by other users.

self.events.subscribe('threads:add', self.addNewThreads);

This event will fire from the TabsPage component when Threads tab has a badge containing the number of new threads have been added in Firebase.

public addNewThreads = () => {
    var self = this;
    self.newThreads.forEach(function (thread: IThread) {
      self.threads.unshift(thread);
    });

    self.newThreads = [];
    self.scrollToTop();
    self.events.publish('threads:viewed');
  }

TabsPage component will receive the threads:viewed event and will remove the badge form the tab. The ngOnInit() function also subscribes to the network:connected event in order to get notified when client reconnects.

self.events.subscribe('network:connected', self.networkConnected);

When this event fires, in case connection exists we reload threads from Firebase, otherwise we make sure to reset the mobile’s local SQLite database and save the currently local threads. This is just a choice we made to keep things simple and always make SQLite contain the latest loaded threads on the app.

public networkConnected = (connection) => {
    var self = this;
    self.internetConnected = connection[0];
    console.log('NetworkConnected event: ' + self.internetConnected);

    if (self.internetConnected) {
      self.threads = [];
      self.loadThreads(true);
    } else {
      self.notify('Connection lost. Working offline..');
      // save current threads..
      setTimeout(function () {
        self.sqliteService.saveThreads(self.threads);
        self.loadSqliteThreads();
      }, 1000);
    }
  }

The getThreads() function is quite important since is the one that loads threads from Firebase. In case the ‘All’ segment button is pressed then we retrieve the threads ordered by priority while keeping track of priorities loaded using the self.start variable. If the ‘Favorites’ button is pressed then we enumerate user’s favorite threads and foreach key retrieved, we download the respective thread and add it to the array.

getThreads() {
    var self = this;
    let startFrom: number = self.start - self.pageSize;
    if (startFrom < 0)
      startFrom = 0;
    if (self.segment === 'all') {
      this.dataService.getThreadsRef().orderByPriority().startAt(startFrom).endAt(self.start).once('value', function (snapshot) {
        self.itemsService.reversedItems<IThread>(self.mappingsService.getThreads(snapshot)).forEach(function (thread) {
          self.threads.push(thread);
        });
        self.start -= (self.pageSize + 1);
        self.events.publish('threads:viewed');
        self.loading = false;
      });
    } else {
      self.favoriteThreadKeys.forEach(key => {
        this.dataService.getThreadsRef().child(key).once('value')
          .then(function (dataSnapshot) {
            self.threads.unshift(self.mappingsService.getThread(dataSnapshot.val(), key));
          });
      });
      self.events.publish('threads:viewed');
      self.loading = false;
    }
  }

The searchThreads() function searches Firebase only when ‘All’ segment button is pressed. It’s a very simple implementation that checks if the title of a thread contains the query text entered by the user.

searchThreads() {
    var self = this;
    if (self.queryText.trim().length !== 0) {
      self.segment = 'all';
      // empty current threads
      self.threads = [];
      self.dataService.loadThreads().then(function (snapshot) {
        self.itemsService.reversedItems<IThread>(self.mappingsService.getThreads(snapshot)).forEach(function (thread) {
          if (thread.title.toLowerCase().includes(self.queryText.toLowerCase()))
            self.threads.push(thread);
        });
      });
    } else { // text cleared..
      this.loadThreads(true);
    }
  }

The last two functions, createThread and viewComments are responsible to push new Pages in the stack. The first one renders the ThreadCreatePage page (we ‘ll create it shortly) using a Modal while the latter simply pushes the ThreadCommentsPage with the thread’s key passed as parameter. The pushed page will read the parameter in order to load the comments posted on that thread.

createThread() {
    var self = this;
    let modalPage = this.modalCtrl.create(ThreadCreatePage);

    modalPage.onDidDismiss((data: any) => {
      if (data) {
        let toast = this.toastCtrl.create({
          message: 'Thread created',
          duration: 3000,
          position: 'bottom'
        });
        toast.present();

        if (data.priority === 1)
          self.newThreads.push(data.thread);

        self.addNewThreads();
      }
    });

    modalPage.present();
  }

  viewComments(key: string) {
    if (this.connected) {
      this.navCtrl.push(ThreadCommentsPage, {
        threadKey: key
      });
    } else {
      this.notify('Network not found..');
    }
  }

Let me remind you that viewComments is an @Output() event fired by a ThreadComponent thread.

 <ion-list *ngIf="!loading">
    <forum-thread *ngFor="let thread of threads" [thread]="thread" (onViewComments)="viewComments($event)"></forum-thread>
  </ion-list>

ionic2-angular2-firebase-24
I have also created some custom css rules for the Threads page inside the threads.scss file.

.thread-card-title {
    font-size: 14x;
    width: 100%;
    font-weight: bold;
    color: black;
    padding: 0px 6px;
    margin-top: 6px;
  }

  .thread-card-question {
    font-size: 1.0em;
    width: 100%;
    padding: 0 10px 0 12px;
    margin-top: 7px;
    color: #424242;
  }

  .wordwrap {
   white-space: normal;      /* CSS3 */
   white-space: -moz-pre-wrap; /* Firefox */
   white-space: -pre-wrap;     /* Opera <7 */
   white-space: -o-pre-wrap;   /* Opera 7 */
   word-wrap: break-word;      /* IE */
}

.segment-button.segment-activated {
    color: black;
    background-color: #f4f4f4;// #ffdd00;
}

.toolbar ion-searchbar .searchbar-input {
  background-color: white;
}

.segment-button {
  color: black;
}

Let’s procceed with the ThreadCreatePage component. Add a folder named thread-create under pages and create the following thread-create.ts, thread-create.html and thread-create.scss files.

import { Component, OnInit } from '@angular/core';
import { Modal, NavController, ViewController, LoadingController } from 'ionic-angular';
import {FORM_DIRECTIVES, FormBuilder, FormGroup, Validators, AbstractControl} from '@angular/forms';

import { IThread } from '../../shared/interfaces';
import { AuthService } from  '../../shared/services/auth.service';
import { DataService } from '../../shared/services/data.service';

@Component({
  templateUrl: 'build/pages/thread-create/thread-create.html',
  directives: [FORM_DIRECTIVES]
})
export class ThreadCreatePage implements OnInit {

  createThreadForm: FormGroup;
  title: AbstractControl;
  question: AbstractControl;
  category: AbstractControl;

  constructor(private nav: NavController,
    private loadingCtrl: LoadingController,
    private viewCtrl: ViewController,
    private fb: FormBuilder,
    private authService: AuthService,
    private dataService: DataService) { }

  ngOnInit() {
    console.log('in thread create..');
    this.createThreadForm = this.fb.group({
      'title': ['', Validators.compose([Validators.required, Validators.minLength(8)])],
      'question': ['', Validators.compose([Validators.required, Validators.minLength(10)])],
      'category': ['', Validators.compose([Validators.required, Validators.minLength(1)])]
    });

    this.title = this.createThreadForm.controls['title'];
    this.question = this.createThreadForm.controls['question'];
    this.category = this.createThreadForm.controls['category'];
  }

  cancelNewThread() {
    this.viewCtrl.dismiss();
  }

  onSubmit(thread: any): void {
    var self = this;
    if (this.createThreadForm.valid) {

      let loader = this.loadingCtrl.create({
        content: 'Posting thread...',
        dismissOnPageChange: true
      });

      loader.present();

      let uid = self.authService.getLoggedInUser().uid;
      self.dataService.getUsername(uid).then(function (snapshot) {
        let username = snapshot.val();

        self.dataService.getTotalThreads().then(function (snapshot) {
          let currentNumber = snapshot.val();
          let newPriority: number = currentNumber === null ? 1 : (currentNumber + 1);

          let newThread: IThread = {
            key: null,
            title: thread.title,
            question: thread.question,
            category: thread.category,
            user: { uid: uid, username: username },
            dateCreated: new Date().toString(),
            comments: null
          };

          self.dataService.submitThread(newThread, newPriority)
            .then(function (snapshot) {
              loader.dismiss()
                .then(() => {
                  self.viewCtrl.dismiss({
                    thread: newThread,
                    priority: newPriority
                  });
                });
            }, function (error) {
              // The Promise was rejected.
              console.error(error);
              loader.dismiss();
            });
        });
      });
    }
  }

}

There is nothing new to explain here except the way a pushed page may return some data to its caller when dismissed. You need an instance of a ViewController to accomplish this.

self.viewCtrl.dismiss({
    thread: newThread,
    priority: newPriority
});
<ion-header>
    <ion-navbar>
        <ion-title>New Thread</ion-title>
        <ion-buttons start>
            <button (click)="cancelNewThread()">
        <ion-icon name="arrow-back"></ion-icon> Cancel
      </button>
        </ion-buttons>
    </ion-navbar>
</ion-header>

<ion-content padding>
    <form [formGroup]="createThreadForm" (ngSubmit)="onSubmit(createThreadForm.value)">
        <ion-item [class.error]="!title.valid && title.touched">
            <ion-label floating>Title</ion-label>
            <ion-input type="text" value="" [formControl]="title"></ion-input>
        </ion-item>
        <div *ngIf="title.hasError('required') && title.touched" class="error-box">* Title is required.</div>
        <div *ngIf="title.hasError('minlength') && title.touched" class="error-box">* Minimum password length is 8.</div>
        <ion-item [class.error]="!question.valid && question.touched">
            <ion-label floating>Question</ion-label>
            <ion-textarea [formControl]="question" rows="6"></ion-textarea>
        </ion-item>
        <div *ngIf="question.hasError('required') && question.touched" class="error-box">* Question is required.</div>
        <div *ngIf="question.hasError('minlength') && question.touched" class="error-box">* Type at least 100 characters.</div>
        <ion-item>
            <ion-label>Category</ion-label>
            <ion-select multiple="false" [formControl]="category">
                <ion-option value="components" checked="true">Components</ion-option>
                <ion-option value="native">Native</ion-option>
                <ion-option value="theming">Theming</ion-option>
                <ion-option value="ionicons">Ionicons</ion-option>
                <ion-option value="cli">CLI</ion-option>
            </ion-select>
        </ion-item>
        <div *ngIf="category.hasError('minlength')" class="error-box">* Select at least one category.</div>
        <br/><br/>
        <button type="submit" class="custom-button" [disabled]="!createThreadForm.valid" block>Submit</button>
    </form>
</ion-content>
.error-box {
    color: color($colors, danger);
    padding: 10px;
}

Add a new folder named thread-comments and create a thread-comments.ts file. Copy the contents from the repository. Let me explain the core parts of this component. On init, we get thread’s key passed from the previous page using NavParams. Then we load those comments on the page. The structure in Firebase looks like this..
ionic2-angular2-firebase-25
Above you can see two comments for two different threads.

ngOnInit() {
    var self = this;
    self.threadKey = self.navParams.get('threadKey');
    self.commentsLoaded = false;

    self.dataService.getThreadCommentsRef(self.threadKey).once('value', function (snapshot) {
        self.comments = self.mappingsService.getComments(snapshot);
        self.commentsLoaded = true;
    }, function (error) {});
}

We can bind to that specific location in Firebase using the order by child method.

getThreadCommentsRef(threadKey: string) {
    return this.commentsRef.orderByChild('thread').equalTo(threadKey);
}

This page allows the user to mark the thread as Favorite. It does that using an Ionic ActionSheet component. If user adds the thread to his/her favorite collection, a key-value pair is added under the currently logged in user object in Firebase.
ionic2-angular2-firebase-26
ionic2-angular2-firebase-27
Here are the thread-comments.html template and the thread-comments.scss custom stylesheets as well.

<ion-header>
    <ion-navbar>
        <ion-title>Comments</ion-title>
        <ion-buttons end>
            <button (click)="showCommentActions()">
        <ion-icon name="options"></ion-icon>
      </button>
        </ion-buttons>
    </ion-navbar>
</ion-header>

<ion-content>
    <div *ngIf="!commentsLoaded">
        <img src="images/ring.gif" style="display:block; margin:auto" />
    </div>
    <ion-list *ngIf="commentsLoaded">
        <ion-item *ngFor="let comment of comments" text-wrap>
            <ion-card>

                <ion-item>
                    <ion-avatar item-left>
                        <forum-user-avatar [user]="comment.user"></forum-user-avatar>
                    </ion-avatar>
                    <h2>{{comment.user.username}}</h2>
                    <p>{{comment.dateCreated | date:'medium'}}</p>
                </ion-item>

                <ion-card-content class="left-border-primary">
                    <p>{{comment.text}}</p>
                </ion-card-content>

                <ion-row class="left-border-primary">
                    <ion-col>
                        <button primary clear small (click)="vote(true,comment)">
        <ion-icon name="arrow-dropup"></ion-icon>
        <div>{{comment.votesUp}}</div>
      </button>
                    </ion-col>
                    <ion-col>
                        <button primary clear small (click)="vote(false,comment)">
        <ion-icon name="arrow-dropdown"></ion-icon>
        <div>{{comment.votesDown}}</div>
      </button>
                    </ion-col>
                    <ion-col center text-center>
                        <ion-note>
                            {{comment.dateCreated | amTimeAgo:true}}
                        </ion-note>
                    </ion-col>
                </ion-row>

            </ion-card>
        </ion-item>
    </ion-list>
    <ion-fixed class="fixed-div">
        <button fab primary fab-bottom fab-right class="fab-footer" (click)="createComment()">
    <ion-icon name="create" is-active="false"></ion-icon>
  </button>
    </ion-fixed>
</ion-content>
.platform-ios .fixed-div {
  right: 0;
    bottom: 0;
    margin-bottom: 42px;
}

.platform-android .fixed-div {
  right: 0;
    bottom: 0;
    margin-bottom: 56px;
}

.platform-windows .fixed-div {
  right: 0;
    bottom: 0;
}

ion-card .item + ion-card-content {
    padding-top: 7px;
}

There’s a Fab button on the template that opens the CommentCreatePage. The logic is all the same so just create a folder named comment-create under pages and add the following comment-create.ts, comment-create.html files.

import { Component, OnInit } from '@angular/core';
import { Modal, NavController, ViewController, LoadingController, NavParams } from 'ionic-angular';
import {FORM_DIRECTIVES, FormBuilder, FormGroup, Validators, AbstractControl} from '@angular/forms';

import { IComment, IUser } from '../../shared/interfaces';
import { AuthService } from '../../shared/services/auth.service';
import { DataService } from '../../shared/services/data.service';

@Component({
  templateUrl: 'build/pages/comment-create/comment-create.html',
  directives: [FORM_DIRECTIVES]
})
export class CommentCreatePage implements OnInit {

  createCommentForm: FormGroup;
  comment: AbstractControl;
  threadKey: string;
  loaded: boolean = false;

  constructor(private nav: NavController,
    private navParams: NavParams,
    private loadingCtrl: LoadingController,
    private viewCtrl: ViewController,
    private fb: FormBuilder,
    private authService: AuthService,
    private dataService: DataService) {

  }

  ngOnInit() {
    this.threadKey = this.navParams.get('threadKey');

    this.createCommentForm = this.fb.group({
      'comment': ['', Validators.compose([Validators.required, Validators.minLength(10)])]
    });

    this.comment = this.createCommentForm.controls['comment'];
    this.loaded = true;
  }

  cancelNewComment() {
    this.viewCtrl.dismiss();
  }

  onSubmit(commentForm: any): void {
    var self = this;
    if (this.createCommentForm.valid) {

      let loader = this.loadingCtrl.create({
        content: 'Posting comment...',
        dismissOnPageChange: true
      });

      loader.present();

      let uid = self.authService.getLoggedInUser().uid;
      self.dataService.getUsername(uid).then(function (snapshot) {
        let username = snapshot.val();

        let commentRef = self.dataService.getCommentsRef().push();
        let commentkey: string = commentRef.key;
        let user: IUser = { uid: uid, username: username };

        let newComment: IComment = {
          key: commentkey,
          text: commentForm.comment,
          thread: self.threadKey,
          user: user,
          dateCreated: new Date().toString(),
          votesUp: null,
          votesDown: null
        };

        self.dataService.submitComment(self.threadKey, newComment)
          .then(function (snapshot) {
            loader.dismiss()
              .then(() => {
                self.viewCtrl.dismiss({
                  comment: newComment,
                  user: user
                });
              });
          }, function (error) {
            // The Promise was rejected.
            console.error(error);
            loader.dismiss();
          });
      });
    }
  }
}
<ion-header>
    <ion-navbar>
        <ion-title>New Comment</ion-title>
        <ion-buttons start>
            <button (click)="cancelNewComment()">
        <ion-icon name="arrow-back"></ion-icon> Cancel
      </button>
        </ion-buttons>
    </ion-navbar>
</ion-header>

<ion-content padding>
    <form [formGroup]="createCommentForm" (ngSubmit)="onSubmit(createCommentForm.value)" *ngIf="loaded">
        <ion-item [class.error]="!comment.valid && comment.touched">
            <ion-label floating>Comment</ion-label>
            <ion-textarea [formControl]="comment" rows="10"></ion-textarea>
        </ion-item>
        <div *ngIf="comment.hasError('required') && comment.touched" class="error-box">* Comment is required.</div>
        <div *ngIf="comment.hasError('minlength') && comment.touched" class="error-box">* Type at least 100 characters.</div>
        <br/><br/>
        <button type="submit" class="custom-button" [disabled]="!createCommentForm.valid" block>Submit</button>
    </form>
</ion-content>

Profile Page

This page displays some basic info about the user such as username or date of birth, fields that created during registration plus some statistics, such as how many threads and comments has the user created. More over will allow the user to upload a new image from his/her mobile Camera or Album folder. For this we will need to import a cordova plugin. Add a folder named profile under pages and create a profile.ts file. Copy the contents from here. Let’s explain the most important parts of this component. The imports statements should be familiar to you by now except for a new one, the Camera ionic-native plugin. Run the following command to install this plugin.

ionic plugin add cordova-plugin-camera
import {Component, OnInit} from '@angular/core';
import {NavController, LoadingController, ActionSheetController } from 'ionic-angular';
import { Camera, CameraOptions } from 'ionic-native';

import { IUser } from '../../shared/interfaces';
import { UserAvatarComponent } from '../../shared/directives/user-avatar.component';
import { AuthService } from '../../shared/services/auth.service';
import { DataService } from '../../shared/services/data.service';

The loadUserProfile is the core function that gets all user’s data. It calls the getUserData() that fills the Firebase’s account data, then loads user’s image from the storage using the getDownloadURL function. It also calls the getUserThreads() and getUserComments() functions to count the number of threads and comments submitted by this user.

loadUserProfile() {
    var self = this;
    self.userDataLoaded = false;

    self.getUserData().then(function (snapshot) {
      let userData: any = snapshot.val();

      self.getUserImage().then(function (url) {
        self.userProfile = {
          username: userData.username,
          dateOfBirth: userData.dateOfBirth,
          image: url,
          totalFavorites: userData.hasOwnProperty('favorites') === true ?
            Object.keys(userData.favorites).length : 0
        };

        self.user = {
          uid : self.firebaseAccount.uid,
          username : userData.username
        };

        self.userDataLoaded = true;
      }).catch(function (error) {
        console.log(error.code);
        self.userProfile = {
          username: userData.username,
          dateOfBirth: userData.dateOfBirth,
          image: 'images/profile.png',
          totalFavorites: userData.hasOwnProperty('favorites') === true ?
            Object.keys(userData.favorites).length : 0
        };
        self.userDataLoaded = true;
      });
    });

    self.getUserThreads();
    self.getUserComments();
  }

  getUserData() {
    var self = this;

    self.firebaseAccount = self.authService.getLoggedInUser();
    return self.dataService.getUser(self.authService.getLoggedInUser().uid);
  }

  getUserImage() {
    var self = this;

    return self.dataService.getStorageRef().child('images/' + self.firebaseAccount.uid + '/profile.png').getDownloadURL();
  }

  getUserThreads() {
    var self = this;

    self.dataService.getUserThreads(self.authService.getLoggedInUser().uid)
      .then(function (snapshot) {
        let userThreads: any = snapshot.val();
        if (userThreads !== null) {
          self.userStatistics.totalThreads = Object.keys(userThreads).length;
        } else {
          self.userStatistics.totalThread = 0;
        }
      });
  }

  getUserComments() {
    var self = this;

    self.dataService.getUserComments(self.authService.getLoggedInUser().uid)
      .then(function (snapshot) {
        let userComments: any = snapshot.val();
        if (userComments !== null) {
          self.userStatistics.totalComments = Object.keys(userComments).length;
        } else {
          self.userStatistics.totalComments = 0;
        }
      });
  }

We use again an ActionSheet to present the user with the available options for uploading a new profile image.

openImageOptions() {
    var self = this;

    let actionSheet = self.actionSheeCtrl.create({
      title: 'Upload new image from',
      buttons: [
        {
          text: 'Camera',
          icon: 'camera',
          handler: () => {
            self.openCamera(Camera.PictureSourceType.CAMERA);
          }
        },
        {
          text: 'Album',
          icon: 'folder-open',
          handler: () => {
            self.openCamera(Camera.PictureSourceType.PHOTOLIBRARY);
          }
        }
      ]
    });

    actionSheet.present();
  }

ionic2-angular2-firebase-28
Depending of what the user selects, the openCamera() function will be called with the respective source parameter. Of course all cordova plugins are only available while running the app on your mobile, not in the browser. The openCamera() function will open either the mobile’s Camera or the Photo album gallery and when done, will capture and convert the data into a Blob which is required by Firebase for uploading files. The startUploadingImage function is quite similar with the one described in the signup page.

openCamera(pictureSourceType: any) {
    var self = this;

    let options: CameraOptions = {
      quality: 95,
      destinationType: Camera.DestinationType.DATA_URL,
      sourceType: pictureSourceType,
      encodingType: Camera.EncodingType.PNG,
      targetWidth: 400,
      targetHeight: 400,
      saveToPhotoAlbum: true,
      correctOrientation: true
    };

    Camera.getPicture(options).then(imageData => {
      const b64toBlob = (b64Data, contentType = '', sliceSize = 512) => {
        const byteCharacters = atob(b64Data);
        const byteArrays = [];

        for (let offset = 0; offset < byteCharacters.length; offset += sliceSize) {
          const slice = byteCharacters.slice(offset, offset + sliceSize);

          const byteNumbers = new Array(slice.length);
          for (let i = 0; i < slice.length; i++) {
            byteNumbers[i] = slice.charCodeAt(i);
          }

          const byteArray = new Uint8Array(byteNumbers);

          byteArrays.push(byteArray);
        }

        const blob = new Blob(byteArrays, { type: contentType });
        return blob;
      };

      let capturedImage: Blob = b64toBlob(imageData, 'image/png');
      self.startUploading(capturedImage);
    }, error => {
      console.log('ERROR -> ' + JSON.stringify(error));
    });
  }

Interested to see how it ‘ll look like when running from the device? Me too.
ionic2-angular2-firebase-38
Here is the profile.html template as well.

<ion-header>
    <ion-navbar>
        <button menuToggle>
        <ion-icon name='menu'></ion-icon>
    </button>
        <ion-title>Profile</ion-title>
        <ion-buttons end>
            <button (click)="openImageOptions()">
            <ion-icon name="camera"></ion-icon>
      </button>
            <button (click)="reload()">
        <ion-icon name="refresh"></ion-icon>
      </button>
        </ion-buttons>
    </ion-navbar>
</ion-header>
<ion-content>
    <div *ngIf="!userDataLoaded">
        <img src="images/ring.gif" style="display:block; margin:auto" />
    </div>

    <ion-list no-border *ngIf="userDataLoaded">

        <ion-list-header>
            Basic Info
        </ion-list-header>
        <ion-item>
            <ion-thumbnail item-left>
                <!--<img src="{{userProfile.image}}">-->
                <forum-user-avatar [user]="user" *ngIf="userDataLoaded"></forum-user-avatar>
            </ion-thumbnail>
            <h2>{{userProfile.username}}</h2>
            <p>{{firebaseAccount.email}}</p>
        </ion-item>

        <ion-item>
            <ion-icon name='calendar' item-left></ion-icon>
            Date of Birth
            <ion-note item-right>
                {{userProfile.dateOfBirth}}
            </ion-note>
        </ion-item>

        <ion-item>
            <ion-icon name='cloud-upload' item-left></ion-icon>
            <ion-note item-right>
                {{firebaseAccount.U}}
            </ion-note>
        </ion-item>

    </ion-list>


    <ion-list *ngIf="userDataLoaded">

        <ion-list-header>
            Activity
        </ion-list-header>

        <ion-item>
            # Threads
            <ion-icon name='text' item-left></ion-icon>
            <ion-badge item-right>{{userStatistics.totalThreads}}</ion-badge>
        </ion-item>

        <ion-item>
            # Comments
            <ion-icon name='quote' item-left></ion-icon>
            <ion-badge item-right>{{userStatistics.totalComments}}</ion-badge>
        </ion-item>
        <ion-item>
            # Favorites
            <ion-icon name='heart' item-left></ion-icon>
            <ion-badge item-right>{{userProfile.totalFavorites}}</ion-badge>
        </ion-item>

    </ion-list>
</ion-content>

The About tab page displays some info about the app. It is the simplest page and the only noticable thing to explain is the InAppBrowser plugin used. We want to be able to open links in browser through this page so go ahead and install the plugin.

ionic plugin add cordova-plugin-inappbrowser

Opening URLs in app Browser couldn’t be easier. Add a new folder named about in pages and create the about.ts file.

import {Component} from '@angular/core';
import {NavController} from 'ionic-angular';
import { InAppBrowser } from 'ionic-native';

@Component({
  templateUrl: 'build/pages/about/about.html'
})
export class AboutPage {

  constructor(private navCtrl: NavController) {
  }

  openUrl(url) {
    let browser = new InAppBrowser(url, '_blank', 'location=yes');
  }
}

And the about.html template..

<ion-header>
    <ion-navbar>
        <button menuToggle>
        <ion-icon name='menu'></ion-icon>
    </button>
        <ion-title>About</ion-title>
    </ion-navbar>
</ion-header>
<ion-content padding>
    <ion-card>
        <img src="images/wordpress.png" />
        <ion-card-content>
            <ion-card-title>
                chsakell's Blog
            </ion-card-title>
            <p>
                This app is a genuine contribution by Chris Sakellarios. Step by step walkthrough on how to build hybrid-mobile apps using
                Ionic 2, Angular 2 and Firebase
            </p>
        </ion-card-content>
        <ion-row no-padding>
            <ion-col>
                <button clear small danger>
                <ion-icon name='book'></ion-icon>
                Post
                </button>
        </ion-col>
            <ion-col text-center>
                <button clear small danger (click)="openUrl('https://twitter.com/chsakellsblog')">
                <ion-icon name='twitter'></ion-icon>
                Twitter
                </button>
            </ion-col>
            <ion-col text-center>
                <button clear small danger (click)="openUrl('https://facebook.com/chsakells.blog')">
                <ion-icon name='facebook'></ion-icon>
                Facebook
                </button>
            </ion-col>
        </ion-row>
    </ion-card>
    <ion-card>
        <img src="images/github.jpg" />
        <ion-card-content>
            <ion-card-title>
                Github repository
            </ion-card-title>
            <p>
                Application's source code is fully available on Github and distributed under MIT licence.
            </p>
        </ion-card-content>
        <ion-row no-padding>
            <ion-col>
                <button clear small danger (click)="openUrl('https://github.com/chsakell/ionic2-angular2-firebase')">
                <ion-icon name='git-network'></ion-icon>
                Code
                </button>
        </ion-col>
            <ion-col text-center>
                <button clear small danger>
                <ion-icon name='share'></ion-icon>
                Share
                </button>
            </ion-col>
        </ion-row>
    </ion-card>
    <ion-card>
        <img src="images/firebase.png" />
        <ion-card-content>
            <ion-card-title>
                Built on Firebase
            </ion-card-title>
            <p>
                Application makes use of the powerfull Firebase data store.
            </p>
        </ion-card-content>
    </ion-card>
</ion-content>

SQLite Service

We ‘ve said that we want our app to be able to display content (at least some threads) while being in offline mode. For this we need to have our data stored locally on the device. We will use the SQLite cordova plugin to accomplish our goal, and we ‘ll make sure that every time the user disconnects, the currently loaded threads are being saved in a database on the mobile device. You can store any data you wish but for simplicity we will only store threads and users. In case you are unfamiliar with SQLite, here is a good tutorial to start with. First of all, install SQLite plugin by running the following command.

ionic plugin add cordova-sqlite-storage

Add an sqlite.service.ts file under shared/services folder and paste the contents from here. First we import all modules needed.

import { Injectable } from '@angular/core';
import { SQLite } from 'ionic-native';

import { IThread, IComment, IUser } from '../interfaces';
import { ItemsService } from '../services/items.service';

The InitDatabase() function will be called once when the app starts. It will create a forumdb.db database if not exists and open a connection to it.

InitDatabase() {
    var self = this;
    this.db = new SQLite();
    self.db.openDatabase({
        name: 'forumdb.db',
        location: 'default' // the location field is required
    }).then(() => {
        self.createThreads();
        self.createComments();
        self.createUsers();
    }, (err) => {
        console.error('Unable to open database: ', err);
    });
}

In case you come from a relational database background, you will find createThreads, createComments and createUsers functions more than familiar.

createThreads() {
    var self = this;
    self.db.executeSql('CREATE TABLE IF NOT EXISTS Threads ( key VARCHAR(255) PRIMARY KEY NOT NULL, title text NOT NULL, question text NOT NULL, category text NOT NULL, datecreated text, USER VARCHAR(255), comments INT NULL);', {}).then(() => {
    }, (err) => {
        console.error('Unable to create Threads table: ', err);
    });
}

createComments() {
    var self = this;
    self.db.executeSql('CREATE TABLE IF NOT EXISTS Comments ( key VARCHAR(255) PRIMARY KEY NOT NULL, thread VARCHAR(255) NOT NULL, text text NOT NULL, USER VARCHAR(255) NOT NULL, datecreated text, votesUp INT NULL, votesDown INT NULL);', {}).then(() => {
    }, (err) => {
        console.error('Unable to create Comments table: ', err);
    });
}

createUsers() {
    var self = this;
    self.db.executeSql('CREATE TABLE IF NOT EXISTS Users ( uid text PRIMARY KEY NOT NULL, username text NOT NULL); ', {}).then(() => {
    }, (err) => {
        console.error('Unable to create Users table: ', err);
    });
}

The functions create corresponding tables in case they don’t exist yet. We save users of type IUser using the following two functions.

saveUsers(users: IUser[]) {
    var self = this;

    users.forEach(user => {
        self.addUser(user);
    });
}

addUser(user: IUser) {
    var self = this;
    let query: string = 'INSERT INTO Users (uid, username) Values (?,?)';
    self.db.executeSql(query, [user.uid, user.username]).then((data) => {
        console.log('user ' + user.username + ' added');
    }, (err) => {
        console.error('Unable to add user: ', err);
    });
}

Notice how we pass input parameters on the executeSql function. Same applies for saving threads of type IThread.

saveThreads(threads: IThread[]) {
    let self = this;
    let users: IUser[] = [];

    threads.forEach(thread => {
        if (!self.itemsService.includesItem<IUser>(users, u => u.uid === thread.user.uid)) {
            console.log('in add user..' + thread.user.username);
            users.push(thread.user);
        } else {
            console.log('user found: ' + thread.user.username);
        }
        self.addThread(thread);
    });

    self.saveUsers(users);
}

addThread(thread: IThread) {
    var self = this;

    let query: string = 'INSERT INTO Threads (key, title, question, category, datecreated, user, comments) VALUES (?,?,?,?,?,?,?)';
    self.db.executeSql(query, [
        thread.key,
        thread.title,
        thread.question,
        thread.category,
        thread.dateCreated,
        thread.user.uid,
        thread.comments
    ]).then((data) => {
        console.log('thread ' + thread.key + ' added');
    }, (err) => {
        console.error('Unable to add thread: ', err);
    });
    }

Ok, we save data but how do we read them? There is a getThreads() function called from the ThreadsPage component which not only selects threads from the Threads table but also joins records with the Users. I have also created a printThreads method in order to understand how easy is reading data using SQLite.

getThreads(): any {
    var self = this;
    return self.db.executeSql('SELECT Threads.*, username FROM Threads INNER JOIN Users ON Threads.user = Users.uid', {});
}

printThreads() {
    var self = this;
    self.db.executeSql('SELECT * FROM Threads', {}).then((data) => {
        if (data.rows.length > 0) {
            for (var i = 0; i < data.rows.length; i++) {
                console.log(data.rows.item(i));
                console.log(data.rows.item(i).key);
                console.log(data.rows.item(i).title);
                console.log(data.rows.item(i).question);
            }
        } else {
            console.log('no threads found..');
        }
    }, (err) => {
        console.error('Unable to print threads: ', err);
    });
}

Bootstrap the Ionic Forum app

The last component remained to add is the first been called when the app fires. Copy the contents of the ForumApp component in the app.ts from here. Let’s take it step by step. The ngOnInit() function ensures that when user is unauthenticated, the LoginPage becomes the root page. Don’t use nav.push here, cause pressing the hardware back button will render the previous page on the stack.

ngOnInit() {
    var self = this;
    // This watches for Authentication events
    this.authService.onAuthStateChanged(function (user) {
        if (user === null) {
        self.menu.close();
        self.nav.setRoot(LoginPage);
        }
    });
    }

The signout() and isUserLoggedIn() methods are self-explanatory.

signout() {
    var self = this;
    self.menu.close();
    self.authService.signOut();
  }

  isUserLoggedIn(): boolean {
    let user = this.authService.getLoggedInUser();
    return user !== null;
  }

The openPage(page) function is called from the menu. You can add any other items you wish on that menu.

openPage(page) {
    let viewCtrl: ViewController = this.nav.getActive();
    // close the menu when clicking a link from the menu
    this.menu.close();

    if (page === 'signup') {
      if (!(viewCtrl.instance instanceof SignupPage))
        this.nav.push(SignupPage);
    }
  }

We import the Network ionic native plugin for detecting network changes (connect-reconnect). Install the plugin by running the following command.

ionic plugin add cordova-plugin-network-information

Any plugin initialization code should be placed inside the platform.ready() event which ensures that all cordova plugins are available. We also make sure we are not deploying the app on our local browser using the window.cordova. This will prevent console errors when deploying your app in your local browser using the command ionic serve –lab

platform.ready().then(() => {
      if (window.cordova) {
        // Okay, so the platform is ready and our plugins are available.
        // Here you can do any higher level native things you might need.
        StatusBar.styleDefault();
        self.watchForConnection();
        self.watchForDisconnect();
        Splashscreen.hide();

        console.log('in ready..');
        let array: string[] = platform.platforms();
        console.log(array);
        let isAndroid: boolean = platform.is('android');
        let isIos: boolean = platform.is('ios');
        let isWindows: boolean = platform.is('windows');
        self.sqliteService.InitDatabase();
      }
    });
  }

  watchForConnection() {
    var self = this;
    let connectSubscription = Network.onConnect().subscribe(() => {
      console.log('network connected!');
      // We just got a connection but we need to wait briefly
      // before we determine the connection type.  Might need to wait
      // prior to doing any api requests as well.
      setTimeout(() => {
        console.log(Network.connection);
          console.log('we got a connection..');
          console.log('Firebase: Go Online..');
          self.dataService.goOnline();
          self.events.publish('network:connected', true);
      }, 3000);
    });
  }

  watchForDisconnect() {
    var self = this;
    // watch network for a disconnect
    let disconnectSubscription = Network.onDisconnect().subscribe(() => {
      console.log('network was disconnected😦');
      console.log('Firebase: Go Offline..');
      self.sqliteService.resetDatabase();
      self.dataService.goOffline();
      self.events.publish('network:connected', false);
    });
  }

On connect or disconnect we publish the network-connected event so that subscribers do what they have to do, for example save currently loaded threads in the device database. We also reset the SQLite database in order to store only the currently loaded threads. This is probably not what you would do in a production app but we ‘ll do it to keep things simple. We want SQLite database to have always the last loaded threads and only. Another plugin we used is the SplashScreen. Install it by running the following command.

ionic plugin add cordova-plugin-splashscreen

We call the Splashscreen.hide() method in order to hide the splashscreen when the app starts, otherwise you may wait for some seconds due to default timeouts.

Theming

Theming your ionic app is crusial and app/theme folder contains SASS files either platform specific or generic. In case you used custom SASS stylesheets in your pages, like we did before, you need to import those files in the app.core.scss file otherwise you will not see the changes.

// http://ionicframework.com/docs/v2/theming/


// App Shared Imports
// --------------------------------------------------
// These are the imports which make up the design of this app.
// By default each design mode includes these shared imports.
// App Shared Sass variables belong in app.variables.scss.

@import "../pages/tabs/tabs";
@import "../pages/threads/threads";
@import "../pages/thread-create/thread-create";
@import "../pages/thread-comments/thread-comments";

I have also added some styles in the app.variables.css file..

$toolbar-background : #0087be;
//$list-background-color : white;
$card-ios-background-color: #f4f4f4;
$card-md-background-color: #f4f4f4;
$card-wp-background-color: #f4f4f4;
scroll-content { background-color: whitesmoke;}
ion-list .item .item-inner {
    background: whitesmoke;
}
.item {
    background-color: whitesmoke !important;
}

ion-card {
    background: white !important;
}

.left-border-primary {
    border-left: 4px solid #0087be;
}

When you deploy your app for the first time (we will talk about this soon), you ‘ll see a default splash screen which apparently isn’t what you really want. You probably want to customise this image to reflect maybe your company’s brand. Ionic-CLI can do that for you with a sigle command but you need to make some preparations first. There is a resources folder in your application with two important files over there, the icon.png and the splash.png images. All you need to do is replace those files with your .png files. You need to make sure though that the files have proper sizes such as 1024×1024 for the icon.png and 2208×2208 for the splash.png. More over validate that your images are really .png files. Check why here. The ionic-command you need to run next in order to generate all the required files for you is the following.

ionic resources

Before running that command though you need to add at least one platform module to your app. Run one of the following commands depending which platform you wish to build for.

ionic platform add android
ionic platform add ios

ion-resources command will place new generated files inside the resources/platform/icon and resources/platform/splash respectively.

Running the Forum app

If you want run the Forum app in your browser, all you have to do is type the following command.

ionic serve --lab

This command will open the app in your default browser and display it in three different modes, IOS, Android and Windows. This mode is more than enough during development but remember, you cannot test native features such as the Camera or the Network plugins we added before. When you decide to run the app on your device, either this is an IOS, an Android or a Windows, you need to install some prerequisites first. Following are the steps you need to follow depending on the type of your device.

  1. Android Platform Guide
  2. iOS Platform Guide
  3. Windows Platform Guide

You do not need to follow all the steps to run the app on your phone. For example let me tell you what I did in order to deploy the Forum app on my Android device.

  1. I installed Java Development Kit (JDK) 7 and set the environment variables
  2. I installed Android Studio. Next I opened it and navigate to Tools/Android/SDK Manager
    ionic2-angular2-firebase-29
  3. Install and add the SDK Android packages I was interested to build my app for.
    ionic2-angular2-firebase-30
  4. Set my device properly. Mind that I followed only the Run on a Real Device steps.
  5. Run the command ionic platform add android
  6. Connect my device on my computer and run the command ionic run android.

In case you have trouble deploying the app on your phone, check your environment variables. Here’s what I have.
ionic2-angular2-firebase-31

Debugging in Chrome

You may ask yourself how do I know if my app crashes or throws an exception while running on the device? Fortunatelly, Chrome gives you the ability to check what is going on in your app while running on the device. All you have to do is connect your device to your computer, open developer tools or press F12 and select More tools -> Insperct devices.
ionic2-angular2-firebase-34
Open the Forum app and Chrome will detect your device and WebView running the app.
ionic2-angular2-firebase-35
Click Inspect and a new window will open, display the contents of your device in real time. You can even control your app running in WebView from the browser. Mind that is very possible for the app to get slow when debuggin in Chrome but the important thing is that you can see all your logs in the console.
ionic2-angular2-firebase-36

Discussion – Architecture

What we created is a mobile app running on client devices and a backend infrastructure hosted on Firebase that not only stores and serves all data but also handles all the authentication logic itself. More over it syncs all data instantly to all connected clients.
ionic2-angular2-firebase-32
Is this schema sufficient? Maybe for smalls apps, apps that handle notes or todo items but certainly not for complicated ones. The latter require business logic which in turn may require complex operations which is kind of difficult to execute on Firebase. Even if you could execute complex queries on Firebase, it is unacceptable to keep the business logic on the client’s device. The missing part on the previous architecture is a web server, an API that could execute server side code and also communicate with Firebase as well. In many cases, a relational database is required too. Both the API and app clients may communicate directly with Firebase but for different reasons. Let’s take a look how that architecture would look like and then give an example.
ionic2-angular2-firebase-33
Consider the scenario where a user decides to post a comment on a thread. The app doesn’t submit the comment directly to Firebase but instead sends an HTTP POST request to the API, containing all comment’s data (content, user, thread key, etc..). The API runs validation logic such as to ensure that the comment doesn’t contain offensive words which in turn are stored in an SQL Server database. Or it could check that the user posted the comment is eligible / allowed to post comments on that thread. On successfull validation the API would submit only the ammount of data needed to the corresponding location in Firebase which finally will make sure to sync the comment to all connected clients.

Conclusion

That’s it we have finished! We have seen how to build a full featured Ionic 2 application using Firebase infrastucture. We started from scratch, setting the Firebase envrironment and installing Ionic 2 CLI. We described how to use native device features by installing Cordova plugins and how to build for a specific flatform. I hope you enjoyed this post as much as I did.

Source Code: You can find the source code for this project here where you will also find instructions on how to run the application.

In case you find my blog’s content interesting, register your email to receive notifications of new posts and follow chsakell’s Blog on its Facebook or Twitter accounts.

Facebook Twitter
.NET Web Application Development by Chris S.
facebook twitter-small

Real-time applications using ASP.NET Core, SignalR & Angular

$
0
0

Real-time web applications are apps that push user experience to the limits while trying to immediately reflect data changes to a great number of connected clients. You make use of such applications on a daily basis, Facebook and Twitter are some of them. There are several ways to design and implement Real-time web applications and of course Microsoft made sure to provide you with a remarkable library named SignalR. The idea behind SignalR is let the server push changes automatically to connected clients instead of having each client polling the server on time intervals. And what does connected clients means anyway? The answer is hidden behind the concept of the HTTP persistent connections which are connections that may remain opened for a long time, in contrast with the tradional HTTP Connections that can be disconnected. The persistent connection remains opened due to certain type of packet exchanging between a client and the server. When a client calls a SignalR method on the server, the server is able to uniquely identify the connection ID of the caller.

What this post is all about

SignalR has been out for a long time but ASP.NET Core and Angular 2 aren’t. On this post we ‘ll see what takes to bind all those frameworks and libraries together and build a Real time application. This is not an Angular tutorial nor a SignalR one. Because of the fact that the final project associated to this post contains code that we have already seen on previous posts, I will only explain the parts that you actually need to know in order to build a real time application. And this is why I will strongly recomend you to download the Live-Game-Feed app and study the code along with me without typing it. Here’s what we ‘ll see in more detail..

  • Fire up an empty ASP.NET Core web application using yeoman
  • Configure and install MVC and SignalR Server dependencies
  • Install SignalR Client-Typescript dependencies
  • Create a SignalR hub
  • Integrate MVC Controllers (API) with SignalR
  • Create the Angular-SignalR service to communicate with SignalR hubs
  • Add Reccurent Tasks on a ASP.NET Core application
  • Have fun with the final App!

About the LiveGameFeed app

The app simulates a web application that users may visit and watch matches live. I am sure you are aware of plenty of such websites, most of them are related to betting. The idea is that there will be two matches running, and every time score is updated all connected clients will receive the update. On the other hand, if a user also wants to getting live feed for a specific match then he/she has to be subscibed to the match. More over, if subscribed, the user will be able to post messages related to that match while those messages will be pushed and read only by users also subscribed to the that match. Why don’t we take a look at the LiveGameFeed app (zoom out a little bit if needed so that you can see both clients)..
aspnet-core-signalr-angular-05
Are you ready? Let’s start!

Fire up an empty ASP.NET Core web application using yeoman

I assume you have already installed .NET Core on your platform and you have opened the Live-Game-Feed app on your favorite text editor. You can start a .NET Core application either using the dotnet-new cli command or using the open-source yeoman tool. I picked the latter choise cause there are some great options to fire up a ASP.NET Core application. In order to use yeoman you need to run the following commands.

npm install -g yo bower
npm install -g generator-aspnet

Next, open a console and navigate where you want to fire up the project and run the following command:

yo aspnet

The tool will give you some options to start with.
aspnet-core-signalr-angular-01
Select Empty Web Application and give a name for your app.
aspnet-core-signalr-angular-02
Open the created folder in your editor (mine is Visual Studio Code) and check the files created. Those are the minimum files required for an empty Web Application. Navigate inside the app’s root folder and restore .NET packages by running the following command.

dotnet restore

As you can see, Visual Studio Code has also an integrated terminal which certainly makes your life easier.
aspnet-core-signalr-angular-03
Then make sure that all have been set properly by running the app..

dotnet run

Of course you will only get the famous Hello world! response but it’s more than enough at the moment.

Configure and install MVC and SignalR Server dependencies

The next step in to install ASP.NET Core MVC and SignalR packages and add them into the pipeline as well. Your project.json file should look like this:

{
  "dependencies": {
    "AutoMapper.Data": "1.0.0-beta1",
    "Microsoft.NETCore.App": {
      "version": "1.0.0-*",
      "type": "platform"
    },
    "Microsoft.AspNet.WebApi.Client": "5.1.1",
    "Microsoft.AspNetCore.Mvc": "1.0.1",
    "Microsoft.AspNetCore.Routing": "1.0.1",
    "Microsoft.AspNetCore.Server.IISIntegration": "1.0.0",
    "Microsoft.AspNetCore.Server.Kestrel": "1.0.1",
    "Microsoft.AspNetCore.SignalR.Server": "0.2.0-*",
    "Microsoft.AspNetCore.StaticFiles": "1.1.0-*",
    "Microsoft.AspNetCore.WebSockets": "0.2.0-*",
    "Microsoft.EntityFrameworkCore": "1.0.1",
    "Microsoft.EntityFrameworkCore.InMemory": "1.0.0",
    "Microsoft.EntityFrameworkCore.Relational": "1.0.1",
    "Microsoft.Extensions.Configuration.EnvironmentVariables": "1.0.0",
    "Microsoft.Extensions.Configuration.FileExtensions": "1.0.0",
    "Microsoft.Extensions.Configuration.Json": "1.0.0",
    "Microsoft.Extensions.Configuration.CommandLine": "1.0.0",
    "Microsoft.Extensions.Logging": "1.0.0",
    "Microsoft.Extensions.Logging.Console": "1.0.0",
    "Microsoft.Extensions.Logging.Debug": "1.0.0",
    "Microsoft.Extensions.Options.ConfigurationExtensions": "1.0.0",
    "RecurrentTasks": "3.0.0-beta1"
  },

  "tools": {
    "Microsoft.AspNetCore.Server.IISIntegration.Tools": "1.0.0-preview2-final"
  },

  "frameworks": {
    "netcoreapp1.0": {
      "imports": [
        "dotnet5.6",
        "portable-net45+win8"
      ]
    }
  },

  "buildOptions": {
    "emitEntryPoint": true,
    "preserveCompilationContext": true,
    "debugType": "portable"
  },

  "runtimeOptions": {
    "configProperties": {
      "System.GC.Server": true
    }
  },

  "publishOptions": {
    "include": [
      "wwwroot",
      "Views",
      "Areas/**/Views",
      "appsettings.json",
      "web.config"
    ]
  },

  "scripts": {
    "postpublish": [ "dotnet publish-iis --publish-folder %publish:OutputPath% --framework %publish:FullTargetFramework%" ]
  },

  "tooling": {
    "defaultNamespace": "LiveGameFeed"
  }
}

Following are the most interesting packages to notice:

"Microsoft.AspNetCore.Mvc": "1.0.1"
"Microsoft.AspNetCore.SignalR.Server": "0.2.0-*"
"Microsoft.AspNetCore.WebSockets": "0.2.0-*"

If you try to restore the packages you will get the following error..

log  : Restoring packages for c:\Users\chsakell\Desktop\LiveGameFeed\project.json...
error: Unable to resolve 'Microsoft.AspNetCore.SignalR.Server (>= 0.2.0)' for '.NETCoreApp,Version=v1.0'.
error: Unable to resolve 'Microsoft.AspNetCore.StaticFiles (>= 1.1.0)' for '.NETCoreApp,Version=v1.0'.
error: Unable to resolve 'Microsoft.AspNetCore.WebSockets (>= 0.2.0)' for '.NETCoreApp,Version=v1.0'.
log  : Restoring packages for tool 'Microsoft.AspNetCore.Server.IISIntegration.Tools' in c:\Users\chsakell\Desktop\LiveGameFeed\project.json...
log  : Writing lock file to disk. Path: c:\Users\chsakell\Desktop\LiveGameFeed\project.lock.json
log  : c:\Users\chsakell\Desktop\LiveGameFeed\project.json
log  : Restore failed in 10232ms.

Errors in c:\Users\chsakell\Desktop\LiveGameFeed\project.json
Unable to resolve 'Microsoft.AspNetCore.SignalR.Server (>= 0.2.0)' for '.NETCoreApp,Version=v1.0'.
Unable to resolve 'Microsoft.AspNetCore.StaticFiles (>= 1.1.0)' for '.NETCoreApp,Version=v1.0'.
Unable to resolve 'Microsoft.AspNetCore.WebSockets (>= 0.2.0)' for '.NETCoreApp,Version=v1.0'.

This error occurred cause you miss NuGet package configuration which is needed in order to install the SignalR and WebSockets packages. Add a NuGet.config file at the root of your app and set it as follow:

<?xml version="1.0" encoding="utf-8"?>
<configuration>
  <packageSources>
    <add key="AspNetCore" value="https://dotnet.myget.org/F/aspnetcore-ci-dev/api/v3/index.json" />
    <add key="NuGet" value="https://api.nuget.org/v3/index.json" />
  </packageSources>
</configuration>

Now the dotnet restore command will not fail. You add MVC and SignalR into the pipeline in the same way you add any other middleware. In the Startup.cs file you will find the following commands into the ConfigureServices method..

// Add framework services.
services
    .AddMvc()
    .AddJsonOptions(options => options.SerializerSettings.ContractResolver =
        new DefaultContractResolver());

services.AddSignalR(options => options.Hubs.EnableDetailedErrors = true);

.. and in the Configure method..

app.UseMvc(routes =>
{
    routes.MapRoute(
        name: "default",
        template: "{controller=Home}/{action=Index}/{id?}");
});
app.UseSignalR();

You will find that in the finished Startup.cs file I have also set dependency injection for the data repositories, Entity Framework InMemoryDatabase provider and some recurrent tasks to run using the RecurrentTasks package. We ‘ll talk about the latter little bit before firing the final app.

Install SignalR Client-Typescript dependencies

The client side will be written in TypeScript entirely and this is something new since in most of the SignalR tutorials the client side was written in pure javascript and jQuery. In case you are familiar with Angular 2 then you already know how to intall npm packages. You need to create a package.json file under the root and also make sure you add the signalr as a dependency.

{
  "version": "1.0.0",
  "description": "live game feed",
  "name": "livegamefeed",
  "readme": "chsakell's blog all right reserved",
  "license": "MIT",
  "repository": {
    "type": "git",
    "url": "https://github.com/chsakell/aspnet-core-signalr-angular"
  },
  "dependencies": {
    "@angular/common": "2.0.0",
    "@angular/compiler": "2.0.0",
    "@angular/core": "2.0.0",
    "@angular/forms": "2.0.0",
    "@angular/http": "2.0.0",
    "@angular/platform-browser": "2.0.0",
    "@angular/platform-browser-dynamic": "2.0.0",
    "@angular/router": "3.0.0",
    "@angular/upgrade": "2.0.0",
    "angular2-in-memory-web-api": "0.0.20",
    "bower": "1.7.9",
    "core-js": "^2.4.1",
    "jquery": "^3.1.0",
    "reflect-metadata": "^0.1.3",
    "rxjs": "5.0.0-beta.12",
    "signalr": "^2.2.1",
    "systemjs": "0.19.27",
    "zone.js": "^0.6.23"
  },
  "devDependencies": {
    "concurrently": "^2.2.0",
    "gulp": ">=3.9.1",
    "gulp-concat": ">=2.5.2",
    "gulp-copy": ">=0.0.2",
    "gulp-cssmin": ">=0.1.7",
    "gulp-rename": ">=1.2.2",
    "gulp-rimraf": ">=0.2.0",
    "gulp-tsc": ">=1.2.0",
    "gulp-uglify": ">=1.2.0",
    "gulp-watch": ">=4.3.9",
    "jasmine-core": "2.4.1",
    "tslint": "^3.15.1",
    "typescript": "^2.0.0",
    "typings": "^1.3.2"
  },
  "scripts": {
    "start": "concurrently \"npm run gulp\" \"npm run watch\" \"npm run tsc:w\"",
    "postinstall": "typings install",
    "tsc": "tsc",
    "tsc:w": "tsc -w",
    "typings": "typings",
    "gulp": "gulp",
    "watch": "gulp watch",
    "ngc": "ngc"
  }
}

Next you need to add the required typings by adding a typings.json file.

{
  "globalDependencies": {
    "core-js": "registry:dt/core-js",
    "node": "registry:dt/node",
    "jquery": "registry:dt/jquery",
    "signalr": "registry:dt/signalr",
    "jasmine": "registry:dt/jasmine"
  }
}

The tsconfig.json TypeScript configuration file.

{
  "compilerOptions": {
    "target": "es5",
    "module": "commonjs",
    "moduleResolution": "node",
    "sourceMap": true,
    "emitDecoratorMetadata": true,
    "experimentalDecorators": true,
    "removeComments": false,
    "suppressImplicitAnyIndexErrors": true
  },
  "compileOnSave": true,
  "angularCompilerOptions": {
    "genDir": ".",
    "debug": true
  }
}

And finally the bower.json.

{
	"name": "livegamefeed",
	"private": true,
	"dependencies": {
		"bootstrap": "3.3.5",
		"jquery": "2.1.4",
		"jquery-validation": "1.14.0",
		"jquery-validation-unobtrusive": "3.2.4",
		"signalr": "2.2.0"
	},
	"ignore": ""
}

At this point you can run the npm install command to install all the NPM packages and typings as well.

Create a SignalR hub

A Hub is nothing but a C# class derived from the Microsoft.AspNetCore.SignalR.Hub. The idea is that clients may connect to a certain Hub and hence it’s logic that this class would implement methods such as OnConnected or OnDisconnected. Let’s view the abstract class in more detail.

public abstract class Hub : IHub, IDisposable
{
    protected Hub();

    [Dynamic(new[] { false, true })]
    public IHubCallerConnectionContext<dynamic> Clients { get; set; }
    public HubCallerContext Context { get; set; }
    public IGroupManager Groups { get; set; }

    public void Dispose();
    public virtual Task OnConnected();
    public virtual Task OnDisconnected(bool stopCalled);
    public virtual Task OnReconnected();
    protected virtual void Dispose(bool disposing);
}

A Hub can implement methods that the client may call and vice versa, the SignalR client may implement methods that the Hub may invoke. That’s the power of SignalR. Our app has a simple Hub named Broadcaster under the Hubs folder.

namespace LiveGameFeed.Hubs
{
    public class Broadcaster : Hub<IBroadcaster>
    {
        public override Task OnConnected()
        {
            // Set connection id for just connected client only
            return Clients.Client(Context.ConnectionId).SetConnectionId(Context.ConnectionId);
        }

        // Server side methods called from client
        public Task Subscribe(int matchId)
        {
            return Groups.Add(Context.ConnectionId, matchId.ToString());
        }

        public Task Unsubscribe(int matchId)
        {
            return Groups.Remove(Context.ConnectionId, matchId.ToString());
        }
    }

    public interface IBroadcaster
    {
        Task SetConnectionId(string connectionId);
        Task UpdateMatch(MatchViewModel match);
        Task AddFeed(FeedViewModel feed);
        Task AddChatMessage(ChatMessage message);
    }
}

Let’s discuss the above class in detail.

  1. Broadcaster implements the OnConnected method by calling a client-side SignalR method named setConnectionId. The OnConnected event fires when the client calls the start method on the accossiated hub connection. It’s going to look like this:
    // start the connection
    $.connection.hub.start()
        .done(response => this.setConnectionState(SignalRConnectionStatus.Connected))
        .fail(error => this.connectionStateSubject.error(error));
    
  2. The Clients property holds references to all connected clients.
    public IHubCallerConnectionContext<dynamic> Clients { get; set; }
    

    Before invoking a client method, you can target specific clients. On the above example we targeted only the caller using the Client(Context.ConnectionId). There are other options though as you can see.
    aspnet-core-signalr-angular-04

  3. SignalR lets you group clients using the Group property.
    public IGroupManager Groups { get; set; }
    

    Broadcaster Hub, has two server methods that clients may call in order to subscribe/unsubscribe to/from certain chat groups. In SignalR, all you have to do is add/remove the respective client connection id to/from the respective group. Here we set that the group name is equal to the matchId that the client wants to listen messages for. Later on, when the server needs to send a message to a certain group, all it takes to do is the following..

    Clients.Group(message.MatchId.ToString()).AddChatMessage(message);
    

    What the previous line of code does, is invoke the addChatMessage(message) client-side method only to those clients that have been subscribed to the group named message.MatchId.ToString().

  4. Subscribe and Unsubscribe are the only methods that our hub implements and can be called from the client. The client though will implement much more methods and most of them will be invoked through the MVC Controllers. As you noticed, in order to call a client-side method you need reference to the IHubCallerConnectionContext Clients property but for this, we need to integrate MVC with SignalR.

We have also used an interface so we have typed support for calling client side methods. You can omit this behavior and simply derive the class from Hub.

Integrate MVC Controllers (API) with SignalR

This is the most important part of the post, making Hubs functionality available to MVC Controllers. The reason why this is that much important is based on the web application architectural patterns where clients usual make HTTP calls to REST APIs, with the only difference this time the API is also responsible to send notifications to a batch of other connected clients as well. For example, in the context of a chat conversation, if a user posts a new message to a MessagesController API Controller and that message needs to be delived to all participants, the API Controller should be able to immediately push and deliver the message to all of them.
aspnet-core-signalr-angular
The image denotes that SignalR server can communicate with SignalR clients either via a direct “channel” between the Hub and the client or through an integrated MVC Controller which does nothing but access and use Hub’s properties. To achieve our goal, we ‘ll make any MVC Controller that we want to use SignalR derived from the following abstract ApiHubController class. You will find that class inside the Controllers folder.

public abstract class ApiHubController<T> : Controller
    where T : Hub
{
    private readonly IHubContext _hub;
    public IHubConnectionContextlt;dynamic> Clients { get; private set; }
    public IGroupManager Groups { get; private set; }
    protected ApiHubController(IConnectionManager signalRConnectionManager)
    {
        var _hub = signalRConnectionManager.GetHubContext<T>();
        Clients = _hub.Clients;
        Groups = _hub.Groups;
    }
}

The most important line of the previous class is the following:

var _hub = signalRConnectionManager.GetHubContext<T>();

Getting the instance of the Microsoft.AspNetCore.SignalR.IHubContext will give us access to both the Clients and the Groups properties. Let us view the interface in detail..

namespace Microsoft.AspNetCore.SignalR
{
    public interface IHubContext
    {
        [Dynamic(new[] { false, true })]
        Hubs.IHubConnectionContext<dynamic> Clients { get; }
        IGroupManager Groups { get; }
    }
}

The where T : Hub means that you can create as many Hub classes as you want and make them available to any MVC Controller on demand. Now let’s see an example where we actually use this class. LiveGameFeed app has a MatchesController MVC Controller which basically is used for two reasons. First for retrieving available matches that our app serves and second, when score is updated on a match, pushes the change to all connected clients.

[Route("api/[controller]")]
public class MatchesController : ApiHubController<Broadcaster>
{
    IMatchRepository _matchRepository;
    public MatchesController(
        IConnectionManager signalRConnectionManager,
        IMatchRepository matchRepository)
    : base(signalRConnectionManager)
    {
        _matchRepository = matchRepository;
    }

    // GET api/matches
    [HttpGet]
    public IEnumerable<MatchViewModel> Get()
    {
        IEnumerable<Match> _matches = _matchRepository.AllIncluding(m => m.Feeds);
        IEnumerable<MatchViewModel> _matchesVM = Mapper.Map<IEnumerable<Match>, IEnumerable<MatchViewModel>>(_matches);

        return _matchesVM;
    }

    // GET api/matches/5
    [HttpGet("{id}")]
    public MatchViewModel Get(int id)
    {
        Match _match = _matchRepository.GetSingle(id);
        MatchViewModel _matchVM = Mapper.Map<Match, MatchViewModel>(_match);
        return _matchVM;
    }

    // PUT api/matches/5
    [HttpPut("{id}")]
    public async void Put(int id, [FromBody]MatchScore score)
    {
        Match _match = _matchRepository.GetSingle(id);
        _match.HostScore = score.HostScore;
        _match.GuestScore = score.GuestScore;
        _matchRepository.Commit();

        MatchViewModel _matchVM = Mapper.Map<Match, MatchViewModel>(_match);
        await Clients.All.UpdateMatch(_matchVM);
    }
}

We get an instance of IHubContext for the Broadcaster Hub..

public class MatchesController : ApiHubController<Broadcaster>

When a match score is updated we want to notifify all connected clients, regardless if they are subscribed or not to the related feed. The client is going to implement an updateMatch function that can be called from the Hub.

await Clients.All.updateMatch(_matchVM);

In a similar way you will find a FeedsController MVC Controller where when a new Feed is added to a match, the API notifies those clients that not only are connected but also subscribed to that match feed. Since we want to target only the clients subscribed to the group named equal to the matchId, we use the Group property as follow.

// POST api/feeds
[HttpPost]
public async void Post([FromBody]FeedViewModel feed)
{
    Match _match = _matchRepository.GetSingle(feed.MatchId);
    Feed _matchFeed = new Feed()
    {
        Description = feed.Description,
        CreatedAt = feed.CreatedAt,
        MatchId = feed.MatchId
    };

    _match.Feeds.Add(_matchFeed);

    _matchRepository.Commit();

    FeedViewModel _feedVM = Mapper.Map<Feed, FeedViewModel>(_matchFeed);

    await Clients.Group(feed.MatchId.ToString()).AddFeed(_feedVM);
}

Create the Angular-SignalR service to communicate with SignalR hubs

Well here’s the tricky part. First of all you should know that the server will generate a client hubs proxy for you at the signalr/js location and this why you will find a reference to this file in the Views/Index.cshtml view. This script contains a jQuery.connection object that allows you to reference any hub you have defined on the server side. In many tutorials where the client side is implemented purely in jQuery you would probably find code similar to the following:

$(function () {
    var broadcaster = $.connection.broadcaster;

    broadcaster.client.message = function (text) {
        alert(text);
    };

    $.connection.hub.start().done(function () {
        broadcaster.server.broadcast('hello from client');
    });
  });

The code references a hub named Broadcaster and defines a client side method on the broadcaster.client object. Notice the lowercase .broadcaster declaration that connects to a Hub class named Broadcaster. You can customize both the custom Hub name and the path where the server will render the proxy library. We need though to switch to TypeScript so let’s define interfaces for the SignalR related objects. You will find them in the interfaces.ts file.

export interface FeedSignalR extends SignalR {
    broadcaster: FeedProxy
}

export interface FeedProxy {
    client: FeedClient;
    server: FeedServer;
}

export interface FeedClient {
    setConnectionId: (id: string) => void;
    updateMatch: (match: Match) => void;
    addFeed: (feed: Feed) => void;
    addChatMessage: (chatMessage: ChatMessage) => void;
}

export interface FeedServer {
    subscribe(matchId: number): void;
    unsubscribe(matchId: number): void;
}

export enum SignalRConnectionStatus {
    Connected = 1,
    Disconnected = 2,
    Error = 3
}

The SignalR interface is defined in the typings/globals/signalr/index.d.ts and we installed it via typings. The FeedProxy will contain references to the client and server hub connection objects respectively. Any client side method that we want to be invoked from the server be implemented on the client object and any server side method implemented on the server (e.g. Subscribe, Unsubscribe) will be called through the server object. The FeedClient is where you define any client side method you are going to implement and the FeedServer contains the server methods you are going to invoke. Again the methods are in lowercase and matches the uppercase relative method on the server. If you don’t use this convetion you will not be able to call the server methods. The feed.service.ts file is an @Injectable angular service where we implement our interfaces.

Implement client-side methods

The pattern is simple and we will examine the case of the addChatMessageSubject client side method. First you define an Observable property of type ChatMessage cause when called from the server, it will accept a parameter of type ChatMessage.

addChatMessage: Observable<ChatMessage>;

.. the ChatMessage looks like that and of course there is a relative server ViewModel on the server.

export interface ChatMessage {
    MatchId: number;
    Text: string;
    CreatedAt: Date;
}

Then you define rxjs/Subject property for that method.

private addChatMessageSubject = new Subject<ChatMessage>();

.. and you make sure to make the following assignment on the service’s constructor:

this.addChatMessage = this.addChatMessageSubject.asObservable();

The next step is to define a method (or event if you prefer) where you respond to the observable events.

private onAddChatMessage(chatMessage: ChatMessage) {
    this.addChatMessageSubject.next(chatMessage);
}

There is a last step where you actually bind this method on the client property of the hubs connection but first we need to configure our proxy. This is done on the start method as follow..

start(debug: boolean): Observable<SignalRConnectionStatus> {

  // Configure the proxy
  let connection = <FeedSignalR>$.connection;
  // reference signalR hub named 'Broadcaster'
  let feedHub = connection.broadcaster;
  this.server = feedHub.server;

  // code omitted

  feedHub.client.addChatMessage = chatMessage => this.onAddChatMessage(chatMessage);

  // start the connection
  $.connection.hub.start()
      .done(response => this.setConnectionState(SignalRConnectionStatus.Connected))
      .fail(error => this.connectionStateSubject.error(error));

  return this.connectionState;
}

In case you had more than one hubs, for example a hub class OtherHub you would reference that hub as follow:

// reference signalR hub named 'OtherHub'
let otherHub = connection.otherHub;

And of course you would have to declare any methods to be called from that hub, on the otherHub.client object and so on.. We followed the observable pattern which means that any client-component that wants to react when a client method is invoked from the server, needs to be subscribed. The chat.component.ts listens for chat messages:

constructor(private feedService: FeedService) { }

ngOnInit() {
    let self = this;

    self.feedService.addChatMessage.subscribe(
        message => {
            console.log('received..');
            console.log(message);
            if(!self.messages)
                self.messages = new Array<ChatMessage>();
            self.messages.unshift(message);
        }
    )
  }

But remember.. in the LiveGameFeed app, this method will be called only on those clients that are subscribed on the relative match. This is defined on the MessagesController MVC Controller, when a chat message is posted.

[Route("api/[controller]")]
public class MessagesController : ApiHubController<Broadcaster>
{
    public MessagesController(
        IConnectionManager signalRConnectionManager)
    : base(signalRConnectionManager)
    {

    }

    // POST api/messages
    [HttpPost]
    public void Post([FromBody]ChatMessage message)
    {
        this.Clients.Group(message.MatchId.ToString()).AddChatMessage(message);
    }
}

The methods that can be called on the server are way much easier to implement since are just methods defined on the connection.server object.

// Server side methods
public subscribeToFeed(matchId: number) {
    this.server.subscribe(matchId);
}

public unsubscribeFromFeed(matchId: number) {
    this.server.unsubscribe(matchId);
}

Add Reccurent Tasks on a ASP.NET Core application

You may have noticed that in the project.json there is a RecurrentTasks package reference. I used that package in order to simulate live updates and make easier for you to see SignalR in action. In the Core folder you will find a FeedEngine class that triggers updates on specific time intervals.

public class FeedEngine : IRunnable
{
    private ILogger logger;
    IMatchRepository _matchRepository;
    private string _apiURI = "http://localhost:5000/api/";

    public FeedEngine(IMatchRepository matchRepository,
                        ILogger<FeedEngine> logger)
    {
        this.logger = logger;
        this._matchRepository = matchRepository;
    }
    public void Run(TaskRunStatus taskRunStatus)
    {
        var msg = string.Format("Run at: {0}", DateTimeOffset.Now);
        logger.LogDebug(msg);
        UpdateScore();
    }

    private async void UpdateScore()
    {
        IEnumerable<Match> _matches = _matchRepository.GetAll();

        foreach (var match in _matches)
        {
            Random r = new Random();
            bool updateHost = r.Next(0, 2) == 1;
            int points = r.Next(2,4);

            if (updateHost)
                match.HostScore += points;
            else
                match.GuestScore += points;

            MatchScore score = new MatchScore()
            {
                HostScore = match.HostScore,
                GuestScore = match.GuestScore
            };

            // Update Score for all clients
            using (var client = new HttpClient())
            {
                await client.PutAsJsonAsync<MatchScore>(_apiURI + "matches/" + match.Id, score);
            }

            // Update Feed for subscribed only clients

            FeedViewModel _feed = new FeedViewModel()
            {
                MatchId = match.Id,
                Description = points + " points for " + (updateHost == true ? match.Host : match.Guest) + "!",
                CreatedAt = DateTime.Now
            };
            using (var client = new HttpClient())
            {
                await client.PostAsJsonAsync<FeedViewModel>(_apiURI + "feeds", _feed);
            }
        }
    }
}

There are two type of updates. A match score update which will be pushed to all connected clients though the MatchesController MVC Controller and feed updates being pushed through th FeedsController. In the Startup class you will also find how we configure this IRunnable task class to be triggered on time intervals.

public void ConfigureServices(IServiceCollection services)
{
    // Code omitted
    services.AddTask<FeedEngine>();
}
public void Configure(IApplicationBuilder app, IHostingEnvironment env, ILoggerFactory loggerFactory)
{
    // Code omitted
    app.StartTask<FeedEngine>(TimeSpan.FromSeconds(15));
}

Have fun with the app!

I guess you have already downloaded or cloned the repository related to this post as I mentioned on start. In order to fire the app you need to run the following commands (open two terminals and navigate to the project) The first three will download NPM and Bower packages and compile the angular app. Also it will be watching for TypeScript changes during development..

npm install
bower install
npm start

and the .NET Core related that will restore the packages and run the server.

dotnet restore
dotnet run

Open as many browser tabs or windows as you wish and start playing with the app. Every 15 seconds the app will trigger updates and all clients will receive at least the score update. If subscribed, they will receive the feed and any messages related to the match as well. Mind that two tabs on the same window browser are two different clients for SignalR which means have a different Connection Id. The connection id for each client is displayed on the chat component. On new feed received event, the new row to be displayed is highlighted for a while. Here is the angular directive responsible for this functionality.

import { Directive, ElementRef, HostListener, Input, Renderer } from '@angular/core';

@Directive({
  selector: '[feedHighlight]'
})
export class HighlightDirective {
  constructor(private el: ElementRef, private renderer: Renderer) {
    let self = this;
      self.renderer.setElementClass(this.el.nativeElement, 'feed-highlight', true);
      setTimeout(function() {
        self.renderer.setElementClass(self.el.nativeElement,'feed-highlight-light', true);
      }, 1000);
   }

  private highlight(color: string) {
    this.renderer.setElementStyle(this.el.nativeElement, 'backgroundColor', color);
  }
}

Conclusion

SignalR library is awesome but you need to make sure that this is the right choice to make before using it. In case you have multiple clients that is important to push them updates on real time then you are good to go. That’s it, we finally finished! We have seen how to setup an ASP.NET Core project that leverages SignalR library through MVC Controllers. More over we used SignalR typings in order to create and use the SignalR client library using Angular and TypeScript.

Source Code: You can find the source code for this project here where you will also find instructions on how to run the application.

In case you find my blog’s content interesting, register your email to receive notifications of new posts and follow chsakell’s Blog on its Facebook or Twitter accounts.

Facebook Twitter
.NET Web Application Development by Chris S.
facebook twitter-small

Master Microsoft Azure Web application deployment

$
0
0

During this year we had the chance to build several Web applications using ASP.NET Core combined with frameworks and libraries such as Angular 2 or SignalR. Since then I have been receiving requests to post about how to deploy that kind of applications on Microsoft Azure so this is what we are going to do on this post. The truth is that despite the fact that those apps were built with the same technologies, they were created and can be run using different tools. For example, the PhotoGallery application was built entirely in Visual Studio which means it can be opened, run and deployed to Azure using Azure Tools for Visual Studio. On the other hand, the Scheduler app has two parts, the server part with the API which can be opened, run and deployed through Visual Studio as well and the client side one which was built outside Visual Studio using NodeJS packages and other client-side libraries. The LiveGameFeed app is an ASP.NET Core – Angular 2 – SignalR app built entirely outside of Visual Studio. Those kind of apps will be deployed using a different techniques that are supported by Azure. More over, we are going to see the way we will handle NodeJS dependencies/packages, in other words the node_modules folder in our app. This folder usually contains a large number of files and would be pain in the ass to get them all in Azure. The interesting thing is that the apps we have built, handles NodeJS depenencies in different ways and hence will be deployed accordingly. Let’s see in detail the contents of the post. Each section denotes the basic app’s features that will affect the way it will be deployed to Azure.

Deploy ASP.NET Core – Angular 2 app using Visual Studio
PhotoGallery

  • Both server and client-side code exists in the same solution
  • App uses an SQL Server database which must be deployed as well
  • NodeJS depenencies are copied and served through www folder as static files
  • The app can be opened, run and deployed through Visual Studio

Deploy Angular 2 app without Visual StudioScheduler UI

  • The server side contains the MVC API controllers, an SQL Server database and will be deployed through Visual Studio
  • The client side is built outside of Visual Studio (no .sln file)
  • For the client-side we need to create build-automation tasks and use the build/production folder as the hosting app on Azure
  • The app will be deployed using Git tools and integrating a Github branch as an Azure Deployment source

Deploy ASP.NET Core – Angular 2 – SignalR app without Visual StudioLiveGameFeed

  • Both server and client-side code exists in the same solution
  • The app is built entirely in a text-editor such as Visual Studio Code (no .sln file)
  • Firstly, the app will be published locally and then deployed to Azure using Git tools and a Local Git repository
  • Additional configuration needed up on Microsoft Azure in order to enable Web-Sockets and leverage SignalR features

In the post we will deploy the apps that mentioned before but in case you want to deploy your app, just follow the instructions that suits best on your app.

Prerequisites

In you are a Windows user, make sure to install the Azure Tools for Visual Studio. Also, you must have an Azure subscription, which is a plan that gives you access to a variety of Azure services. You can get started with Azure with a free account. Once you decide to purchase a subscription plan, you can choose from a variety of purchase options. If you’re an MSDN subscriber, you get free monthly credits that you can use with Azure services, including Azure Storage. See Azure Storage Pricing for information on volume pricing.

Deploy ASP.NET Core – Angular 2 app using Visual Studio – PhotoGallery

The PhotoGallery app, is an app built using Visual Studio 2015, it uses an SQL database for data store and Angular 2 on the client side. For start, clone the repository and follow the instructions in the README.md file. Even if you haven’t an SQL Server instance installed on your machine (maybe Linux or MAC user) make sure to run at least the command that initializes mirgrations.

dotnet ef migrations add initial

This is important for initializing the respective SQL Server database on Microsoft Azure. When you finish setting up the application right click the PhotoGallery app and select Publish….
microsoft-azure-deployment-01
This will open the Publish wizard which requires that you are a signed user. You can sign in in Visual Studio on the upper right, with your Microsoft Account for which you have an Azure subscription or add that account in the next step.
microsoft-azure-deployment-02
We are going to use the Platform as a service (PaaS) deployment enviromnent to host our application. Click the Microsoft Azure App Service button and click the New… button in order to declare a Resource Group, an App Service Plan and any additional Azure services that our app requires. In case you are unfamiliar with those terms, that’s all right, all you need to know is that all the resources such as Web Applications, SQL Servers are contained in a Resource Group. Deleting that Resource Group will also delete the contained services. Typically, all resources in a Resource Group share the same lifecycle. The App Service Plan declares the region that your resources are going to be deployed and the type of Virtual Machines to be used (how many instances, cores, memory etc..). Name the Resource Group PhotoGalleryRG and click New… to configure an App Service Plan. Leave the App Service Plan name as it is, set the Location that you are closest at and select any size you wish. I chose West Europe and S1 (1 core, 1,75 GR RAM) as size.
microsoft-azure-deployment-03
Click OK and then click Explore additional Azure services in order to create an SQL Server and a database.
microsoft-azure-deployment-04
Click the green plus (+) button to add an SQL Database. Click New… on the SQL Server textbox to create an SQL Server and enter an administrator’s username and password. Click OK and your credentials will fill the textboxes as shown below. Leave the connection string name DefaultConnection and click OK.
microsoft-azure-deployment-05
Attention: It’s important that the connection string name matches the one in the appsettings.json file.

{
  "ConnectionStrings": {
    "DefaultConnection": "Server=(localdb)\\mssqllocaldb;Database=PhotoGallery;Trusted_Connection=True;MultipleActiveResultSets=true"
  },
  "Data": {
    "PhotoGalleryConnection": {
      "InMemoryProvider": false
    }
  }
}

Mind that you don’t need to change the connection string in the appsettings.json to point the new SQL Database on Microsoft Azure. Azure will be responsible to inject the right connection string when required.
microsoft-azure-deployment-06
At this point you should have a window such as the following..
microsoft-azure-deployment-07
Click the Create button and Visual Studio will deploy the configured services up in Azure. Before procceeding let’s take a look what happend on your Microsoft Azure subscription. Navigate and sign in in the Azure Portal. Then click the All resources button..
microsoft-azure-deployment-08
The App Service resource is the actuall web application where the PhotoGallery app will be deployed. At the moment, it is just an empty web site. You can click it and you will find various properties. Find the URL and Navigate to it.
microsoft-azure-deployment-09
Back in Visual Studio and with the Connection tab textboxes all filled, click the Settings tab.
microsoft-azure-deployment-10
Make sure to check the checkboxes related to your database configuration. The first one will make sure that Azure will inject the right connection string when required and the second one is required in order to initialize the database.
microsoft-azure-deployment-11
Click next and finally Publish!!! Visual Studio will build the app in Release mode and deploy the PhotoGallery app up in Azure. After finishing it will probably open the deployed web app in your default browser.
microsoft-azure-deployment-12

Notes

You may wonder, what happend with the NodeJS depenencies. First of all, if you check the project.json file you will notice that we certainly didn’t deploy that folder.

"publishOptions": {
    "include": [
      "wwwroot",
      "Views",
      "appsettings.json",
      "web.config"
    ],
    "exclude": [
      "node_modules"
    ]
  }

What happend is that we deployed only the packages using the setup-ventors gulp task, that copies all required packages into the www folder. This means that when you publish your app those packages will also be deployed at least the first time. Of course you need to run the build-spa task that runs all the neccessary gulp tasks before publishing the app.

Deploy Angular 2 app without Visual Studio – Scheduler UI

Now lets move to the Scheduler app that consists of two different projects. The first one is the server side which contains the MVC API controllers, an SQL Server database and can be deployed in the exact same way we did with the PhotoGallery app. For this reason, I ‘ll assume you can deploy the app on your own, just follow the previous steps we saw before. Clone the repository and follow the instructions on the README.md file. The project you need to deploy is the Scheduler.API. As you can see I have deployed the API on a separated Resource Group and Plan..
microsoft-azure-deployment-13
And here’s what the Azure Portal resources look like. I have filter them by typing Scheduler on the filter box.
microsoft-azure-deployment-14

Deploy an Angular 2 application

The client side of the Scheduler app is build outside of Visual Studio (no .sln file), in fact I used my favorite text editor, Visual Studio Code. This is a classic Angular 2 application and certainly cannot be deployed on the same way we did with the previous two. First of all, go ahead, fork the repo and follow the instructions to install the app. I said fork because later on we will authorize Azure to access our Github projects so we can set the deployment source. This repo has two branches, the master and the production. I have created the production branch in order to integrate it with the Azure deployment services (we ‘ll see it later on). I assume you have already hosted the Scheduler.API project by now so in order to test the Angular 2 app, switch to the production branch and make sure to alter the API URL in the utils/config.service.ts to point the previously deployed Scheduler.API. Next run npm start.

import { Injectable } from '@angular/core';

@Injectable()
export class ConfigService {

    _apiURI : string;

    constructor() {
        // Replace the following line with your deployed API URL
        this._apiURI = 'http://localhost:5000/api/';
     }

     getApiURI() {
         return this._apiURI;
     }

     getApiHost() {
         return this._apiURI.replace('api/','');
     }
}

Publishing a pure Angular 2 app on Azure is another story. First of all we will create the App Service on the portal, instead of letting Visual Studio creating it for us, as we did in the previous examples. Login to Azure Portal and create a new Web App.
microsoft-azure-deployment-15
Give it a name (mind that all App Services should have uniquely identified names) and assign it to a resource group. I assigned the app under the same Resource Group that the Scheduler API service belongs.
microsoft-azure-deployment-16
Click create to provision the App Service. Switch back to the Angular app, open a terminal and run the following gulp task. Make sure you are on the production branch and you have changed the API URL to point tha Azure API.

gulp

This command will run the default gulp task existing in the gulpfile.js and creates a production build inside a build folder. This folder is the one that hosts our application and the one that we want Azure to run. If you take a good look at the generated build folder, you will find an app folder that contains the actual SPA and a lib folder that has only the required NPM packages. It also changes folder references in the index.html file and the systemjs.config.js one. The most important files though are the index.js and the package.json files that are copied from the src/server folder. The package.json contains only an express server depedency to be installed up on Azure and a post-install event for installing the bower packages. Microsoft Azure will notice the package.json file and will assume that this is a node.js application. After installing the dependencies it will run the node index.js command which in turn starts the express server.. If you want to test the production build before commiting any changes to the production branch, navigate to the build folder, run npm install and node index.js. This will emulate what Azure does on cloud.
Now that we have our production branch with our latest build, we need to configure the App Service on Azure to hook with that branch and use it for continuous integration and deployment. Click on the Web app, then select Deployment options and click the Github option.
microsoft-azure-deployment-22
In order to associate a Github project first you need to authorize Azure accessing your Github account. This means that you will not be able to use my Github project through my account and it would be better to simply fork it to yours and use that instead. After authorizing Azure, click Choose project, find the angular2-features from your Github account and finally select the production branch. Click OK.
microsoft-azure-deployment-23
Azure will set the deployment source and will try to sync and deploy the app.
microsoft-azure-deployment-24
When deployment finished, I got an error (awesome).
microsoft-azure-deployment-25
From the logs you can understand that Azure tried to run the root’s package.json and the npm start command which means that there is somemthing missing here. Azure needs to be aware that our project exists inside the build folder not the root. To do this, go the Application settings and add an App setting with a key-value pair Projectbuild. Click Save.
microsoft-azure-deployment-26
Now you need to trigger a deployment so the easiest way to do this is push a change to the production branch. This time the deployment succeeded and we are ready to run the app!
microsoft-azure-deployment-27
microsoft-azure-deployment-28

Deploy ASP.NET Core – Angular 2 – SignalR app without Visual Studio – LiveGameFeed

The moment you start thinking “OK, I believe I can deploy any app I want up on Azure now, the LiveGameFeed comes in to the scene. This app is an ASP.NET Core – Angular 2 – SignalR Web Application and certainly cannot be deployed using Visual Studio (maybe Visual Studio 15 Preview though). It was created in Visual Studio Code leveraging all the cross-platform features in .NET Core. This means that we need to deal both with the Angular 2 features and .NET Core at the same time but without the Visual Studio Azure tools. Clone the repo, follow the instructions to install it and make sure you can run it locally. Switch to Azure Portal, create a new Web App and give it a uniquely identified name.
microsoft-azure-deployment-29
Switch to Visual Studio Code or your editor where you opened the source code and make sure to change the apiURL in the appsettings.json file to match your newly created Web app url.

{
  "Logging": {
    "IncludeScopes": false,
    "LogLevel": {
      "Default": "Debug",
      "System": "Information",
      "Microsoft": "Information"
    }
  },
  "apiURL" : "http://livegamefeed.azurewebsites.net/api/"
}

Make sure you run tsc command in order to compile the app. The idea is to produce a build of our app in a folder, in or outside the app. Then we configure a Local repository up on Azure and we will set it as remote for our local. Finally we will push the build to Azure Git repository. I will publish the app by running the following command.

dotnet publish

This published the app in Release mode on the bin/Release folder. Swith to Azure and from the Deployment options select Local Git repository. Click OK.
microsoft-azure-deployment-30
Next click Deployment credentials and set username and password for this repository. Click Save.
microsoft-azure-deployment-31
Open the Overview Blade and you will find a Git clone url for your project. Copy it.
microsoft-azure-deployment-32
All we need to do now is push the published folder up on the remote repository. I will make something dirty on this example by simply coping the contents from bin/Release/netcoreapp1.0/publish to another directory.
microsoft-azure-deployment-35
Then I will open that folder in a terminal, init a local repository and commit all files on the master branch.

git init
git add .
git commit -m "init repo"

Then add the remote repository on Azure.

git remote add azure your_clone_url_git_here

Push the changes and enter the credentials you configured previously if asked.

git push azure master

microsoft-azure-deployment-33
In Azure Portal, go to Application settings and enable Web sockets. Otherwise you wont be able to leverage SignalR features which are needed by our app.
microsoft-azure-deployment-34
.. and voila!!
microsoft-azure-deployment-36

Conclusion

We ‘ve seen several ways to deploy a Web App up on Azure but this doesn’t mean that they are just them. There are a few more deployment options such as the classic FTP or Visual Studio Online integration. Microsoft Azure gives you the options to set your deployment plan that best fits your application and your organization’s source control tools. I will stand for a moment in the way we deployed the Angular 2 ScedulerUI app. You can have only one Github repository for your app and create for example 3 branches, dev, stage and production. Up on azure you can create the respective slots and map each one of them to the respective Github branch. When your stage branch reaches a stable and ready to deploy state, all you have to do is merge it with the production one. The Azure App Service production slot will be synced and redeployed automatically. Amazing isn’t it? Or you could set only the stage slot work on this way and when it ‘s time to deploy on the production, swap the stage and the production slots.

In case you find my blog’s content interesting, register your email to receive notifications of new posts and follow chsakell’s Blog on its Facebook or Twitter accounts.

Facebook Twitter
.NET Web Application Development by Chris S.
facebook twitter-small

ReactiveX operators – Angular playground

$
0
0

Reactive programming pattern seems to get more and more trusted by developers for building large-scale Web applications. Applications built with this pattern make use of frameworks, libraries or architecture styles that eventually will force you to intensively use RxJS and its operators. It’s kind of difficult to start using ngrx/store if you haven’t already being familiar with RxJS operators. This is why I thought it would be nice to create a playground project where we could gather as many RxJS operators examples as possible, using Angular. This will help you to visually understand the exact behavior of an RxJS operator.

The Playground

The previous gif image is actually the home screen of the project, making use of RxJS operators in order to flip individual div elements.

let counter = 0;
const interval$ = Observable.interval(100).take(13 * 5).map(i => i % 13);
const indexSubject: Subject<number> = new BehaviorSubject(counter);

interval$.withLatestFrom(indexSubject)
  .subscribe(([i, j]) => {
    this.phrases[j][i].highlighted = true;
     if (i === 12) {
       counter++;
       indexSubject.next(counter);
     }
  });

The project is built with Angular 4, Angular Material 2 and has currently examples for the most commonly used RxJS operators, such as merge, scan, reduce or combineLatest. I will be adding more in the future and you are welcomed to contribute as well. You will find that each example has 3 tabs, one to show what an operator can do, another that has an iframe with the operator’s documentation and a third one to show the most important code lines used for the example.

I have deployed the app on Microsoft Azure. Make sure you clone or fork the repository and get the latest changes being committed every time.

In case you find my blog’s content interesting, register your email to receive notifications of new posts and follow chsakell’s Blog on its Facebook or Twitter accounts.

Facebook Twitter
.NET Web Application Development by Chris S.
facebook twitter-small


Continuous Integration & Delivery with Microsoft Azure & GitHub – Best Practices

$
0
0
Continuous Integration and Delivery (CI/CD) automation practices, is one way path when you want to continuously produce and deliver software in short iterations, software that is guaranteed that when deployed, it has passed successful reviews, builds and tests through an automated and strict process. Automating the software release process is not an easy task and usually requires a batch of tools, patterns and platforms to accomplish. All these parameters depend on the company’s culture (e.g. open source or not), employee’s know how and the nature or the variety of the software. This post will describe not only how to configure a CI/CD environment but also provide instructions for Git operations as well. We will use Microsoft Azure and GitHub as the base for setting our CI/CD environment. I will break the post in the following three sections:
  • Requirements from developer, tester perspective
  • Continuous Integration & Delivery Architecture
  • Setup the Continuous Integration / Delivery environment
  • Example: Run a full release cycle (new feature / release / hot-fix)

Are you ready?

The developer’s perspective

  • Each developer should be able to work in an isolated way without affecting other’s work.
  • If needed, more than one developers should be able to collaborate and work on the same feature in a seamless way.
  • New features should always pass through a review process before merged (pull request). Pull requests should always have build and tests status indicators.
  • The development should take place in a separated and safe environment rather than the staging or production, where all developers can check the current development status (develop branch). Each time the develop branch changes (push), the corresponding deployed Azure slot is affected.

We will use the Vincent Driessen’s branching model in order to control the way new software is released. Let’s explain in a nutshell how this works:

  • New features are created from the develop branch which means, each time a developer needs to add a new feature, he/she creates a new feature branch from the develop one. At the same time, there may be many new features on development process by different developers.
  • When a developer feels that the new feature is ready, pushes (publishes) the new feature branch and opens a pull request to be merged to the develop branch. The pull request has build and test status and after being successfully reviewed is being merged into the develop branch. If the feature branch fails the review, developers can continue to commit and push changes on the feature branch till the pull request is ready for merge.
  • After the successful merge in the develop branch, the feature branch may be deleted from both local and origin.
  • When we need to ship a new release, we create and push a new release branch from the develop. The release branch is being tested on a staging environment (we ‘ll talk about this more later..). If the release branch is ready for production, we merge the branch both in the develop and master branch. At this stage we have a specific tag-version as well. If not, we continue to commit and push changes to the release branch till is ready for production.
  • When we need to apply a fix in the production (ASAP), then we create a hotfix branch from the master. This hotfix branch should be deployed and tested on the staging environment in the same way a release branch is being tested. When the hotfix is ready for production, we merge the branch in both develop and master and finally delete the branch.

The tester’s perspective

  • Release candidate branches should be tested on a separated staging environment without affecting the production
  • Staging environment should be able to simulate how the production environment would behave in case the release were applied
  • Testers should be able to dynamically deploy release candidate branches on the staging environment with a single command
  • When a release candidate is successfully tested and ready for production, it should be deployed on production with a single command as well

This is where Microsoft Azure deployment slots and Azure CLI 2.0 come into the scene. Testers don’t have to be aware about the configuration for all these, all they need to know in order to deploy release candidates in staging or the production environment, is the name of the release or hotfix branch. Deployment and slot swapping between the staging and the production environment will happen using two Azure CLI 2.0 commands.

Continuous Integration & Delivery Architecture


All requirements that we have listed before can be achieved using the architecture shown in the above image. There are three platforms used, each one for different reason. Microsoft Azure, is where we have the deployment slots for our application. Assuming we have a .NET Core Web application that also uses an SQL Azure database, that would result in an Azure App Service with two deployment slots, the dev and the staging. The default website is considered as the production slot. Each of these slots have their application settings and of course a separated database connection string. The connection string setting will be a per slot setting so they don’t swap when we swap staging and production slots (more on this later..) As far as for the source control, there is a develop branch, from which all the new feature branches are created. The develop branch has a fixed Webhook hooked to the App Service dev slot. This means that each time we push to develop branch, changes are reflected on the dev slot (build/re-deploy).

When we wish to ship a new software release, we create a new release branch with the next version (tag) number. We deploy the new release candidate branch on the staging slot using Azure CLI 2.0. What this will do, is delete any Webhook existed on the Staging slot and dynamically create on demand, a new one hooked to the new release branch. Testers can either test the new features using the staging slot’s settings or swap with preview the staging and production slots in order to test the release candidate using the production settings. Till the release candidate branch passes all the tests, any push to that branch would result in a new build/deploy cycle on the staging slot. When all the tests pass, testers finalize the swap to production. The release candidate branch can now be merged to the develop and master and finally deleted. The same applies for any hotfix branch that is being created from the master branch.

Any push to develop / release-version / hotfix-version or feature branches or pull requests, should trigger an Appveyor build task, that should detect if the build and any tests succeeded. This is very important, because can detect bugs before reaching the production environment and the end users.

Setup the CI/CD environment

This section will describe exactly the steps I took in order to implement the requirements we have set for Continuous integration & Delivery using Microsoft Azure and Git. Let’s begin. I started by creating an empty ASP.NET Core Web Application (no database yet) and initialize a Git repository so that I can push it up to GitHub. I made sure to create a develop branch from master before pushing it. The repository I used for the tutorial is this one. As shown from the architecture diagram, there is build/test task running on AppVeyor each time we push code to certain branches. So this is what I needed to setup next. The steps to make this work are quite easy. First, I signed in to Appveyor with my GitHub account, pressed the NEW PROJECT button and selected the azure-github-ci-cd repository.

AppVeyor requires you to add an appveyor.yml file at the root of your repository, a file that defines what tasks do you want it to run when something is pushed to your repository. There are a lot of things you can configure in AppVeyor but let’s stick with the basics, which are the build and test tasks. Here is the appveyor.yml file I created.

# branches to build

# configuration for "master" branch
# build in Release mode and deploy to Azure
-
  branches:
    only:
      - master
      - /release/.*/
      - /hotfix/.*/
      - /bugfix/.*/
  image: Visual Studio 2017
  environment:
    DOTNET_CLI_TELEMETRY_OPTOUT: true
    DOTNET_SKIP_FIRST_TIME_EXPERIENCE: true
  version: 1.0.{build}
  configuration: Release
  platform: Any CPU
  skip_branch_with_pr: false
  before_build:
    - cmd: dotnet restore
  test_script:
    - cmd: dotnet test C:\projects\azure-github-ci-cd\azure-github-ci-cd.Tests\azure-github-ci-cd.Tests.csproj  --configuration Release

# configuration for all branches starting from "dev-"
# build in Debug mode and deploy locally for testing
-
  branches:
    only:
      - develop
      - /feature/.*/
  image: Visual Studio 2017
  environment:
    DOTNET_CLI_TELEMETRY_OPTOUT: true
    DOTNET_SKIP_FIRST_TIME_EXPERIENCE: true
  version: 1.0.{build}
  configuration: Debug
  platform: Any CPU
  skip_branch_with_pr: false
  before_build:
    - cmd: dotnet restore
  test_script:
    - cmd: dotnet test C:\projects\azure-github-ci-cd\azure-github-ci-cd.Tests\azure-github-ci-cd.Tests.csproj --configuration Debug

For master, release/.*/, hotfix/.*/ and bugfix/.*/ branches I want Appveyor to build and test the solution in Release mode while the develop and feature/.*/ branches may run in Debug. More over I made sure the tasks run on pull requests as well. With this configuration file, each time we push to those branches a build/test task is running on AppVeyor. The final result can be shown using badges like this:

[![Build status](https://ci.appveyor.com/api/projects/status/github/chsakell/azure-github-ci-cd?branch=master&svg=true)](https://ci.appveyor.com/project/chsakell/azure-github-ci-cd/branch/master)


The next step is to create the AppService up on Microsoft Azure Portal and the required slots as well. I named the App Service ms-azure-github and added two slots, dev and staging. The default instance will be used as the production slot. For all these slots, I added the following App setting, to make sure that Git operations will be used without problems.

SCM_USE_LIBGIT2SHARP_REPOSITORY 0


What this setting will do, is ensure to use git.exe instead of libgit2sharp for git operations. Otherwise you may get errors such as this one. I didn’t add any database yet, I did later on, when I wanted to create a new feature for my app (more on this on the example section..). At the moment, the only thing left was to add a Webhook between the develop branch and the dev slot. This is very important step, because you are going to authorize Azure to access your GitHub account. Doing this directly from the Azure Portal will help you run related commands from the Azure CLI 2.0 without any authentication issues. To do this, I selected the dev slot, clicked the deployment options, connected to my GitHub account, select the ms-azure-git-ci-cd repository and finally the develop branch. Azure instantly fired up the first build and I could see the dev slot online.

Example: Run a full release cycle (new feature / release / hotfix)

This is the section where we will see in action a full release cycle. A full release cycle will show us how to use and mix together, all the tools, platforms and Git operations in order to automate the release process. We ‘ll start developing a new feature, publish it and open a pull request,merge the feature and create a release branch for testing. We will deploy the release candidate on the staging slot using Azure CLI 2.0 and apply a swap with preview with the production slot. After finishing and ship the feature in production, which by the way will be related to adding database features, we will run another full cycle where will have to make a hotfix directly from the master branch. Before starting though, I would like to introduce you some Git extensions that will help us simplify the process when applying the git-flow branching model we mentioned on the start of the post. The extension is named git-flow cheatsheet and I encourage you to spend 5 minutes to read and see how easy is to use it. As a Windows user I installed wget and cygwin before installing the git-flow-cheatsheet extension. I made sure to add the relative paths to the System path to work from the command line.

You certainly don’t have to work with git-flow-cheatsheet, you can just use the usual git commands on the way you are used to, that’s fine. I used the utility for this tutorial to emphasize the git-flow branching model and that’s all. Having the extension installed I run the following git-flow command at the root of my git repository.

git flow init

I left the default options but you could pick your own, for example you can set the name of the releases or hotfix branches etc..

Add a new Feature

Let’s say we have a new task where we need to add entity framework and also show a page with users. The users data will come from the database. The developer that is assigned to complete the task (always happy to..), starts by creating a new feature branch directly from the develop one. With git-flow-cheatsheet this is done by typing:

git flow feature start add-entity-framework

SQL Azure Database

Since this task is related to database, we need to prepare the database environment first, that is create 3 databases, one for each environment: dev, staging, production. We also need to add the connection string settings per slot, in each App Service slot, pointing to the respective database. Creating database on Microsoft Azure is quite easy. You select SQL Databases, click add and fill the required fields.

As you can see I have named the databases in the same way I named the slots. If you click on a database and select Properties, you can find the connection string.

Make sure to set this connection string to the respective App Service slot in the Application Settings connection strings.

It’s very important to check the Slot setting option. Now that you have the SQL Databases set, you need to create the schema of course. For start, I added the Entity Framework model, created the connection string pointing to the dev database, in the appsettings.json file.

{
  "ConnectionStrings": {
    "DefaultConnection": "<your-azure-sql-connection-string-here>"
  },
  "Logging": {
    "IncludeScopes": false,
    "LogLevel": {
      "Default": "Warning"
    }
  }
}

I run Entity Framework Core migrations from Visual Studio 2017 and when it was time to update the Azure database, Visual Studio asked me to sign in with my Microsoft Azure account and also add my local IP to the relative Firewall Rules. I run the same Update-Database command three times, for the three different connection strings. I also added some mock users to all databases to ensure that connections work as intended. When the add-entity-framework feature was ready for review, I published (pushed) it up to GitHub. Other developers could also contribute to that feature.

As soon as I pushed the branch, AppVeyor run its tasks and send me the result on my personal address. Apparently there was an error occurred..

I signed in to AppVeyor and checked the build for details..

After fixing the error while still working on the add-entity-framework branch, the new push triggered a new successful build.

Now I was ready to open a Pull Request to merge the new feature branch the develop one.


Since the feature branch passed the review and all the build/test tasks, I merged it with the develop and then delete it by running the git-flow command:

git flow feature finish add-entity-framework


When I pushed the develop branch to origin, the related slot took all the changes have been made on the add-entity-framework feature.


By the way, at the same time there was another (fiction) developer working on another feature following the same process and when opened a pull request, AppVeyor build/test tasks failed.


He fixed the issue, merged the new feature in to develop and delete that branch.

Ship a new Release

It is about time to ship a new release, where we can see all the new features have been added to develop branch. We ‘ll deploy the new features through a new branch named release/{next-version} where {next-version} is the next tag/release of your software, such as 1.0.0, 1.2.3 etc.. Of course you can make your own convensions for naming your tags. To get the next version simply run git tag. I run the command and since the latest tag was 1.0.1 I named the next release release/1.0.2. I did that using the git-flow-cheatsheet command:

git flow release start 1.0.2


Based on the convensions I accepted during the git-flow init, this created a new branch named release/1.0.2 directly from the develop branch. I also published that branch up to origin using the command:

git flow release publish 1.0.2

It is very important to push the release branch up to GitHub because the next step is to sync the staging slot with that branch. At this point the developer may inform the tester that a new release candidate with the version 1.0.2 is ready for testing. The tester may sync the release/1.0.2 branch with a single Azure CLI 2.0 command but first he/she has to have it installed. You can install Azure CLI 2.0 from here. The first time you are going to use Azure CLI you have to login with your Microsoft Azure credentials. In order to do this, open a Powershell and run the az login command. After a successful login you will be able to access your Azure resources from the command line. As we described before, you could add a Webhook to the staging slot through the Azure portal in the same way we did for the develop branch and the dev slot. But since the staging slot is going to continuously “host” different release candidate branches, we need to use a more robust way and this is why we use Azure CLI. We want a Powershell script that accepts as a paremeter the release candidate branch name (e.g. 1.0.2) and when runs, it removes any previous branch/Webhook bound and add the new one. Doing this would result a new build and deployment on the staging slot, having all the new release features we want to test. Awesome right? The script is this one:

$branch=$args[0]
$repo = '<your repo url here>'
$resourceGroup = '<resource-group name here>'

az webapp deployment source delete --name ms-azure-github --resource-group ms-azure-githubRG --slot staging
az webapp deployment source config --name ms-azure-github --repo-url $repo --resource-group $resourceGroup --branch $branch --slot stagingwer

# example
# .\staging-deploy.ps1 "release/1.0.2"

You should replace your repository url and the Azure Resource Group under which the App Service is bound. Let’s see what I run.


As you can see, Azure instantly fired up a new build on the staging slot, and here is the result after the successful build..

You can find the script here. Testers at this point can test the new release features on a staging environment (staging database, application settings, etc..). If they find a bug, the developer can commit and push the changes on the release branch as it is. Since there is a Webhook to that branch, the staging slot will trigger a new deployment each time you push changes to the branch.

A very good practice for testing new features is to test what impact would the new features have in the production environment. But can we do this without affecting the actual production environment? Yes we can, thanks to the Swap with Preview feature. What this does in a nutshell, is apply production application settings on the staging slot. The very first time, you may haven’t deployed anything to production yet, but remember that we have already set all the application settings, such as connection strings. So we run a swap with review, production settings are applied in to the staging slot and we test the release with those settings. When we ensure that everything is OK, we complete the swap. If we aren’t, we “reset” the swap, that is apply the default staging settings to the staging slot, in other words revert the settings. We want to do all that stuff in a robust way as well and this is why we will use an Azure CLI 2.0 command again.

$action = $args[0] # preview, reset, swap
$resourceGroup = '<resource-group name here>'
$webapp = '<webapp name here>'
$slot = 'staging'

az webapp deployment slot swap --name $webapp --resource-group $resourceGroup --slot $slot --action $action

# example
# .\swap-slots.ps1 "preview"
# .\swap-slots.ps1 "swap"
# .\swap-slots.ps1 "reset"

You can find the script here. The script have 3 options to pass, preview to apply the production settings into the staging slot, swap to complete the swap which will result to deploy exactly what the staging slot has in to production and reset which resets the staging slot’s settings. You can read more about swap here.

After completing the swap to production we can finally see the release version deployed on the production slot.

A full release cycle has been completed and we can merge now the release branch to both the develop and master. Then we can safely delete it from both local and origin. The command to do it using the git-flow-cheatsheet is this:

git flow release finish 1.0.2

Hotfix

There are times (like a lot..) that you have to immediately push a hotfix in production. The way we do this using git-flow branching model is create a new hotfix branch from master and follow the same process we did for a release candidate branch. The naming though may vary, for example if you want to make a hotfix to release 1.0.2 then the hotfix branch may be named hotfix/1.0.2-1 and so on. Using git-flow-cheatsheet simply run this command:

git flow hotfix start <release-tag-version-#>


Push/publish the branch up to origin and sync with the staging slot as we did with a release branch.

Hotfix branches trigger AppVeyor build tasks as well..

Test the hotfix in staging, apply the swap with preview with the production and complete the swap when ready. When you are ready, finish/delete the hotfix branch, that is merge it with both the master and develop and then deleted it.

git flow hotfix finish VERSION

Discussion

Let’s review what we’ have done in this post. We saw how to use and setup Microsoft Azure, AppVeyor and Azure CLI continuously work with GitHub and more specifically the Git-Flow branching model. The more important points to remember is that a single push to develop branch where all the features are merged, automatically re-deploys the dev-slot up on Azure so that developers have a first view of what is currently happening. We also saw how easy and quick is to dynamically deploy a new release candidate or a hotfix up to the staging slot and swap it with the production. As far as the status of your builds, AppVeyor with its badges and email notifications will capture any failed builds or tests during the push or pull requests.

In case you find my blog’s content interesting, register your email to receive notifications of new posts and follow chsakell’s Blog on its Facebook or Twitter accounts.

Facebook Twitter GitHub
.NET Web Application Development by Chris S.
facebook twitter-small twitter-small

Azure Cosmos DB: DocumentDB API in Action

$
0
0
During tha last years, there has been an significant change regarding the amount of data being produced and consumed by applications while data-models and scemas are evolving more frequently than used to. Assuming a traditional application (makes use of relational databases) goes viral, those two combinations could easily bring it to an unfortunate state due to lack of scalability capabilities. This is where Azure Cosmos DB, planet NoSQL database as a service comes into the scene. In a nutchel, Azure Cosmos DB or DocumentDB if you prefer, is a fully managed by Microsoft Azure, incredibly scalable, queryable and last but not least, schema-free JSON document database. Here are the most important features that Azure Cosmos DB offers via the DocumentDB API:
  • Elastically scalable throughput and storage
  • Multi-region replication
  • Ad hoc queries with familiar SQL syntax
  • JavaScript execution within the database
  • Tunable consistency levels
  • Fully managed
  • Automatic indexing

Azure Cosmos DB is document based and when we refer to documents we mean JSON objects that can be managed through the Document API. If you are not familiar with the Azure Cosmos DB and its resources, here is the relationship between them.

This post will show you how to use the Document DB API to manipulate JSON documents in NoSQL DocumentDB collections. Let’s see in more detail what we are gonna see:

  • Create DocumentDB database and collections
  • CRUD operations: we will see in detail several ways to query, create, update and delete JSON documents
  • Create and consume JavaScript stored procedures, triggers and user defined functions
  • Add attachments to JSON documents
  • Create Generic Data DocumentDB repositories: ideally, we would like to have a single repository that could target a specific DocumentDB database with multiple collections
  • Use the famous Automapper to map DocumentDB documents to application domain models

What do you need to follow along with this tutorial? In case you don’t have an Azure Subscription, simply install the Azure Cosmos DB Emulator with which you can develop and test your DocumentDB based application locally. Are you ready? Let’s start!

Clone and explore the GitHub repository

I have already built an application that makes use of the DocumentDB API and the Azure Cosmos DB Emulator. Clone the repository from here and either open the solution in Visual Studio 2017 or run the following command to restore the required packages.

dotnet restore

Apparently the project is built in ASP.NET Core. Build the solution but before firing it up, make sure the Azure Comsos DB Emulator is up and running. In case you don’t know how to do this, search in the apps for Azure Cosmos DB Emulator and open the app. It will ask you to grant admimistrator permissions in order to start.

When the emulator starts, it will automatically open its Data Explorer on the browser at https://localhost:8081/_explorer/index.html. If it doesn’t, right click on the tray icon and select Open Data Explorer... Now you can run the app and initiate a DocumentDB database named Gallery and two collections, Pictures and Categories. The initializer class which we ‘ll examine in a moment, will also populate some mock data for you. At this point, what matters is to understand what exactly a collection and a document is, throught the emulator’s interface. Before examine what really happened on the emulator’s database, notice that the app is a Photo Gallery app.

Each picture, has a title and belongs to a category. Now let’s take a look at the emulator’s data explorer.

You can see how a collection and a JSON document looks like. A collection may have Stored Procedures, User Defined Functions and Triggers. A JSON document is of type Document and can be converted to an application’s domain model quite easily. Now let’s switch to code and see how to connect to a DocumentDB account and initiate database and collections.

Create Database and Collections

The first thing we need to do before create anything in a DocumentDB account is connect to it. The appsettings.json file contains the default DocumentDB Endpoint and Key to connect to the Azure DocumentDB Emulator. In case you had a Microsoft Azure DocumentDB account, you would have to place the relative endpoint and key here. Now open the DocumentDBInitializer class inside the Data folder. First of all, you need to install the Microsoft.Azure.DocumentDB.Core NuGet package. You create a DocumentClient instance using the endpoint and key of the DocumentDB account:

  Endpoint = configuration["DocumentDBEndpoint"];
  Key = configuration["DocumentDBKey"];

  client = new DocumentClient(new Uri(Endpoint), Key);
  

Before creating a database you have to check that doesn’t already exist.

  private static async Task CreateDatabaseIfNotExistsAsync(string DatabaseId)
  {
      try
      {
          await client.ReadDatabaseAsync(UriFactory.CreateDatabaseUri(DatabaseId));
      }
      catch (DocumentClientException e)
      {
          if (e.StatusCode == System.Net.HttpStatusCode.NotFound)
          {
              await client.CreateDatabaseAsync(new Database { Id = DatabaseId });
          }
          else
          {
              throw;
          }
      }
  }
  

The DatabaseId parameter is the database’s name and will be used for all queries against a database. When creating a database collection you may or may not provide a partitionkey. Partition keys are specified in the form of a JSON path, for example in our case and for the collection Pictures, we specified the partition key /category which represents the property Category in the PictureItem class.

  public class PictureItem
  {
      [JsonProperty(PropertyName = "id")]
      public string Id { get; set; }

      [Required]
      [JsonProperty(PropertyName = "title")]
      public string Title { get; set; }

      [Required]
      [JsonProperty(PropertyName = "category")]
      public string Category { get; set; }

      [JsonProperty(PropertyName = "dateCreated")]
      public DateTime DateCreated { get; set; }
  }
  

Partitioning in DocumentDB is an instrument to make a collection massively scale in terms of storage and throughput needs. Documents with the same partition key values are stored in the same physical partition (grouped together) and this is done and managed automatically for you by calculating and assign a hash of a partitionkey to the relative physical location. In order to understand the relationship between a partition and a collection, think that while a partition hosts one or more partition keys, a collection acts as the logical container of these physical partitions.

Documents with the same partition key are grouped together always in the same physical partition and if that group needs to grow more, Azure will automatically make any required transformations for this to happen (e.g shrink another group or move to a different partition). Always pick a partition key that leverages the maximum throughput of your DocumentDB account. In our case, assuming thousands of people uploading pictures with with different category at the same rate, then we would leverage the maximum throughput. On the other hand, if you pick a partition key such as the DateCreated, all pictures uploaded on the same date would end up to the same partition. Here is how you create a collection.

  private static async Task CreateCollectionIfNotExistsAsync(string DatabaseId, string CollectionId, string partitionkey = null)
  {
      try
      {
          await client.ReadDocumentCollectionAsync(UriFactory.CreateDocumentCollectionUri(DatabaseId, CollectionId));
      }
      catch (DocumentClientException e)
      {
          if (e.StatusCode == System.Net.HttpStatusCode.NotFound)
          {
              if (string.IsNullOrEmpty(partitionkey))
              {
                  await client.CreateDocumentCollectionAsync(
                      UriFactory.CreateDatabaseUri(DatabaseId),
                      new DocumentCollection { Id = CollectionId },
                      new RequestOptions { OfferThroughput = 1000 });
              }
              else
              {
                  await client.CreateDocumentCollectionAsync(
                      UriFactory.CreateDatabaseUri(DatabaseId),
                      new DocumentCollection
                      {
                          Id = CollectionId,
                          PartitionKey = new PartitionKeyDefinition
                          {
                              Paths = new Collection<string> { "/" + partitionkey }
                          }
                      },
                      new RequestOptions { OfferThroughput = 1000 });
              }

          }
          else
          {
              throw;
          }
      }
  }
 

Generic Data DocumentDB repositories Overview

Now that we have created the database and collections, we need an elegant way to CRUD against them. The requirements for the repositories are the following.

  • A repository should be able to target a specific DocumentDB database
  • A repository should be able to target all collections inside a DocumentDB database
  • The repository’s actions are responsible for converting documents to domain models, such as the PictureItem and the CategoryItem

Having these requirements in mind, I used the following repository pattern: At the top level there is a generic interface named IDocumentDBRepository.

public interface IDocumentDBRepository<DatabaseDB>
  {
      Task<T> GetItemAsync<T>(string id) where T : class;

      Task<T> GetItemAsync<T>(string id, string partitionKey) where T : class;

      Task<Document> GetDocumentAsync(string id, string partitionKey);

      Task<IEnumerable<T>> GetItemsAsync<T>() where T : class;

      Task<IEnumerable<T>> GetItemsAsync<T>(Expression<Func<T, bool>> predicate) where T : class;

      IEnumerable<T> CreateDocumentQuery<T>(string query, FeedOptions options) where T : class;

      Task<Document> CreateItemAsync<T>(T item) where T : class;

      Task<Document> CreateItemAsync<T>(T item, RequestOptions options) where T : class;

      Task<Document> UpdateItemAsync<T>(string id, T item) where T : class;

      Task<ResourceResponse<Attachment>> CreateAttachmentAsync(string attachmentsLink, object attachment, RequestOptions options);

      Task<ResourceResponse<Attachment>> ReadAttachmentAsync(string attachmentLink, string partitionkey);

      Task<ResourceResponse<Attachment>> ReplaceAttachmentAsync(Attachment attachment, RequestOptions options);

      Task DeleteItemAsync(string id);

      Task DeleteItemAsync(string id, string partitionKey);

      Task<StoredProcedureResponse<dynamic>> ExecuteStoredProcedureAsync(string procedureName, string query, string partitionKey);

      Task InitAsync(string collectionId);
  }

There is a base abstract class that implements all of the interface’s methods except the InitAsync.

public abstract class DocumentDBRepositoryBase<DatabaseDB> : IDocumentDBRepository<DatabaseDB>
  {
      #region Repository Configuration

      protected string Endpoint = string.Empty;
      protected string Key = string.Empty;
      protected string DatabaseId = string.Empty;
      protected string CollectionId = string.Empty;
      protected DocumentClient client;
      protected DocumentCollection collection;

      #endregion

      public DocumentDBRepositoryBase()
      {

      }

      // Code ommitted

      public abstract Task InitAsync(string collectionId);

Don’t worry about the implementation, we ‘ll check it later on the CRUD section. Last but not least, there are the concrete classes that can finally target specific DocumentDB database. In our case, we want a repository to target the Gallery database and its collections we created on the first step.

public class GalleryDBRepository : DocumentDBRepositoryBase<GalleryDBRepository>, IDocumentDBRepository<GalleryDBRepository>
  {
      public GalleryDBRepository(IConfiguration configuration)
      {
          Endpoint = configuration["DocumentDBEndpoint"];
          Key = configuration["DocumentDBKey"];
          DatabaseId = "Gallery";
      }

      public override async Task InitAsync(string collectionId)
      {
          if (client == null)
              client = new DocumentClient(new Uri(Endpoint), Key);

          if (CollectionId != collectionId)
          {
              CollectionId = collectionId;
              collection = await client.ReadDocumentCollectionAsync(UriFactory.CreateDocumentCollectionUri(DatabaseId, CollectionId));
          }
      }
  }

When we want to CRUD agains a specific collection we call the InitAsync method passing as a parameter the collection id. Make sure you register your repositories in the dependcy injection on the Starup class.

public void ConfigureServices(IServiceCollection services)
{
    // Repositories
    services.AddScoped<IDocumentDBRepository<GalleryDBRepository>, GalleryDBRepository>();

    // Add framework services.
    services.AddMvc();

    // Code omitted
}

It is more likely that you wont need more that two or three DocumentDB databases, so a single repository should be more than enough.

CRUD operations using the DocumentDB API

The Index action of the PicturesController reads all the pictures inside the Pictures collection. First of all we get an instance of the repository. As we previously saw, its constructor will also initiate the credentials to connect to the Gallery DocumentDB database.

public class PicturesController : Controller
{
    private IDocumentDBRepository<GalleryDBRepository> galleryRepository;

    public PicturesController(IDocumentDBRepository<GalleryDBRepository> galleryRepository)
    {
        this.galleryRepository = galleryRepository;
    }

    // code omitted

The Index action may or may not receive a parameter to filter the picture results based on their title. This means that we want to be able either query all the items of a collection or pass a predicate and filter them. Here are both the implementations.

public async Task<IEnumerable<T>> GetItemsAsync<T>() where T : class
{
    IDocumentQuery<T> query = client.CreateDocumentQuery<T>(
        UriFactory.CreateDocumentCollectionUri(DatabaseId, CollectionId),
        new FeedOptions { MaxItemCount = -1, EnableCrossPartitionQuery = true })
        .AsDocumentQuery();

    List<T> results = new List<T>();
    while (query.HasMoreResults)
    {
        results.AddRange(await query.ExecuteNextAsync<T>());
    }

    return results;
}

public async Task<IEnumerable<T>> GetItemsAsync<T>(Expression<Func<T, bool>> predicate) where T : class
{
    IDocumentQuery<T> query = client.CreateDocumentQuery<T>(
        UriFactory.CreateDocumentCollectionUri(DatabaseId, CollectionId),
        new FeedOptions { MaxItemCount = -1, EnableCrossPartitionQuery = true })
        .Where(predicate)
        .AsDocumentQuery();

    List<T> results = new List<T>();
    while (query.HasMoreResults)
    {
        results.AddRange(await query.ExecuteNextAsync<T>());
    }

    return results;
}

The DatabaseId has already defined on the repository’s constructor but the CollectionId needs to be initiated using the InitAsync method as follow:

[ActionName("Index")]
public async Task<IActionResult> Index(int page = 1, int pageSize = 8, string filter = null)
{
    await this.galleryRepository.InitAsync("Pictures");
    IEnumerable<PictureItem> items;

    if (string.IsNullOrEmpty(filter))
        items = await this.galleryRepository.GetItemsAsync<PictureItem>();
    else
    {
        items = await this.galleryRepository
            .GetItemsAsync<PictureItem>(picture => picture.Title.ToLower().Contains(filter.Trim().ToLower()));
        ViewBag.Message = "We found " + (items as ICollection<PictureItem>).Count + " pictures for term " + filter.Trim();
    }
    return View(items.ToPagedList(pageSize, page));
}

Here you can see for the first time, how we convert a Document item to a Domain model class. Using the same repository but targeting the Categories collection, we will be able to query CategoryItem items.

Create a Trigger

Let’s switch gears for a moment and see how to create a JavaScript trigger. We want our picture documents to get a DateCreated value when being added on the collection. For this we create a function that can read the document object from the request. This is the Triggers/createDate.js file.

function createDate() {
    var context = getContext();
    var request = context.getRequest();

    // document to be created in the current operation
    var documentToCreate = request.getBody();

    //if (!("dateCreated" in documentToCreate)) {
        var date = new Date();
        documentToCreate.dateCreated = date.toUTCString();
    //}

    // update the document
    request.setBody(documentToCreate);
}

The documentDB initializer class has the following method, that registers a Pre-Trigger type.

private static async Task CreateTriggerIfNotExistsAsync(string databaseId, string collectionId, string triggerName, string triggerPath)
{
    DocumentCollection collection = await client.ReadDocumentCollectionAsync(UriFactory.CreateDocumentCollectionUri(databaseId, collectionId));

    string triggersLink = collection.TriggersLink;
    string TriggerName = triggerName;

    Trigger trigger = client.CreateTriggerQuery(triggersLink)
                            .Where(sp => sp.Id == TriggerName)
                            .AsEnumerable()
                            .FirstOrDefault();

    if (trigger == null)
    {
        // Register a pre-trigger
        trigger = new Trigger
        {
            Id = TriggerName,
            Body = File.ReadAllText(Path.Combine(Config.ContentRootPath, triggerPath)),
            TriggerOperation = TriggerOperation.Create,
            TriggerType = TriggerType.Pre
        };

        await client.CreateTriggerAsync(triggersLink, trigger);
    }
}

One important thing to notice here is that a trigger is registered on a collection level (collection.TriggersLink). Now when we want to create a document and also require a trigger to run, we need to pass it in the RequestOptions. Here is how you create a document with or without request options.

public async Task<Document> CreateItemAsync<T>(T item) where T : class
{
    return await client.CreateDocumentAsync(UriFactory.CreateDocumentCollectionUri(DatabaseId, CollectionId), item);
}

public async Task<Document> CreateItemAsync<T>(T item, RequestOptions options) where T : class
{
    return await client.CreateDocumentAsync(UriFactory.CreateDocumentCollectionUri(DatabaseId, CollectionId), item, options);
}

And here is how the CreateAsync action creates a PictureItem document.

await this.galleryRepository.InitAsync("Pictures");

RequestOptions options = new RequestOptions { PreTriggerInclude = new List<string> { "createDate" } };

Document document = await this.galleryRepository.CreateItemAsync<PictureItem>(item, options);

The picture item instance parameter, has a Category value which will be used as the partition key value. You can confirm this in the DocumentDB emulator interface.

Create attachments

Each document has an AttachmentsLink where you can store attachments, in our case we ‘ll store a file attachment. Mind that you should avoid storing images attachments but instead you should store their links, otherwise you ‘ll probably face performance issues. In our application we store the images because we just want to see how to store files. In a production application we would store the images as blobs in an Azure Blog Storage account and store the blob’s link as an attachment to the document. Here is how we create, read and update a document attachment.

public async Task<ResourceResponse<Attachment>> CreateAttachmentAsync(string attachmentsLink, object attachment, RequestOptions options)
{
    return await client.CreateAttachmentAsync(attachmentsLink, attachment, options);
}

public async Task<ResourceResponse<Attachment>> ReadAttachmentAsync(string attachmentLink, string partitionkey)
{
    return await client.ReadAttachmentAsync(attachmentLink, new RequestOptions() { PartitionKey = new PartitionKey(partitionkey) });
}

public async Task<ResourceResponse<Attachment>> ReplaceAttachmentAsync(Attachment attachment, RequestOptions options)
{
    return await client.ReplaceAttachmentAsync(attachment, options);
}

The CreateAsync action method checks if there’s a file uploaded while posting to action and if so, creates the attachment.

if (file != null)
{
    var attachment = new Attachment { ContentType = file.ContentType, Id = "wallpaper", MediaLink = string.Empty };
    var input = new byte[file.OpenReadStream().Length];
    file.OpenReadStream().Read(input, 0, input.Length);
    attachment.SetPropertyValue("file", input);
    ResourceResponse<Attachment> createdAttachment = await this.galleryRepository.CreateAttachmentAsync(document.AttachmentsLink, attachment, new RequestOptions() { PartitionKey = new PartitionKey(item.Category) });
}

Since you create an attachment to a collection that uses partition keys, you also need to provide the one related to the document at which the attachment will be created.

Reading Documents & Automapper

When reading a document, you can either get a domain model instance or the generic Document.

public async Task<T> GetItemAsync<T>(string id, string partitionKey) where T : class
    {
        try
        {
            Document document = await client.ReadDocumentAsync(UriFactory.CreateDocumentUri(DatabaseId, CollectionId, id), new RequestOptions { PartitionKey = new PartitionKey(partitionKey) });
            return (T)(dynamic)document;
        }
        catch (DocumentClientException e)
        {
            if (e.StatusCode == System.Net.HttpStatusCode.NotFound)
            {
                return null;
            }
            else
            {
                throw;
            }
        }
    }

public async Task<Document> GetDocumentAsync(string id, string partitionKey)
{
    try
    {
        Document document = await client.ReadDocumentAsync(UriFactory.CreateDocumentUri(DatabaseId, CollectionId, id), new RequestOptions { PartitionKey = new PartitionKey(partitionKey) });
        return document;
    }
    catch (DocumentClientException e)
    {
        if (e.StatusCode == System.Net.HttpStatusCode.NotFound)
        {
            return null;
        }
        else
        {
            throw;
        }
    }
}

When you need to use the domain’s properties, the first one is preferred while when you need to access document based properties such as the document’s attachments link, the second one fits best. But what if you need both? Should you query twice? Fortunately no. The generic Document instance has all the properties you need to get a domain model instance. All you have to do, is use the GetPropertyValue value for all domain model’s properties. However, instead of doing this every time you want to create a domain model you can use AutoMapper as follow:

public DocumentMappingProfile()
{
    CreateMap<Document, PictureItem>()
        .ForAllMembers(opt =>
        {
            opt.MapFrom(doc => doc.GetPropertyValue<object>(opt.DestinationMember.Name.ToLower()));
        });


    // Could be something like this..

    /*
    CreateMap<Document, PictureItem>()
        .ForMember(vm => vm.Id, map => map.MapFrom(doc => doc.GetPropertyValue<string>("id")))
        .ForMember(vm => vm.Title, map => map.MapFrom(doc => doc.GetPropertyValue<string>("title")))
        .ForMember(vm => vm.Category, map => map.MapFrom(doc => doc.GetPropertyValue<string>("category")))
        .ForMember(vm => vm.DateCreated, map => map.MapFrom(doc => doc.GetPropertyValue<DateTime>("dateCreated")));
    */
}

The comments show how you would do manually the mapping for each property. But we figured out a more generic way didn’t we? Here’s how the EditAsync action reads a picture document.

[ActionName("Edit")]
public async Task<ActionResult> EditAsync(string id, string category)
{
    if (id == null)
    {
        return BadRequest();
    }

    await this.galleryRepository.InitAsync("Pictures");

    Document document = await this.galleryRepository.GetDocumentAsync(id, category);

    // No need for this one - AutoMapper will make the trick
    //PictureItem item = await this.galleryRepository.GetItemAsync<PictureItem>(id, category);
    PictureItem item = Mapper.Map<PictureItem>(document);

    if (item == null)
    {
        return NotFound();
    }

    await FillCategoriesAsync(category);

    return View(item);
}

In case you don’t want to use AutoMapper, you could achieve the deserialization using Newtonsoft.Json or the dynamic keyword. The following three statements will return the same result.

PictureItem itemWithAutoMapper = Mapper.Map<PictureItem>(document);
PictureItem itemWithNewtonSoft = JsonConvert.DeserializeObject<PictureItem>(document.ToString());
PictureItem itemWithDynamic = (dynamic)document;

Updating and deleting documents

Updating a document is prety simple.

public async Task<Document> UpdateItemAsync<T>(string id, T item) where T : class
    {
        return await client.ReplaceDocumentAsync(UriFactory.CreateDocumentUri(DatabaseId, CollectionId, id), item);
    }

Mind though that in case you change the value for the partition key, you cannot just simply update the document, since the new partition key may be stored in a different physical partition. In this case as you can see in the EditAsync POST method, you need to delete and re-created the item from scratch using the new partition key value.

[HttpPost]
[ActionName("Edit")]
[ValidateAntiForgeryToken]
public async Task<ActionResult> EditAsync(PictureItem item, [Bind("oldCategory")] string oldCategory, IFormFile file)
{
    if (ModelState.IsValid)
    {
        await this.galleryRepository.InitAsync("Pictures");

        Document document = null;

        if (item.Category == oldCategory)
        {
            document = await this.galleryRepository.UpdateItemAsync(item.Id, item);

            if (file != null)
            {
                var attachLink = UriFactory.CreateAttachmentUri("Gallery", "Pictures", document.Id, "wallpaper");
                Attachment attachment = await this.galleryRepository.ReadAttachmentAsync(attachLink.ToString(), item.Category);

                var input = new byte[file.OpenReadStream().Length];
                file.OpenReadStream().Read(input, 0, input.Length);
                attachment.SetPropertyValue("file", input);
                ResourceResponse<Attachment> createdAttachment = await this.galleryRepository.ReplaceAttachmentAsync(attachment, new RequestOptions() { PartitionKey = new PartitionKey(item.Category) });
            }
        }
        else
        {
            await this.galleryRepository.DeleteItemAsync(item.Id, oldCategory);

            document = await this.galleryRepository.CreateItemAsync(item);

            if (file != null)
            {
                var attachment = new Attachment { ContentType = file.ContentType, Id = "wallpaper", MediaLink = string.Empty };
                var input = new byte[file.OpenReadStream().Length];
                file.OpenReadStream().Read(input, 0, input.Length);
                attachment.SetPropertyValue("file", input);
                ResourceResponse<Attachment> createdAttachment = await this.galleryRepository.CreateAttachmentAsync(document.AttachmentsLink, attachment, new RequestOptions() { PartitionKey = new PartitionKey(item.Category) });
            }
        }

        return RedirectToAction("Index");
    }

    return View(item);
    }

Like most of the methods, depending if the collection created using a partition key or not, the DeleteItemAsync may or may not require a partition key value.

public async Task DeleteItemAsync(string id)
{
    await client.DeleteDocumentAsync(UriFactory.CreateDocumentUri(DatabaseId, CollectionId, id));
}

public async Task DeleteItemAsync(string id, string partitionKey)
{
    await client.DeleteDocumentAsync(UriFactory.CreateDocumentUri(DatabaseId, CollectionId, id), new RequestOptions { PartitionKey = new PartitionKey(partitionKey) });
}

If you try to query a collection that requires a partition key and you don’t provide one, you ‘ll get an exception. On the other hand if your query indeed must search among all partitions then all you have to do use the EnableCrossPartitionQuery = true in the FeedOptions.

Stored Procedures

A collection may have stored procedures as well. Our application uses the sample bulkDelete stored procedure from the official Azure DocumentDB repository, to remove pictures from the Pictures collection. The SP accepts an SQL query as a parameter. First, let’s register the stored procedure on the collection.

private static async Task CreateStoredProcedureIfNotExistsAsync(string databaseId, string collectionId, string procedureName, string procedurePath)
{
    DocumentCollection collection = await client.ReadDocumentCollectionAsync(UriFactory.CreateDocumentCollectionUri(databaseId, collectionId));

    string storedProceduresLink = collection.StoredProceduresLink;
    string StoredProcedureName = procedureName;

    StoredProcedure storedProcedure = client.CreateStoredProcedureQuery(storedProceduresLink)
                            .Where(sp => sp.Id == StoredProcedureName)
                            .AsEnumerable()
                            .FirstOrDefault();

    if (storedProcedure == null)
    {
        // Register a stored procedure
        storedProcedure = new StoredProcedure
        {
            Id = StoredProcedureName,
            Body = File.ReadAllText(Path.Combine(Config.ContentRootPath, procedurePath))
        };
        storedProcedure = await client.CreateStoredProcedureAsync(storedProceduresLink,
    storedProcedure);
    }
}

You can execute a stored procedure as follow:

public async Task<StoredProcedureResponse<dynamic>> ExecuteStoredProcedureAsync(string procedureName, string query, string partitionKey)
    {
        StoredProcedure storedProcedure = client.CreateStoredProcedureQuery(collection.StoredProceduresLink)
                                .Where(sp => sp.Id == procedureName)
                                .AsEnumerable()
                                .FirstOrDefault();

        return await client.ExecuteStoredProcedureAsync<dynamic>(storedProcedure.SelfLink, new RequestOptions { PartitionKey = new PartitionKey(partitionKey) }, query);

    }

The DeleteAll action method deletes either all pictures from a selected category or all the pictures in the collection. As you ‘ll see, the query passed to the bulkDelete stored procedure is the same, what changes is the partition key that can target pictures on an individual category.

[ActionName("DeleteAll")]
public async Task<ActionResult> DeleteAllAsync(string category)
{
    await this.galleryRepository.InitAsync("Categories");

    var categories = await this.galleryRepository.GetItemsAsync<CategoryItem>();

    await this.galleryRepository.InitAsync("Pictures");

    if (category != "All")
    {
        var response = await this.galleryRepository.ExecuteStoredProcedureAsync("bulkDelete", "SELECT * FROM c", categories.Where(cat => cat.Title.ToLower() == category.ToLower()).First().Title);
    }
    else
    {

        foreach (var cat in categories)
        {
            await this.galleryRepository.ExecuteStoredProcedureAsync("bulkDelete", "SELECT * FROM c", cat.Title);
        }
    }

    if (category != "All")
    {
        await FillCategoriesAsync("All");
        ViewBag.CategoryRemoved = category;

        return View();
    }
    else
        return RedirectToAction("Index");
}

User Defined Functions

You can register a UDF as follow:

private static async Task CreateUserDefinedFunctionIfNotExistsAsync(string databaseId, string collectionId, string udfName, string udfPath)
{
    DocumentCollection collection = await client.ReadDocumentCollectionAsync(UriFactory.CreateDocumentCollectionUri(databaseId, collectionId));

    UserDefinedFunction userDefinedFunction =
                client.CreateUserDefinedFunctionQuery(collection.UserDefinedFunctionsLink)
                    .Where(udf => udf.Id == udfName)
                    .AsEnumerable()
                    .FirstOrDefault();

    if (userDefinedFunction == null)
    {
        // Register User Defined Function
        userDefinedFunction = new UserDefinedFunction
        {
            Id = udfName,
            Body = System.IO.File.ReadAllText(Path.Combine(Config.ContentRootPath, udfPath))
        };

        await client.CreateUserDefinedFunctionAsync(collection.UserDefinedFunctionsLink, userDefinedFunction);
    }
}

Our application registres the toUpperCase UDF that returns a value in upper case.

function toUpperCase(item) {
    return item.toUpperCase();
}

The FillCategoriesAsync method can return each category title in upper case if required.

private async Task FillCategoriesAsync(string selectedCategory = null, bool toUpperCase = false)
{
    IEnumerable<CategoryItem> categoryItems = null;

    await this.galleryRepository.InitAsync("Categories");

    List<SelectListItem> items = new List<SelectListItem>();

    if (!toUpperCase)
        categoryItems = await this.galleryRepository.GetItemsAsync<CategoryItem>();
    else
        categoryItems = this.galleryRepository.CreateDocumentQuery<CategoryItem>("SELECT c.id, udf.toUpperCase(c.title) as Title FROM Categories c", new FeedOptions() { EnableCrossPartitionQuery = true });

    // code omitted

Here we can see, an alternative and powerful way for quering JSON documents using a combination of SQL and JavaScript syntax. You can read more about the Azure Cosmos DB Query syntax here.

That’s it we finished! We have seen many things related to the DocumentDB API, starting from installing the Azure Cosmos DB Emulator and creating a Database with some collections to CRUD operations and generic data repositories. You can download the project for this post, here.

In case you find my blog’s content interesting, register your email to receive notifications of new posts and follow chsakell’s Blog on its Facebook or Twitter accounts.

Facebook Twitter
.NET Web Application Development by Chris S.
facebook twitter-small
twitter-small

New e-book: Globally-Distributed Applications with Microsoft Azure

$
0
0

Microsoft Azure provides a huge amount of cloud services and is probably the best option for building applications in the cloud. While Microsoft provides documentation for its services, many times it isn’t clear how those services can fit together in a single application. I decided to write the Globally-Distributed Applications with Microsoft Azure book because I believed it will help developers and architects to understand not only how to use Azure Services but also how to combine them to solve complex problems while optimizing performance in a globally-distributed cloud solution.

The book is backed by an open-source .NET Core – Angular project that makes use of the following Azure Services:


About the book

The first 4 parts describe the features for each Azure Service used and their role in the design of the Online.Store application. It provides step by step instructions to configure Online.Store application settings and secret keys so that you can deploy it all over the globe. The final chapter explains the PowerShell scripts that you can use to automate processes in a globally distributed application (resource provisioning, releases or rolling back updates)

Continuous Integration & Delivery

Business continuity in geographically distributed systems with SQL Active Geo-Replication is a tough task to accomplish. The last part of the book covers all the DevOps processes needed to automate releases in globally-distributed applications. Learn how to structure and design resource groups, how to effortless provision their resources and release or rolling back new versions of your software, without affecting the end user experience.

Who should read this book

This book is both for developers and architects.

Developers will profit by learning to code against Azure Services. For every Azure Service
introduced such as Redis Cache or Service Bus, the source code contains a relevant library project with generic repositories.

public interface IRedisCacheRepository
{
   Task SetStringAsync(string key, string value);
   Task SetStringAsync(string key, string value, int expirationMinutes);
   Task SetItemAsync(string key, object item);
   Task SetItemAsync(string key, object item, int expirationMinutes);
   Task<T> GetItemAsync<T>(string key);
   Task RemoveAsync(string key);
}
public interface IDocumentDBRepository
{
   Task<T> GetItemAsync<T>(string id) where T : class;
   Task<T> GetItemAsync<T>(string id, string partitionKey) where T : class;
   Task<Document> GetDocumentAsync(string id, string partitionKey);
   Task<IEnumerable<T>> GetItemsAsync<T>() where T : class;
   Task<IEnumerable<T>> GetItemsAsync<T>(Expression<Func<T, bool>> predicate) where T : class;
   // Code omitted
}

Architects will find this book extremely useful as well. They will learn how to properly design
and group Azure resources in order to ease and automate release processes while keeping business
continuity. There are lots of PowerShell scripts written for DevOps automation and most of them
can easily change and meet your application requirements.

$serviceBusNameSpace 
    = "$PrimaryName-$ResourceGroupLocation-$serviceBusPrefix";
$serviceBusExists = Test-AzureName -ServiceBusNamespace $serviceBusNameSpace
# Check if the namespace already exists or needs to be created
if ($serviceBusExists)
{
    # Report what was found
    Get-AzureRMServiceBusNamespace -ResourceGroup $resourceGroupName `
                                    -NamespaceName $serviceBusNameSpace
}
else
{
    New-AzureRmServiceBusNamespace -ResourceGroup $resourceGroupName `
     -NamespaceName $serviceBusNameSpace -Location $ResourceGroupLocation

    $namespace = Get-AzureRMServiceBusNamespace `
                        -ResourceGroup $resourceGroupName `
                        -NamespaceName $serviceBusNameSpace
}

The book is available on Leanpub here. Anyone who buys the book gets any new releases instantly for free. To follow along with the examples you will need an Azure Free Account.

In case you find my blog’s content interesting, register your email to receive notifications of new posts and follow chsakell’s Blog on its Facebook or Twitter accounts.

Facebook Twitter
.NET Web Application Development by Chris S.
facebook twitter-small
twitter-small

Release process for distributed applications with data Geo-Replication

$
0
0

One of the most critical parts in software architecture is designing a release process for upgrading the software in your applications. The release plan is crucial and affects several factors such as:

  • Website’s availability or downtime
  • Time required to release new features
  • Ability to rollback your upgrades and return to a previous stable version (in case you find out that the new version fails)

The most common scenarios for traditional web applications are the following:

Entirely shutdown the website, display a friendly message to users that the site is under maintenance and finally upgrade code and SQL database. It’s easy, it works but it also has a huge disadvantage: During the release you prevent users from accessing your application which is unacceptable.

A widely used release plan with zero downtime requires to deploy your web app at two servers at least and put a load balancer on the front. When you decide to release new software, you disable one server at a time using the load balancer and you upgrade the code. SQL updates mustn’t have any breaking changes since both of the servers accessing the same database. While one of the servers are down the load balancer directs the requests to the server that is up and users don’t experience any downtime.

Things get really complicated when your application is deployed in more than one locations and also uses SQL Geo-Replication meaning that there is one primary READ-WRITE SQL database that continuously sends committed transactions asynchronously to its secondary databases so that they are up to date. Secondary databases are READ-ONLY and available for querying and failover as well. The following picture describes this type of architecture.

What makes this scenario difficult to release new software is the SQL Geo-Replication feature. In case you wish to release breaking SQL schema changes you have to apply them in the primary READ-WRITE database. When you do that, changes will be transferred to secondary databases as well which means that all web apps should also be already updated otherwise will crash (due to the breaking changes). The solution to the problem is to provision new web apps and databases and apply the changes on them instead to those that are currently in production. When you finish with the upgrades you disable the previous endpoints from your load balancer, add and enable new endpoints that point to your new web apps which run the latest version of your software. Still, it’s not that simple as it sounds and several steps needs to be taken to accomplish such type of a release so let’s break it down.

Step 1 – Provision new Web Apps and SQL Databases

In this step you provision new web apps and SQL server/databases. You provision the same number of web apps and databases that are currently in production. Let’s assume that you have deployed your application in West Europe, West Central US and South East Asia and that the primary READ-WRITE database is in West Europe.

Step 2 – Setup chaining SQL Geo-Replication

At this step you start replicating your SQL data at your new databases by setting them as secondaries of your primary READ-WRITE database. In Microsoft Azure you can set up to 4 secondary databases using the SQL Active Geo-Replication feature. If you wish to add more secondaries you use a process known as chaining where you create secondary of a secondary.

Step 3 – Switch primary READ-WRITE database

At this step, you stop replicating data and also change the primary READ-WRITE database to one of the newly created. The purpose of this step is to apply the SQL schema changes to the new databases while they contain the latest snapshot of your data. Following are the sub-tasks needed in order to complete this step:

  1. Make READ-ONLY the first primary database. This will ensure that the new secondaries will contain the latest snapshot of your data. During this point your application should be able to operate without a READ-WRITE database (e.g. using queues)
  2. Disconnect the main new secondary database
  3. Make the disconnected secondary database READ-WRITE

Step 4 – Deploy code and SQL shcema changes

You can safely deploy your code and SQL schema changes to the new web apps and databases. SQL schema changes are applied only in the new READ-WRITE database and replicated to the secondaries.

Notice that the web app is still served by the old version of your software and you haven’t removed SQL Geo-Replication from the old databases even they are all in READ-ONLY mode.

Step 5 – Switch active web apps

It is high time you serve the users the new version of your software. At this step, you add and enable endpoints to your load balancer for your new web apps and disable the old ones.

In case you decide to switch back to the old version, revert again the endpoints in your load balancer. Mind though that before doing so, you have to switch again the primary READ-WRITE database. After a successful release cycle you can safely delete the resources you don’t actually use (web apps and sql server/databases).

Microsoft Azure App Services

In case you use App Services for your web apps you have the option to create staging slots instead of provision new web apps, something that will certainly reduce the costs for your infrastructure. At this scenario you don’t add new endpoints to your Azure Traffic Manager but instead you swap the production and staging slots and the switch is done internally for you by the traffic manager.

About this post

This post is part of the new e-book Globally-Distributed Applications with Microsoft Azure that describes in detail how to build and deploy modern, highly available and planet-scale web applications with Microsoft Azure. The source code associated with the book contains a cross-platform Web App built with .NET Core and Angular and uses the following Azure Services:

Users authenticate using either ASP.NET Core Identity or Azure Active Directory B2C

The first 4 parts of the book describe the features for each Azure Service used and their role in the design of the web application. It provides step by step instructions to configure application settings and secret keys so that you can deploy it all over the globe. You will also find plenty of code for accessing Azure Services programmatically. The final chapter explains the PowerShell scripts that you can use to automate processes in a globally distributed application (resource provisioning, releases or rolling back updates). This means that all of the steps described in this post will be automated by scripts such as the following:

.\init-geo-replication.ps1 `
    -Database "<primary name>" `
    -PrimaryResourceGroupName "<primary-resource-group>" `
    -PrimaryServerName "<primary-server>" `
    -SecondaryResourceGroupName "<secondary-resource-group>" `
    -SecondaryServerName "<sercondary-server>"

.\deploy-webjob.ps1 `
    -PrimaryDatabaseServer "<primary-database-server>" `
    -Database "<database>" `
    -SqlServerLogin "<login>" `
    -SqlServerPassword "<password>" `
    -WebappParentResourceGroup "<parent-resource-group>"`
    -WebappResourceGroup "<webapp-resource-group>" `
    -WebjobAppLocation "<path-to-webjob>" `
    -DeploymentDestinationFolder "<destination-folder>" `
    -slot "upgrade"

.\start-deployment.ps1 `
   -token "<token>" -accountName "<account-name>" `
   -projectSlug "<project-slug>" `
   -webappName "<webapp-name>" `
   -resourceGroupName "<resource-group>" `
   -deploymentEnvironment "<environment>" `
   -slot "upgrade"

In case you find my blog’s content interesting, register your email to receive notifications of new posts and follow chsakell’s Blog on its Facebook or Twitter accounts.

Facebook Twitter
.NET Web Application Development by Chris S.
facebook twitter-small
twitter-small

Azure App Service CI/CD using AppVeyor

$
0
0

Publishing a web app to an Azure App Service is quite easy thing to do using Visual Studio but it certainly isn’t the best way to go with for enterprise solutions. Consider for example that you wish to deploy your application to different regions around the globe, using different application settings or build configurations. In case you choose Visual Studio this can be not only time consuming but also error prone. The real disadvantage though is that you don’t have full control of what is being deployed during the process. Ideally you would like to know more details about the deployment such as the build version to be released and if all the tests have been passed before the process starts. All these are possible using AppVeyor, a continuous integration solution capable of making the release process fast and more important reliable. AppVeyor is free for open-source projects but also provides several plans to meet the needs for enterprise solutions.

Integrating AppVeyor

There are 4 main steps you need to follow to configure CI/CD for your project in AppVeyor.

  1. Add the project to AppVeyor
  2. Create a build definition (appveyor.yml)
  3. Create a deployment environment
  4. Publish artifacts (either manually or automatically)

Before moving on to the next steps, visit AppVeyor and sign in. It is recommended that use your GitHub account and if you don’t have any simply create one, it’s free.

Add the project

For this tutorial we will be using a Web App built with .NET Core and Angular that you can find here. In case you wish to follow along with this app simply fork the repository. To fork the repository, sign in to your GitHub account and visit the repository’s URL. Click the Fork button on the upper right and that’s it. Back in AppVeyor, click Projects from the top menu, search for the forked repository in the GitHub tab and click the Add button on the right.

Notice that you can integrate projects from many other sources such as Bitbucket, Visual Studio Team Services, GitLab, Kiln, GitHub Enterprise, Stash, Git, Mercurial and Subversion

AppVeyor.yml build definition

AppVeyor requires to add an appveyor.yml file at the root of your repository that defines what do you want it to do with your project when you push changes. This file is already there for you so go ahead and open it. Following are the most important parts of the file.

version: '2.0.{build}'
image: Visual Studio 2017
branches:
  only:
  - master
  - develop

The above snipper tells AppVeyor to use the Visual Studio 2017 build worker image so that it can build the .NET Core application. An image has a pre-installed software ready to be used for processing your projects. It also informs AppVeyor to run a build every time you push a commit either in the master or the develop branches. Any commits to different branches will not trigger a build.

# Install scripts. (runs after repo cloning)
install:
  # Get the latest stable version of Node.js or io.js
  - cd DotNetCoreAngularToAzure
  # install npm modules
  - ps: Install-Product node $env:nodejs_version
  - npm install
  - node node_modules/webpack/bin/webpack.js --config webpack.config.vendor.js --env.prod

The install instruction prepares the environment before the actual build starts. After changing the working directory to DotNetCoreAngularToAzure web application project, it installs node
and runs the npm install command. Next it runs webpack to produce the vendors packages
file used by the Angular application.

The web app was created using the .NET Core – Angular template in Visual Studio 2017

before_build:
  # Display minimal restore text
  - cmd: dotnet restore --verbosity m
build_script:
  # output will be in ./DotNetCoreAngularToAzure/bin/Release/netcoreapp2.0/publish/
  - cmd: dotnet publish -c Release

Before building the project it restores packages using the .NET Core CLI. Next it runs the dotnet publish command to produce the artifacts.

artifacts:
 - path: '\DotNetCoreAngularToAzure\bin\Release\netcoreapp2.0\publish'
   name: WebSite
   type: WebDeployPackage

When dotnet publish -c Release command finishes, the produced artifacts are stored in the \Online.Store\bin\Release\netcoreapp2.0\publish folder. The instruction tells AppVeyor to name the artifacts WebSite and ZIP them in a file named WebSite.zip. These artifacts will be available for deployment using the Web Deploy method.

Build artifacts

Every build produces its own artifacts. This means that using the build number you can deploy any version of your software at any time you want

Try and push a simple change to your forked repository. AppVeyor will trigger a new build. To view your project’s build history, in the Projects page click the forked repository and select the History tab. You can check how a build looks like here. By default AppVeyor will send you an email saying if the build was successful or not.

Web Deploy

You will use the Web Deploy method to publish the artifacts of your builds up on your App Services in Azure. This will be done through AppVeyor Deployment Environments. A deployment environment’s role is to connect to a specific Azure App Service and publish the artifacts for the selected build. In order to connect though to an App Service it needs to know the web deploy‘s credentials for that service. These credentials can be found in the publish profile of an App Service slot. This means that there will be different deployment environments in AppVeyor for each App Service you create. Before continue on it’s good to know how an xml publish profile looks like. Assuming that you have already created an App Service in Azure Portal open the resource and in the main blade select Overview. Click the Get publish profile button to download the App Service’s publish profile.

Part of the xml file for the App Service I created looks like this:

<publishProfile 
    profileName="app-service-appveyor - Web Deploy" 
    publishMethod="MSDeploy" 
    publishUrl="app-service-appveyor.scm.azurewebsites.net:443" 
    msdeploySite="app-service-appveyor" 
    userName="$app-service-appveyor" 
    userPWD="TnEv09M0WTLAzPnbNHACoxWsSGoyTgfMc0a0cbwi4EGHsB4ZQ5wCDYPvp9zk" 
    destinationAppUrl="http://app-service-appveyor.azurewebsites.net" 
    SQLServerDBConnectionString="" 
    mySQLDBConnectionString="" 
    hostingProviderForumLink="" 
    controlPanelLink="http://windows.azure.com" 
    webSystem="WebSites">
      <databases />
   </publishProfile>

To create an AppVeyor’s deployment environment and publish build artifacts to an Azure App Service, you will use the following properties from the publish profile file:

  • msdeploySite
  • publishUrl
  • userName
  • userPWD

Deployment environment

Back in AppVeyor select ENVIRONMENTS from the top menu and click NEW ENVIRONMENT to create a deployment environment. Fill the form as follow:

  • Provider: Select Web Deploy
  • Environment name: Just give it a name such as Production
  • Server: This value has the following format:
    https://<publishUrl>/msdeploy.axd?site=<msdeploySite>
    

    where you need to replace the <publishUrl> and the <msdeploySite> variables with the respective values existing in the publish profile file you saw before. In my case the value for the Server property was the following:

    https://app-service-appveyor.scm.azurewebsites.net:443/msdeploy.axd?site=app-service-appveyor
    
  • Webiste name: Use the msdeploySite value from the publish profile
  • Username: Use the userName value from the publish profile
  • Password: Use the userPWD value from the publish profile
  • Artifact to deploy: WebSite (this is the value you used in the artifacts section of the appveyor.yml file)
  • ASP.NET Core application: Checked
  • Force restarting ASP.NET Core application on deploy: Checked
  • Take ASP.NET application offline during deployment: Checked
  • Other settings: Leave all the other settings as are


After filling the form click the Add environment button to create the deployment environment.

Trigger a deployment

You can trigger a deployment in 3 different ways:

  1. Manually using AppVeyor’s interface
  2. Automatically after a push and a successful build, by configuring appveyor.yml file
  3. On-demand using REST APIs

To trigger a deployment manually, select the deployment environment you wish to use and click NEW DEPLOYMENT.

Next select the project and the build you want to be used for the deployment and click DEPLOY.

The deployment shouldn’t take more than a few seconds to finish. You can check a sample deployment here. If you wish to trigger a deployment automatically each time you push changes to a branch, you need to add a deploy section in the appveyor.yml file as follow:

deploy:
  - provider: Environment
    name: Production
    on:
      branch: master

The snippet above declares that you wish to use the Production deployment environment to trigger a deployment each time you push changes to the master branch. This means that the build will be triggered when you push either in the master or develop branch but only changes in the master branch will trigger a deployment. On the other hand, in case you wish to take the full control of the deployments and trigger them on demand and optionally passing a build version number you have to leverage AppVeyor’s REST APIs. In the Globally-Distributed Applications with Microsoft Azure e-book you will find PowerShell scripts that automate creating, updating and triggering of deployment environments.

.\create-deployment-environment.ps1 `
          -token "<appveyor-api-token>" `
          -projectSlug "<project-slug>" `
          -webappName "<webappName>" `
          -resourceGroupName "<resourceGroupName>" `
          -slot "staging"

.\start-deployment.ps1  `
          -token "<appveyor-api-token>" -accountName "<accountName>" `
          -projectSlug "<project-slug>" `
          -webappName "<webappName>" `
          -resourceGroupName "<resourceGroupName>" `
          -deploymentEnvironment "<deploymentEnvironment>" `
          -slot "staging"

Notice that the scripts can take care to use specific deployment environments per App Service slots, meaning that each slot has each own deployment environment.

In case you find my blog’s content interesting, register your email to receive notifications of new posts and follow chsakell’s Blog on its Facebook or Twitter accounts.

Facebook Twitter
.NET Web Application Development by Chris S.
facebook twitter-small
twitter-small

ASP.NET Core Identity Series – Getting Started

$
0
0

ASP.NET Core Identity is Microsoft’s membership system widely known to .NET developers for managing application users. And by managing we mean everything that has to do with a user account such as creating one, login functionality (cookies, tokens, Multi-Factor Authentication, etc..), resetting passwords, using external login providers or even providing access to certain resources. This membership system has always been quite easy to be used and plugged in a .NET application providing easy access to extremely useful helper methods around authentication that would be pain in the ass to implement ourselves. More over, developers have highly associated it with Entity Framework and a specific SQL Schema used to support all the membership functionality. On the other hand, because of the fact that the library is so easy to be used without having any expertise on Identity and Security, developers many times find it difficult to extend it or customize its default behavior and fit their application needs. This can only be done only if there is deep knowledge on how the library works behind the scenes on its kernel and this is what we are gonna see on this post.

More specifically we will study the ASP.NET Core Identity library’s core components and the way they are architectected and coupled together to provide the basic user management features. Throught the ASP.NET Core Identity blog post series, we will be building step by step an ASP.NET Core Web application and explaining Identity features as we add them. Before start building the application though we need to learn the basics in theory.

The source code for the series is available here. Each part will have a related branch on the repository. You can either follow along with the tutorial or simply clone the repository. In case you choose the latter make sure you checkout the getting-started branch as follow:

git clone https://github.com/chsakell/aspnet-core-identity
cd .\aspnet-core-identity
git fetch
git checkout getting-started

ASP.NET Core Identity Basics

It is fact that many developers confuse ASP.NET Core Identity’s role in the stack by thinking that it’s an authentication library. Well.. actually it isn’t but where does this assumption come from anyway? The answer is hidden in the library’s structure so let’s start investigating it from bottom to top. At the very bottom of the architecture there is a store which most of the times is a database.

This is where the actual user data are stored, data such as usernames, email addresses or hashed passwords. The next layer is the data access layer which is implementations of the IUserStore and IRoleStore interfaces.

These interfaces abstract the way the membership schema is implemented in the database (or other type of storage) which means that this is where you may write your own data access layer that saves and managing users on your own store and custom schema. IUserStore is a required dependency for the next layer to work which means that you always have to provide an implentation for the library to work. In case you wonder, Entity Framework provides an IUserStore implementation out of the box which models a user as an IdentityUser in the database. The next layer is the one you probably use the most, the business layer and is aparted from the UserManager and RoleManager.

These managers hold all the business logic such as validating user passwords based on configuration or checking that a user with the same username doesn’t exist in the database during registration. Under the hood managers make calls to the data access layer. The final layer is a set of extensions which I use to call plugins. The most used plugin is the SignInManager which manages sign in operations for users.

These extensions sit on top of the managers by abstracting their logic or adding integration with other libraries. Signing a user using an external login is a simple example of these extensions. ASP.NET Core Identity’s role isn’t authenticating users but managing them. But what extensions can do is take this step further and add functionality such as authenticating users. So looking back to the question why do many developers think of ASP.NET Core Identity as an authentication library? Because of it’s widely known and commonly used extensions that provide this type of functionality! Enough with the theory, let’s get start coding and explaining each feature step by step.

Start coding

Open Visual Studio 2017 and create a .NET Core 2.0 Web Application named AspNetCoreIdentity by selecting the Angular template. The first thing you need to do is change the installed dependencies. By default the selected template will reference the Microsoft.AspNetCore.All package which includes a bunch of unnecessary packages. Right click the project and select edit AspNetCoreIdentity.scproj. Remove the default Microsoft.AspNetCore.All reference and add the following:

<ItemGroup>
<PackageReference Include="Microsoft.AspNetCore" Version="2.0.2" />
<PackageReference Include="Microsoft.AspNetCore.Mvc" Version="2.0.3" />
<PackageReference Include="Microsoft.AspNetCore.SpaServices" Version="2.0.3" />
<PackageReference Include="Microsoft.AspNetCore.StaticFiles" Version="2.0.2" />
</ItemGroup>

Switch to Startup.cs file and register ASP.NET Core Identity inside the ConfigureServices method as follow:

public void ConfigureServices(IServiceCollection services)
{
    services.AddIdentityCore<AppUser>(options => { });

    services.AddMvc();
}

First let’s fix the compalition errors and then we will explain what’s happening behind the scenes. Install the Microsoft.Extensions.Identity.Core NuGet package using the NuGet package manager or simply run the following command on the Package Manager Console.

install-package Microsoft.Extensions.Identity.Core

Next create a Models folder and add the AppUser class.

public class AppUser
{
    public string Id { get; set; }
    public string UserName { get; set; }
    public string EmailAddress { get; set; }
    public string NormalizeUserName { get; set; }
    public string PasswordHash { get; set; }
}

The Microsoft.Extensions.Identity.Core package contains the core interfaces and managers to get started with ASP.NET Core Identity and also provides default implementations for features such as password hashing. The AddIdentityCore<T> generic method will register and make all required dependencies for a UserManager<T> and a RoleManager<T> available as well. But what exactly is a UserManager<T> anyway? UserManager as already mentioned belongs to the business layer of the ASP.NET Core Identity’s architecture and provides the APIs for managing users in the persistence store. Operations such as resetting password, email configuration or password validation are made through this entity. To accomplish all these the manager requires a set of dependencies which we can study on its constructor.

public UserManager(IUserStore<TUser> store,
    IOptions<IdentityOptions> optionsAccessor,
    IPasswordHasher<TUser> passwordHasher,
    IEnumerable<IUserValidator<TUser>> userValidators,
    IEnumerable<IPasswordValidator<TUser>> passwordValidators,
    ILookupNormalizer keyNormalizer,
    IdentityErrorDescriber errors,
    IServiceProvider services,
    ILogger<UserManager<TUser>> logger)

Following is a list describing each of the constructor’s dependencies:

  • IUserStore<TUser> store: The persistence store the manager will operate over
  • IOptions<IdentityOptions> optionsAccessor: The accessor used to access the IdentityOptions
  • IPasswordHasher<TUser> passwordHasher: The password hashing implementation to use when saving passwords
  • IEnumerable<IUserValidator<TUser>> userValidators: A collection of IUserValidator<TUser> to validate users against
  • IEnumerable<IPasswordValidator<TUser>> passwordValidators: A collection of IPasswordValidator<TUser> to validate passwords against
  • ILookupNormalizer keyNormalizer: The ILookupNormalizer to use when generating index keys for users
  • IdentityErrorDescriber errors: The IdentityErrorDescriber used to provide error messages
  • IServiceProvider services: The IServiceProvider used to resolve services
  • ILogger<UserManager<TUser>> logger: The logger used to log messages, warnings and errors

The AddIdentityCore<T> method will add and configure the identity system for the specified User and Role types.

public static IdentityBuilder AddIdentityCore<TUser>(this IServiceCollection services, Action<IdentityOptions> setupAction)
    where TUser : class
{
    // Services identity depends on
    services.AddOptions().AddLogging();

    // Services used by identity
    services.TryAddScoped<IUserValidator<TUser>, UserValidator<TUser>>();
    services.TryAddScoped<IPasswordValidator<TUser>, PasswordValidator<TUser>>();
    services.TryAddScoped<IPasswordHasher<TUser>, PasswordHasher<TUser>>();
    services.TryAddScoped<ILookupNormalizer, UpperInvariantLookupNormalizer>();
    // No interface for the error describer so we can add errors without rev'ing the interface
    services.TryAddScoped<IdentityErrorDescriber>();
    services.TryAddScoped<IUserClaimsPrincipalFactory<TUser>, UserClaimsPrincipalFactory<TUser>>();
    services.TryAddScoped<UserManager<TUser>, UserManager<TUser>>();

    if (setupAction != null)
    {
        services.Configure(setupAction);
    }

    return new IdentityBuilder(typeof(TUser), services);
}

Having said all that let’s switch back to our solution and try to register a user. Before doing so we will add some helper ViewModel classes to be used in our AccountController. Add a new folder named ViewModels and create the following two classes.

public class RegisterVM
{
    public string UserName { get; set; }

    [DataType(DataType.EmailAddress)]
    public string EmailAddress { get; set; }

    [DataType(DataType.Password)]
    public string Password { get; set; }

    [Compare("Password")]
    [DataType(DataType.Password)]
    public string ConfirmPassword { get; set; }
}
public class ResultVM
{
    public Status Status { get; set; }
    public string Message { get; set; }
    public object Data { get; set; }
}

public enum Status
{
    Success = 1,
    Error = 2
}

Next create the AccountController Controller inside the Controllers folder and paste the following code.

[Route("api/[controller]/[action]")]
public class AccountController : Controller
{
    private readonly UserManager<AppUser> _userManager;

    public AccountController(UserManager<AppUser> userManager)
    {
        this._userManager = userManager;
    }

    [HttpPost]
    public async Task<ResultVM> Register([FromBody]RegisterVM model)
    {
        if (ModelState.IsValid)
        {
            IdentityResult result = null;
            var user = await _userManager.FindByNameAsync(model.UserName);

            if (user != null)
            {
                return new ResultVM
                {
                    Status = Status.Error,
                    Message = "Invalid data",
                    Data = "<li>User already exists</li>"
                };
            }

            user = new AppUser
            {
                Id = Guid.NewGuid().ToString(),
                UserName = model.UserName,
                EmailAddress = model.EmailAddress
            };

            result = await _userManager.CreateAsync(user, model.Password);

            if (result.Succeeded)
            {
                return new ResultVM
                {
                    Status = Status.Success,
                    Message = "User Created",
                    Data = user
                };
            }
            else
            {
                var resultErrors = result.Errors.Select(e => "<li>" + e.Description + "</li>");
                return new ResultVM
                {
                    Status = Status.Error,
                    Message = "Invalid data",
                    Data = string.Join("", resultErrors)
                };
            }
        }

        var errors = ModelState.Keys.Select(e => "<li>" + e + "</li>");
        return new ResultVM
        {
            Status = Status.Error,
            Message = "Invalid data",
            Data = string.Join("", errors)
        };
    }
}

Don’t mind that much about the returned results (will be used from the front later on..), just focus on the highlighted lines where either we try to find a user or we register one. Fire up the app and try to register a user by sending the following POST request to the AccountController register method using Fiddler or Postman (make sure you set Content-Type: application/json).

{
	"userName" : "chsakell",
	"emailAddress" : "example@gmail.com",
	"password" : "&MysuperPass123",
	"confirmPassword" : "&MysuperPass123"
}

As soon as you try to send the request you will get an awesome error saying:

InvalidOperationException: Unable to resolve service for type ‘Microsoft.AspNetCore.Identity.IUserStore`1[AspNetCoreIdentity.Models.AppUser]’ while attempting to activate ‘Microsoft.AspNetCore.Identity.UserManager`1[AspNetCoreIdentity.Models.AppUser]’


Well this is quite descriptive isn’t it? It says that we haven’t provided an IUserStore<AppUser> and hence the UserManager<AppUser> couln’t get activated. Of course this makes sense since we haven’t decided yet the store (lowest level in architecture) where the user and role entities are actually stored. Also if you recall, the very first parameter of the UserManager<T> constructor is of type IUserStore<TUser> store. So let’s provide an implementation of IUserStore<TUser> store. For this part of the series we will be using an in memory repository just to simplify and focus on the core components of the ASP.NET Core Identity library. Add the UserRepository class inside a new folder named Infrastructure.

public static class UserRepository
{
    public static List<AppUser> Users;

    static UserRepository()
    {
        Users = new List<AppUser>();
    }
}

Inside the same folder add a class named AppUserStore and implement the IUserStore<AppUser> interface. The IUserStore<TUser> interface requires that T is a class which means that nothing restricts you to implement the backing store however you wish. This answers the question you may have had for a long time, how to use ASP.NET Core Identity with your own custom schema and not by extending the Entity’s Framework IdentityUser model. Let’s take a look at the IUserStore<TUser> interface methods before viewing the AppUserStore code.

public interface IUserStore<TUser> : IDisposable where TUser : class
{
    /// <summary>
    /// Gets the user identifier for the specified user/>.
    /// </summary>
    Task<string> GetUserIdAsync(TUser user, CancellationToken cancellationToken);

    /// <summary>
    /// Gets the user name for the specified user/>.
    /// </summary>
    Task<string> GetUserNameAsync(TUser user, CancellationToken cancellationToken);

    /// <summary>
    /// Sets the given <paramref name="userName" /> for the specified user/>.
    /// </summary>
    Task SetUserNameAsync(TUser user, string userName, CancellationToken cancellationToken);

    /// <summary>
    /// Gets the normalized user name for the specified user/>.
    /// </summary>
    Task<string> GetNormalizedUserNameAsync(TUser user, CancellationToken cancellationToken);

    /// <summary>
    /// Sets the given normalized name for the specified user/>.
    /// </summary>
    Task SetNormalizedUserNameAsync(TUser user, string normalizedName, CancellationToken cancellationToken);

    /// <summary>
    /// Creates the specified user/> in the user store.
    /// </summary>
    Task<IdentityResult> CreateAsync(TUser user, CancellationToken cancellationToken);

    /// <summary>
    /// Updates the specified user/> in the user store.
    /// </summary>
    Task<IdentityResult> UpdateAsync(TUser user, CancellationToken cancellationToken);

    /// <summary>
    /// Deletes the specified user/> from the user store.
    /// </summary>
    Task<IdentityResult> DeleteAsync(TUser user, CancellationToken cancellationToken);

    /// <summary>
    /// Finds and returns a user, if any, who has the specified userId/>.
    /// </summary>
    Task<TUser> FindByIdAsync(string userId, CancellationToken cancellationToken);

    /// <summary>
    /// Finds and returns a user, if any, who has the specified normalized user name.
    /// </summary>
    Task<TUser> FindByNameAsync(string normalizedUserName, CancellationToken cancellationToken);
}

The default implementation for the normalized name is the uppercase username. Appart from an IUserStore implementation you also have to provide an IUserPasswordStore implementation as well. This interface is much simpler and provides an abstraction for a store containing users password hashes.

public interface IUserPasswordStore<TUser> : IUserStore<TUser> where TUser : class
{
    /// <summary>
    /// Sets the password hash for the specified user/>.
    /// </summary>
    Task SetPasswordHashAsync(TUser user, string passwordHash, CancellationToken cancellationToken);

    /// <summary>
    /// Gets the password hash for the specified user/>.
    /// </summary>
    Task<string> GetPasswordHashAsync(TUser user, CancellationToken cancellationToken);

    /// <summary>
    /// Gets a flag indicating whether the specified user/> has a password.
    /// </summary>
    Task<bool> HasPasswordAsync(TUser user, CancellationToken cancellationToken);
}

Following is the AppUserStore implementing both the IUserStore<AppUser> and the IUserPasswordStore<AppUser> while saving users in an in memory store.

public class AppUserStore : IUserStore<AppUser>, IUserPasswordStore<AppUser>
{
    #region IUserStore
    public Task<IdentityResult> CreateAsync(AppUser user, CancellationToken cancellationToken)
    {
        UserRepository.Users.Add(new AppUser
        {
            Id = user.Id,
            UserName = user.UserName,
            EmailAddress = user.EmailAddress,
            NormalizeUserName = user.NormalizeUserName,
            PasswordHash = user.PasswordHash
        });

        return Task.FromResult(IdentityResult.Success);
    }

    public Task<IdentityResult> DeleteAsync(AppUser user, CancellationToken cancellationToken)
    {
        var appUser = UserRepository.Users.FirstOrDefault(u => u.Id == user.Id);

        if (appUser != null)
        {
            UserRepository.Users.Remove(appUser);
        }

        return Task.FromResult(IdentityResult.Success);
    }

    public void Dispose()
    {
        // throw new NotImplementedException();
    }

    public Task<AppUser> FindByIdAsync(string userId, CancellationToken cancellationToken)
    {
        return Task.FromResult(UserRepository.Users.FirstOrDefault(u => u.Id == userId));
    }

    public Task<AppUser> FindByNameAsync(string normalizedUserName, CancellationToken cancellationToken)
    {
        return Task.FromResult(UserRepository.Users.FirstOrDefault(u => u.NormalizeUserName == normalizedUserName));
    }

    public Task<string> GetNormalizedUserNameAsync(AppUser user, CancellationToken cancellationToken)
    {
        return Task.FromResult(user.NormalizeUserName);
    }

    public Task<string> GetUserIdAsync(AppUser user, CancellationToken cancellationToken)
    {
        return Task.FromResult(user.Id);
    }

    public Task<string> GetUserNameAsync(AppUser user, CancellationToken cancellationToken)
    {
        return Task.FromResult(user.UserName);
    }

    public Task SetNormalizedUserNameAsync(AppUser user, string normalizedName, CancellationToken cancellationToken)
    {
        user.NormalizeUserName = normalizedName;
        return Task.CompletedTask;
    }

    public Task SetUserNameAsync(AppUser user, string userName, CancellationToken cancellationToken)
    {
        user.UserName = userName;
        return Task.CompletedTask;
    }

    public Task<IdentityResult> UpdateAsync(AppUser user, CancellationToken cancellationToken)
    {
        var appUser = UserRepository.Users.FirstOrDefault(u => u.Id == user.Id);

        if (appUser != null)
        {
            appUser.NormalizeUserName = user.NormalizeUserName;
            appUser.UserName = user.UserName;
            appUser.EmailAddress = user.EmailAddress;
            appUser.PasswordHash = user.PasswordHash;
        }

        return Task.FromResult(IdentityResult.Success);
    }

    #endregion

    #region IUserPasswordStore
    public Task<bool> HasPasswordAsync(AppUser user, CancellationToken cancellationToken)
    {
        return Task.FromResult(user.PasswordHash != null);
    }

    public Task<string> GetPasswordHashAsync(AppUser user, CancellationToken cancellationToken)
    {
        return Task.FromResult(user.PasswordHash);
    }

    public Task SetPasswordHashAsync(AppUser user, string passwordHash, CancellationToken cancellationToken)
    {
        user.PasswordHash = passwordHash;
        return Task.CompletedTask;
    }

    #endregion
}

Now that we do have an IUserStore implementation switch back to Startup ConfigureServices method and add it to the services as follow:

public void ConfigureServices(IServiceCollection services)
{
    services.AddMvc();

    services.AddIdentityCore<AppUser>(options => { });
    services.AddScoped<IUserStore<AppUser>, AppUserStore>();
}

Rebuild the app, fire up and POST the same request again. Verify that this time the user is being created successfully. Notice that when _userManager.FindByNameAsync(model.UserName) in the AccountController, invokes the FindByNameAsync of the AppUserStore provided. This makes sense if you study UserManager‘s implementation in the library. Here’s a part of it.

public virtual async Task<TUser> FindByNameAsync(string userName)
{
    ThrowIfDisposed();
    if (userName == null)
    {
        throw new ArgumentNullException(nameof(userName));
    }
    userName = NormalizeKey(userName);

    var user = await Store.FindByNameAsync(userName, CancellationToken);

    // Code omitted
    
    return user;
}

The same applies for the _userManager.CreateAsync(user, model.Password) call of the AccountController which internally invokes several methods both from IUserPasswordStore and the IUserStore which provided through the AppUserStore.

Signing a user

Now that we have a user registered and stored in the in memory collection we can procceed to the sign in feature. We will use Cookie authentication and for this we need to install a new package named Microsoft.AspNetCore.Authentication.Cookies which is the default ASP.NET Core authentication middleware. Install the package either from the NuGet Package manager or the Package Manager Console by running the following command:

install-package Microsoft.AspNetCore.Authentication.Cookies

Notice that authentication isn’t handled by the ASP.NET Core Identity library but by the new authentication middleware we have just installed

In the Starup class first register the required services for the authentication middleware in the ConfigureServices method as follow:

public void ConfigureServices(IServiceCollection services)
{
    services.AddMvc();

    services.AddIdentityCore<AppUser>(options => { });
    services.AddScoped<IUserStore<AppUser>, AppUserStore>();

    services.AddAuthentication(CookieAuthenticationDefaults.AuthenticationScheme)
        .AddCookie(CookieAuthenticationDefaults.AuthenticationScheme, options =>
        {
            options.Events.OnRedirectToAccessDenied = ReplaceRedirector(HttpStatusCode.Forbidden, options.Events.OnRedirectToAccessDenied);
            options.Events.OnRedirectToLogin = ReplaceRedirector(HttpStatusCode.Unauthorized, options.Events.OnRedirectToLogin);
        });
}

The AddCookie method registers the services for a scheme named CookieAuthenticationDefaults.AuthenticationScheme which is “Cookies” and use it as the default with the services.AddAuthentication line. The options we passed to the method use a helper method that stops redirection to a login path if the requested route requires authentication and the request is Unauthorized. Paste the ReplaceRedirector method at the end of the Startup class.

// https://stackoverflow.com/questions/42030137/suppress-redirect-on-api-urls-in-asp-net-core/42030138#42030138
static Func<RedirectContext<CookieAuthenticationOptions>, Task> ReplaceRedirector(HttpStatusCode statusCode, 
    Func<RedirectContext<CookieAuthenticationOptions>, Task> existingRedirector) =>
    context =>
    {
        if (context.Request.Path.StartsWithSegments("/api"))
        {
            context.Response.StatusCode = (int)statusCode;
            return Task.CompletedTask;
        }
        return existingRedirector(context);
    };

We need this feature on the Angular front because when a request is Unauthorized we don’t want MVC to redirect us to a new MVC route, for example /Account/login but only send back a 401 status code. We registered the required services for the authentication middleware but we didn’t add the middleware itself yet, so add it to the pipeline before the MVC middleware in the Configure method.

app.UseStaticFiles();

app.UseAuthentication();

app.UseMvc(routes =>
// Code omitted

For the AccountController Login method we need a new ViewModel class so go ahead and add the LoginVM to the ViewModels folder.

public class LoginVM
{
    public string UserName { get; set; }

    [DataType(DataType.Password)]
    public string Password { get; set; }
}

Switch to the AccountController and create the Login method.

[HttpPost]
public async Task<ResultVM> Login([FromBody]LoginVM model)
{
    if (ModelState.IsValid)
    {
        var user = await _userManager.FindByNameAsync(model.UserName);

        if (user != null && await _userManager.CheckPasswordAsync(user, model.Password))
        {
            var identity = new ClaimsIdentity(CookieAuthenticationDefaults.AuthenticationScheme);
            identity.AddClaim(new Claim(ClaimTypes.NameIdentifier, user.Id));
            identity.AddClaim(new Claim(ClaimTypes.Name, user.UserName));

            await HttpContext.SignInAsync(CookieAuthenticationDefaults.AuthenticationScheme, new ClaimsPrincipal(identity));

            return new ResultVM
            {
                Status = Status.Success,
                Message = "Succesfull login",
                Data = model
            };
        }

        return new ResultVM
        {
            Status = Status.Error,
            Message = "Invalid data",
            Data = "<li>Invalid Username or Password</li>"
        };
    }

    var errors = ModelState.Keys.Select(e => "<li>" + e + "</li>");
    return new ResultVM
    {
        Status = Status.Error,
        Message = "Invalid data",
        Data = string.Join("", errors)
    };
}

After checking that the user’s password is valid using UserManager password hasher, we use the HttpContext.SignInAsync method to create a ClaimsPricipal that represents a user in an HTTP Request. This principal accepts a ClaimIdentity authored by the default authentication scheme “Cookies” registered before and contains two claims. Before testing the Login method let’s take a quick look at how Claim-based security model works.

Claim-Based Authentication Model

Starting from bottom to top, a Claim is a property of an Identity consisted of a name-value pair specific to that Identity while an Identity may have many Claims associated with it. For example, a Patient which represents an Identity have multiple claims that define the patient.

An Identity along with its claims is represented with the ClaimsIdentity class but that class isn’t the top of the hierarchy. This happens because a user may have multiple identities and that’s where ClaimsPrincipal fits into the model. A ClaimsPrincipal is consisted by 1 or more Claims Identities which in turn may have 1 or more Claims.

The image above shows a user with a ClaimsPrincipal having two Claims Identities. One that defines the user as a Patient and has two claims and another one that defines the user through the driver license. Each of these Claims Identities may have different access level to different resources. Keep in mind that a ClaimsPrincipal inherits all the claims for each identity associated. The Claim-based security model utilizes ASP.NET Core Cookie middleware by encrypting, serializing and saving the ClaimsPrincipal in the cookie response after a succesfull sign in. During an HTTP request, the cookie is validated and the ClaimsPrincipal is assigned to the HttpContext.User property.
Switch back to Postman and after registering a user try to login.

Front End

On the front of our application there is an Angular app hitting the AccountController methods. We won’t paste all the code here since the source code is available online but we will explain what’s actually happening. First of all, the app makes use of the following 3 new methods in AccountController

  1. Claims method returns the Claims of an authenticated user and requires that the user is authenticated. In case the app tries to access this API without being authenticated it gets back a 401 Status code and redirects to an Angular login route. This is done through an angular interceptor
  2. Authenticated method checks if the user is authenticated
  3. SignOut method logs out an authenticated user

Paste the following methods in the AccountController.

[HttpGet]
[Authorize]
public async Task<UserClaims> Claims()
{
    var claims = User.Claims.Select(c => new ClaimVM
    {
        Type = c.Type,
        Value = c.Value
    });

    return new UserClaims
    {
        UserName = User.Identity.Name,
        Claims = claims
    };
}

[HttpGet]
public async Task<UserStateVM> Authenticated()
{
    return new UserStateVM
    {
        IsAuthenticated = User.Identity.IsAuthenticated,
        Username = User.Identity.IsAuthenticated ? User.Identity.Name : string.Empty
    };
}

[HttpPost]
public async Task SignOut()
{
    await HttpContext.SignOutAsync(CookieAuthenticationDefaults.AuthenticationScheme);
}

You also need the following ViewModels:

public class ClaimVM
{
    public string Type { get; set; }
    public string Value { get; set; }
}

public class UserClaims
{
    public IEnumerable<ClaimVM> Claims { get; set; }
    public string UserName { get; set; }
}
public class UserStateVM
{
    public bool IsAuthenticated { get; set; }
    public string Username { get; set; }
}

The basic components of the Angular app are displayed in following image:

The register component simply registers the user by sending a POST request to the api/account/register method.

export class RegisterComponent {
    public user: RegisterVM = { userName: '', emailAddress: '', password: '', confirmPassword: '' };
    public errors: string = '';

    constructor(public http: Http, 
                @Inject('BASE_URL') public baseUrl: string,
                public router: Router) {
    }

    register() {
        this.errors = '';
        this.http.post(this.baseUrl + 'api/account/register', this.user).subscribe(result => {
            let registerResult = result.json() as ResultVM;
            if (registerResult.status === StatusEnum.Success) {
                this.router.navigate(['/login']);
            } else if (registerResult.status === StatusEnum.Error) {
                this.errors = registerResult.data.toString();
            }

        }, error => console.error(error));
    }
}

Notice that the api call may return validation errors to be displayed on the screen.

If you try to view the Claims page without being authenticated you will be redirected in the Login view. This is done through an HTTP Interceptor which is implemented under the core folder of the client app.

@Injectable()
export class HttpInterceptor extends Http {

  constructor(backend: XHRBackend, defaultOptions: RequestOptions, 
    public stateService: StateService, public router: Router) {
    super(backend, defaultOptions);
  }

  request(url: string | Request, options?: RequestOptionsArgs): Observable<Response> {
    return super.request(url, options).catch((error: Response) => {
            if ((error.status === 401 || error.status === 403) && (window.location.href.match(/\?/g) || []).length < 2) {
                this.stateService.setAuthentication({ userName: '', isAuthenticated: false });
                this.router.navigate(['/login']);
            }
            return Observable.throw(error);
        });
  }
}

The login compoment follows the same logic and after a succesfull login sets the state of the user to “isAuthenticated:true” using an angular service.

@Injectable()
export class StateService {
    userState: UserState = { userName: '', isAuthenticated: false };

    constructor() { }

    /**
     * setAuthentication
     */
    public setAuthentication(state: UserState) {
        this.userState = state;
    }

    public isAuthenticated() {
        return this.userState.isAuthenticated;
    }
}

export interface UserState {
    userName: string;
    isAuthenticated: boolean;
}

That’s it we have finished the first part of the ASP.NET Core Identity Series explainig how to get started with the library while focusing on its core components. Hopefully, you have understand the basic concepts of the library and how stores and managers are associated under the hood. Lots of interesting stuff comming on the next series such as integrating Entity Framework, external provider or token based authentication so make sure to stay tuned!

The repository for the Series is here and each part will have a related branch

In case you find my blog’s content interesting, register your email to receive notifications of new posts and follow chsakell’s Blog on its Facebook or Twitter accounts.

Facebook Twitter
.NET Web Application Development by Chris S.
facebook twitter-small
twitter-small

ASP.NET Core Identity Series – Integrating Entity Framework

$
0
0

Microsoft.Extensions.Identity.Core is the minimum ASP.NET Core Identity package you need to install in order to get start working with the core functionality of the library. We have seen how to do this in the Getting Started part of these ASP.NET Core Identity Series blog posts. As a quick reminder, what we did on the first part is implement and register a custom IUserStore along with a custom user entity to be used by the library’s managers. User entities were quite simple and saved at an in-memory store.

// User Entity
public class AppUser
{
    public string Id { get; set; }
    public string UserName { get; set; }
    public string Email { get; set; }
    public string NormalizeUserName { get; set; }
    public string PasswordHash { get; set; }
}

// Implement a custom IUserStore
public class AppUserStore : IUserStore<AppUser>, IUserPasswordStore<AppUser></AppUser>

// register services at Startup
services.AddIdentityCore<AppUser>(options => { });
services.AddScoped<IUserStore<AppUser>, AppUserStore>();

This configuration though is not sufficient (not even close) to leverage all ASP.NET Core Identity library’s features. To make this more clearer just switch to the AccountController and check the functions provided by a UserManager through the intellisense.

As you can see you there are many things you can do using a UserManager such as adding claims or assigning roles to a user. But the custom user entity AppUser we created doesn’t have this type of properties and we didn’t provide any type of store that manages these properties either (obviously). For example, when UserManager tries to add a claim to a user, first it checks if there’s a registered implementation for IUserClaimStore.

public virtual Task<IdentityResult> AddClaimAsync(TUser user, Claim claim)
{
    ThrowIfDisposed();
    var claimStore = GetClaimStore();
    if (claim == null)
    {
        throw new ArgumentNullException(nameof(claim));
    }
    if (user == null)
    {
        throw new ArgumentNullException(nameof(user));
    }
    return AddClaimsAsync(user, new Claim[] { claim });
}

private IUserClaimStore<TUser> GetClaimStore()
{
    var cast = Store as IUserClaimStore<TUser>;
    if (cast == null)
    {
        throw new NotSupportedException(Resources.StoreNotIUserClaimStore);
    }
    return cast;
}

So what is the solution to our problem? The answer is hidden inside the Microsoft.Extensions.Identity.Stores NuGet package where you can find two important classes:

  • IdentityUser: Represents a user in the identity system and it contains all the properties for ASP.NET Core library to be fully functional (claims, roles, etc..). It’s the default ASP.NET Core library’s user entity
  • UserStoreBase: A store that implements most of the IUserStore interfaces while having IdentityUser representing a user

The source code for the series is available here. Each part has a related branch on the repository. To follow along with this part clone the repository and checkout the getting-started branch as follow:

git clone https://github.com/chsakell/aspnet-core-identity.git
cd .\aspnet-core-identity
git fetch
git checkout getting-started

Having said all these, the first thing we ‘ll do to support more features available in ASP.NET Core Identity library, is to install the Microsoft.Extensions.Identity.Stores NuGet package. Do it either through NuGet Package Manager or running the following command in the Package Manager Console

install-package Microsoft.Extensions.Identity.Stores

Remove all the code inside the AppUserStore class and replace it with the following:

public class AppUserStore : UserStoreBase<IdentityUser, string, IdentityUserClaim<string>,
    IdentityUserLogin<string>, IdentityUserToken<string>> {

        public AppUserStore(IdentityErrorDescriber describer) : base(describer)  {  }    
    }

Next, use Visual Studio’s intellisense features and implement all the interfaces (just leave them throwing a NotImplementedException). Now let’s examine what’s really happening here and what we have actually gained using UserStoreBase and IdentityUser. UserStoreBase comes in two flavors, one that can support user related operations and another that supports both user and role operations.

/// <summary>
/// Represents a new instance of a persistence store for the specified user type.
/// </summary>
/// <typeparam name="TUser">The type representing a user.</typeparam>
/// <typeparam name="TKey">The type of the primary key for a user.</typeparam>
/// <typeparam name="TUserClaim">The type representing a claim.</typeparam>
/// <typeparam name="TUserLogin">The type representing a user external login.</typeparam>
/// <typeparam name="TUserToken">The type representing a user token.</typeparam>
public abstract class UserStoreBase<TUser, TKey, TUserClaim, TUserLogin, TUserToken> :
    IUserLoginStore<TUser>,
    IUserClaimStore<TUser>,
    IUserPasswordStore<TUser>,
    IUserSecurityStampStore<TUser>,
    IUserEmailStore<TUser>,
    IUserLockoutStore<TUser>,
    IUserPhoneNumberStore<TUser>,
    IQueryableUserStore<TUser>,
    IUserTwoFactorStore<TUser>,
    IUserAuthenticationTokenStore<TUser>,
    IUserAuthenticatorKeyStore<TUser>,
    IUserTwoFactorRecoveryCodeStore<TUser>
    where TUser : IdentityUser<TKey>
    where TKey : IEquatable<TKey>
    where TUserClaim : IdentityUserClaim<TKey>, new()
    where TUserLogin : IdentityUserLogin<TKey>, new()
    where TUserToken : IdentityUserToken<TKey>, new()
{
    // Code omitted
/// <summary>
/// Represents a new instance of a persistence store for the specified user and role types.
/// </summary>
/// <typeparam name="TUser">The type representing a user.</typeparam>
/// <typeparam name="TRole">The type representing a role.</typeparam>
/// <typeparam name="TKey">The type of the primary key for a role.</typeparam>
/// <typeparam name="TUserClaim">The type representing a claim.</typeparam>
/// <typeparam name="TUserRole">The type representing a user role.</typeparam>
/// <typeparam name="TUserLogin">The type representing a user external login.</typeparam>
/// <typeparam name="TUserToken">The type representing a user token.</typeparam>
/// <typeparam name="TRoleClaim">The type representing a role claim.</typeparam>
public abstract class UserStoreBase<TUser, TRole, TKey, TUserClaim, TUserRole, TUserLogin, TUserToken, TRoleClaim> :
    UserStoreBase<TUser, TKey, TUserClaim, TUserLogin, TUserToken>,
    IUserRoleStore<TUser>
    where TUser : IdentityUser<TKey>
    where TRole : IdentityRole<TKey> 
    where TKey : IEquatable<TKey>
    where TUserClaim : IdentityUserClaim<TKey>, new()
    where TUserRole : IdentityUserRole<TKey>, new()
    where TUserLogin : IdentityUserLogin<TKey>, new()
    where TUserToken : IdentityUserToken<TKey>, new()
    where TRoleClaim : IdentityRoleClaim<TKey>, new()
{
    // Code omitted

We used the first one cause we won’t be dealing with roles yet. IdentityUser is a dependency of the UserStoreBase since lots of the interfaces that implements are based on its properties. For example IdentityUser has a property named TwoFactorEnabled that is used by the IUserTwoFactorRecoveryCodeStore. There is a method in UserManager implementation that checks whether a recovery code is valid for a user and looks like this:

/// <summary>
/// Returns whether a recovery code is valid for a user. Note: recovery codes are only valid
/// once, and will be invalid after use.
/// </summary>
/// <param name="user">The user who owns the recovery code.</param>
/// <param name="code">The recovery code to use.</param>
/// <returns>True if the recovery code was found for the user.</returns>
public virtual async Task<IdentityResult> RedeemTwoFactorRecoveryCodeAsync(TUser user, string code)
{
    ThrowIfDisposed();
    var store = GetRecoveryCodeStore();
    if (user == null)
    {
        throw new ArgumentNullException(nameof(user));
    }

    var success = await store.RedeemCodeAsync(user, code, CancellationToken);
    if (success)
    {
        return await UpdateAsync(user);
    }
    // code omitted
}
private IUserTwoFactorRecoveryCodeStore<TUser> GetRecoveryCodeStore()
{
    var cast = Store as IUserTwoFactorRecoveryCodeStore<TUser>;
    if (cast == null)
    {
        throw new NotSupportedException(Resources.StoreNotIUserTwoFactorRecoveryCodeStore);
    }
    return cast;
}

As you can see the code searches for an implementation of the IUserTwoFactorRecoveryCodeStore in order to call the ReplaceCodesAsync method. Luckilly, UserStoreBase allready provides an implementation for you..

public virtual Task ReplaceCodesAsync(TUser user, IEnumerable<string> recoveryCodes, CancellationToken cancellationToken)
{
    var mergedCodes = string.Join(";", recoveryCodes);
    return SetTokenAsync(user, InternalLoginProvider, RecoveryCodeTokenName, mergedCodes, cancellationToken);
}

UserStoreBase has done much of the hard work for you by implementing interfaces and also providing getters and setters for the IdentityUser properties but this doesn’t mean that you are ready to go and start using the library. You need to provide implementations for all the abstract methods in the AppUserStore class. Here you have two choices: Either create your own SQL Schema and write you own data access layer using pure ADO.NET or some ORM library such as Dapper or integrate and use Entity Framework Core which by the way comes with a pre-defined SQL Schema. Since this part is about integrating Entity Framework with ASP.NET Core Identity we won’t provide custom implementations but I believe its worthy to take a quick look how it would look like to provide your own implementations. Check this file where you can see a class quite similar to the UserStoreBase you used before. It implements the interfaces by saving and updating DapperIdentityUser properties in the database using Dapper. If you were to use a real AppUserStore implementation along with the IdentityUser you would need to configure it at Startup as follow:

services.AddIdentityCore<IdentityUser>(options => { });
services.AddScoped<IUserStore<IdentityUser>, AppUserStore>();

Entity Framework Core

So where does Entity Framework fits in all these? Entity Framework provides default store implementations (for both user and roles) that can be easily plugged in using the Microsoft.AspNetCore.Identity.EntityFrameworkCore NuGet package. All you have to do is install the package and configure it at the Startup ConfigureServices method. Go ahead and install the package either from the manager or the console by typing:

install-package Microsoft.AspNetCore.Identity.EntityFrameworkCore

Next switch to the Startup file and configure Identity as follow:

public void ConfigureServices(IServiceCollection services)
{
    services.AddMvc();

    services.AddDbContext<IdentityDbContext>(options =>
        options.UseSqlServer(Configuration.GetConnectionString("AspNetCoreIdentityDb"),
            optionsBuilder => 
            optionsBuilder.MigrationsAssembly(typeof(Startup).Assembly.GetName().Name)));

    services.AddIdentityCore<IdentityUser>(options => { });
    services.AddScoped<IUserStore<IdentityUser>, UserOnlyStore<IdentityUser, IdentityDbContext>>();

    services.AddAuthentication(CookieAuthenticationDefaults.AuthenticationScheme)
        .AddCookie(CookieAuthenticationDefaults.AuthenticationScheme, options =>
        {
            options.Events.OnRedirectToAccessDenied = ReplaceRedirector(HttpStatusCode.Forbidden, options.Events.OnRedirectToAccessDenied);
            options.Events.OnRedirectToLogin = ReplaceRedirector(HttpStatusCode.Unauthorized, options.Events.OnRedirectToLogin);
        });
}

Let’s break down the highlighted lines. UserOnlyStore is nothing different than another implementation very similar to the UserStoreBase described previously. IdentityDbContext is the DbContext to be used for accessing Identity entities in the database using Entity Framework. We used a simple generic definition providing only two parameters of the UserOnlyStore but it’s just sugar for the default constructor as shown below..

/// <summary>
/// Represents a new instance of a persistence store for the specified user type.
/// </summary>
/// <typeparam name="TUser">The type representing a user.</typeparam>
/// <typeparam name="TContext">The type of the data context class used to access the store.</typeparam>
/// <typeparam name="TKey">The type of the primary key for a role.</typeparam>
/// <typeparam name="TUserClaim">The type representing a claim.</typeparam>
/// <typeparam name="TUserLogin">The type representing a user external login.</typeparam>
/// <typeparam name="TUserToken">The type representing a user token.</typeparam>
public class UserOnlyStore<TUser, TContext, TKey, TUserClaim, TUserLogin, TUserToken> :
    UserStoreBase<TUser, TKey, TUserClaim, TUserLogin, TUserToken>,
    IUserLoginStore<TUser>,
    IUserClaimStore<TUser>,
    IUserPasswordStore<TUser>,
    IUserSecurityStampStore<TUser>,
    IUserEmailStore<TUser>,
    IUserLockoutStore<TUser>,
    IUserPhoneNumberStore<TUser>,
    IQueryableUserStore<TUser>,
    IUserTwoFactorStore<TUser>,
    IUserAuthenticationTokenStore<TUser>,
    IUserAuthenticatorKeyStore<TUser>,
    IUserTwoFactorRecoveryCodeStore<TUser>,
    IProtectedUserStore<TUser>
    where TUser : IdentityUser<TKey>
    where TContext : DbContext
    where TKey : IEquatable<TKey>
    where TUserClaim : IdentityUserClaim<TKey>, new()
    where TUserLogin : IdentityUserLogin<TKey>, new()
    where TUserToken : IdentityUserToken<TKey>, new()
{
    /// <summary>
    /// Creates a new instance of the store.
    /// </summary>
    /// <param name="context">The context used to access the store.</param>
    /// <param name="describer">The <see cref="IdentityErrorDescriber"/> used to describe store errors.</param>
    public UserOnlyStore(TContext context, IdentityErrorDescriber describer = null) : base(describer ?? new IdentityErrorDescriber())
    {
        if (context == null)
        {
            throw new ArgumentNullException(nameof(context));
        }
        Context = context;
    }

    /// <summary>
    /// Gets the database context for this store.
    /// </summary>
    public TContext Context { get; private set; }

    /// <summary>
    /// DbSet of users.
    /// </summary>
    protected DbSet<TUser> UsersSet { get { return Context.Set<TUser>(); } }

    /// <summary>
    /// DbSet of user claims.
    /// </summary>
    protected DbSet<TUserClaim> UserClaims { get { return Context.Set<TUserClaim>(); } }

    /// <summary>
    /// DbSet of user logins.
    /// </summary>
    protected DbSet<TUserLogin> UserLogins { get { return Context.Set<TUserLogin>(); } }

    /// <summary>
    /// DbSet of user tokens.
    /// </summary>
    protected DbSet<TUserToken> UserTokens { get { return Context.Set<TUserToken>(); } }

    /// <summary>
    /// Gets or sets a flag indicating if changes should be persisted after CreateAsync, UpdateAsync and DeleteAsync are called.
    /// </summary>
    /// <value>
    /// True if changes should be automatically persisted, otherwise false.
    /// </value>
    public bool AutoSaveChanges { get; set; } = true;

    /// <summary>Saves the current store.</summary>
    /// <param name="cancellationToken">The <see cref="CancellationToken"/> used to propagate notifications that the operation should be canceled.</param>
    /// <returns>The <see cref="Task"/> that represents the asynchronous operation.</returns>
    protected Task SaveChanges(CancellationToken cancellationToken)
    {
        return AutoSaveChanges ? Context.SaveChangesAsync(cancellationToken) : Task.CompletedTask;
    }

    // Code omitted

Notice that you get DbSet<T> properties to access entities using the DbContext. Entity Framework comes with 3 different implementations for stores. The one we used, that is UserOnlyStore which provides implementations for managing users only, the RoleStore<TRole> for managing roles and UserStore for managing both of them. Another thing that worths to mention is that in case you have previously used ASP.NET Core Identity with Entity Framework, it’s most likely that you plugged EF as follow:

services.AddIdentity<IdentityUser, IdentityRole>();

.. rather that the way we did. AddIdentity<IdentityUser, IdentityRole> adds the default identity system configuration for the specified User and Role types and also configures several other features for you, such as the default authentication scheme, cookie expiration time, cookie name for external logins etc.. Let’s take a quick look how it looks like:

public static IdentityBuilder AddIdentity<TUser, TRole>(
    this IServiceCollection services,
    Action<IdentityOptions> setupAction)
    where TUser : class
    where TRole : class
{
    // Services used by identity
    services.AddAuthentication(options =>
    {
        options.DefaultAuthenticateScheme = IdentityConstants.ApplicationScheme;
        options.DefaultChallengeScheme = IdentityConstants.ApplicationScheme;
        options.DefaultSignInScheme = IdentityConstants.ExternalScheme;
    })
    .AddCookie(IdentityConstants.ApplicationScheme, o =>
    {
        o.LoginPath = new PathString("/Account/Login");
        o.Events = new CookieAuthenticationEvents
        {
            OnValidatePrincipal = SecurityStampValidator.ValidatePrincipalAsync
        };
    })
    .AddCookie(IdentityConstants.ExternalScheme, o =>
    {
        o.Cookie.Name = IdentityConstants.ExternalScheme;
        o.ExpireTimeSpan = TimeSpan.FromMinutes(5);
    })
    .AddCookie(IdentityConstants.TwoFactorRememberMeScheme, o =>
    {
        o.Cookie.Name = IdentityConstants.TwoFactorRememberMeScheme;
        o.Events = new CookieAuthenticationEvents
        {
            OnValidatePrincipal = SecurityStampValidator.ValidateAsync<ITwoFactorSecurityStampValidator>
        };
    })
    .AddCookie(IdentityConstants.TwoFactorUserIdScheme, o =>
    {
        o.Cookie.Name = IdentityConstants.TwoFactorUserIdScheme;
        o.ExpireTimeSpan = TimeSpan.FromMinutes(5);
    });

    // Hosting doesn't add IHttpContextAccessor by default
    services.AddHttpContextAccessor();
    // Identity services
    services.TryAddScoped<IUserValidator<TUser>, UserValidator<TUser>>();
    services.TryAddScoped<IPasswordValidator<TUser>, PasswordValidator<TUser>>();
    services.TryAddScoped<IPasswordHasher<TUser>, PasswordHasher<TUser>>();
    services.TryAddScoped<ILookupNormalizer, UpperInvariantLookupNormalizer>();
    services.TryAddScoped<IRoleValidator<TRole>, RoleValidator<TRole>>();
    // No interface for the error describer so we can add errors without rev'ing the interface
    services.TryAddScoped<IdentityErrorDescriber>();
    services.TryAddScoped<ISecurityStampValidator, SecurityStampValidator<TUser>>();
    services.TryAddScoped<ITwoFactorSecurityStampValidator, TwoFactorSecurityStampValidator<TUser>>();
    services.TryAddScoped<IUserClaimsPrincipalFactory<TUser>, UserClaimsPrincipalFactory<TUser, TRole>>();
    services.TryAddScoped<UserManager<TUser>, AspNetUserManager<TUser>>();
    services.TryAddScoped<SignInManager<TUser>, SignInManager<TUser>>();
    services.TryAddScoped<RoleManager<TRole>, AspNetRoleManager<TRole>>();

    if (setupAction != null)
    {
        services.Configure(setupAction);
    }

    return new IdentityBuilder(typeof(TUser), typeof(TRole), services);
}

We might switch to this default configuration on the next posts of these series where we will be managing roles or signing in with external providers. Back to the Startup, we used IdentityDbContext which is the base class for Entity Framework database context used for identity. We also have to configure a connection string for the database where Identity entities are stored and this has to be configured in the appsettings.json file. Place a connection string property in the appsettings.json file at the root of the web application.

{
    "ConnectionStrings": {
      "AspNetCoreIdentityDb": "Data Source=(LocalDb)\\MSSQLLocalDb;Database=AspNetCoreIdentityDb;trusted_connection=yes;MultipleActiveResultSets=true;"
    },
    "Logging": {
      "LogLevel": {
        "Default": "Warning"
      }
    }
  }  

Make sure you replace the connection string to reflect your development environment

Since now we use IdentityUser as the base Identity user type, make sure to replace any reference to AppUser in the AccountController with IdentityUser.

public class AccountController : Controller
{
    private readonly UserManager<IdentityUser> _userManager;

    public AccountController(UserManager<IdentityUser> userManager)
    {
        this._userManager = userManager;
    }

    [HttpPost]
    public async Task<ResultVM> Register([FromBody]RegisterVM model)
    {
        // Code omitted
        user = new IdentityUser
        {
            Id = Guid.NewGuid().ToString(),
            UserName = model.UserName,
            Email = model.Email
        };

        // Code omitted
}

Entity Framework Migrations

Build, run the application and try to register a new user. Of course you ‘ll get exception because we configured Entity Framework in code but we haven’t created the database yet.

To solve this problem, we will use Entity Framework Migrations to create the database. Follow the next steps to enable migrations and create the database schema as well:

  1. Install Microsoft.EntityFrameworkCore.Design NuGet package by running:
    install-package Microsoft.EntityFrameworkCore.Design
    
  2. Right click the project and select Edit AspNetCoreIdentity.csproj. Add the required tooling to use the dotnet cli
    <ItemGroup>
      <DotNetCliToolReference Include="Microsoft.VisualStudio.Web.CodeGeneration.Tools" Version="2.0.3" />
      <DotNetCliToolReference Include="Microsoft.EntityFrameworkCore.Tools.DotNet" Version="2.0.2" />
    </ItemGroup>
    
  3. Open a terminal and cd to the root of your project. Type the following command to add the first migration:
    dotnet ef migrations add initial_migration
    

  4. Next create the database by typing:
    dotnet ef database update
    

    Before running the previous command make sure you have re-build the application

    Confirm tha the database has been created succesfully and that you can now register and login with a new user.

Discussion

Over the years I have noticed that there’s a big debate about whether you should or shouldn’t use ASP.NET Identity membership system along with Entity Framework. Here are some of the excuses I usually hear from fellows that choose not to use ASP.NET Identity with Entity Framework or simply to put, ASP.NET Identity at all.

  • Entity Framework is too slow
  • Entity Framework consumes lots of memory due to its tracking entities features
  • I use a different database access provider, such as Dapper

These are all relatively logical thoughts but they should’t at any case prevent you for using ASP.NET Core Identity with Entity Framework. First of all, if you want to use your own custom data access provider which is lighter and faster than EF that’s totally fine, go ahead and do that. This though doesn’t mean that you can’t plug ASP.NET Core Identity with Entity Framework! Simply to put, you can use ASP.NET Core Identity library configured with Entity Framework for managing your application’s membership operations without conflicting with your different database access provider. All ASP.NET Core Identity needs is the required database tables to support its huge set of features. And believe me, you won’t have any performance penalties for using a simple DbContext accessing a few tables in the database. On the other hand, you will be able to use out of the box a set of membership features (proven security algorithms, token based authentication, external logins, Two-Factor authentication and much more..) that you would spend months to implement on your own.

In case you find my blog’s content interesting, register your email to receive notifications of new posts and follow chsakell’s Blog on its Facebook or Twitter accounts.

Facebook Twitter
.NET Web Application Development by Chris S.
facebook twitter-small
twitter-small

ASP.NET Core Identity Series – Deep dive in Authorization

$
0
0

Authorization in ASP.NET Core is the process that determines whether a user can or cannot access a specific resource. It’s not part of the ASP.NET Core Identity library but can be tightly connected to its underline structures such as Claims or Roles and that’s why this post belongs to the ASP.NET Core Identity Series blog posts. On this post we will cover by example the following important authorization types:

  • Claims-based authorization
  • Role-based authorization
  • Policy-based authorization
  • Custom authorization policy providers
  • Imperative authorization

The source code for the series is available here. Each part has a related branch on the repository. To follow along with this part clone the repository and checkout the authorization branch as follow:

git clone https://github.com/chsakell/aspnet-core-identity.git
cd .\aspnet-core-identity
git fetch
git checkout authorization

The branch contains the final solution so you won’t have anything to do, just understand the concepts and the different types of authorization applied on the project. Before continuing though you have to create the database using Entity Framework migrations descripted in the installation instructions section. In case you don’t want to use a database just set “InMemoryProvider”: true in the appsettings.json.

In the first two posts of the series, we covered the basic interfaces that you would need to get started with ASP.NET Core Identity and how to integrate Entity Framework as well. It worths to mention the first change needed in order to start leveraging all the features of the ASP.NET Core Identity library. The change exists on the Startup class:

services.AddIdentity ()
    .AddEntityFrameworkStores ()
    .AddDefaultTokenProviders ();

services.ConfigureApplicationCookie (options => {
    options.Events.OnRedirectToLogin = context => {
        context.Response.Headers["Location"] = context.RedirectUri;
        context.Response.StatusCode = 401;
        return Task.CompletedTask;
    };
    options.Events.OnRedirectToAccessDenied = context => {
        context.Response.Headers["Location"] = context.RedirectUri;
        context.Response.StatusCode = 403;
        return Task.CompletedTask;
    };
});

Notice that we still need to configure the way we send 401 and 403 status codes on the Angular front in order not to get redirected to the default MVC routes that actually don’t exist.

Claims-based authorization


An identity or an IdentityUser if you prefer, may have one more claims assigned. A claim is a name-value pair that describes what the subject is. Let’s recall how the Identity schema looks like in the database:

Authorization rules are defined through Policies and hence the Policy-based authorization where you declare a policy name following by the requirements needed in order to authorize a user request to a specific resource. The way that Claims-based authorization fits on the Policy-based model is simply that the requirement is that the user must have a specific Claim. Back in our project we will assume that we provide a Streaming platform where users can subscribe to video categories and watch online videos, something like Netflix. We want to give the opportunity to users to get a Free Trial subscription where they can access random videos of the platform. To solve this we won’t create a role but instead we will simply assign a Claim named “Trial” to the user and the value will be the date registered for the trial subscription. The steps to accomplish the full “Trial” subscription using Claims based authorization are the following:

  1. Declare the Claims-based authorization. This usually takes place in the Startup class as follow:
    services.AddAuthorization(options =>
     {
       options.AddPolicy ("TrialOnly", policy => {
                policy.RequireClaim ("Trial");
       });
     });   
    

    The code declares a “TrialOnly” policy which when applied to a resource allows access to users that have a “Trial” claim assigned.

    You won’t find that code in the Startup class but don’t worry, we ‘ll get to that soon.

  2. The second step is to apply the policy on a resource. In the project you will find a StreamingController that serves the streams. This controller has a Videos action that plays the role of the “Trial” videos.
    [HttpGet]
    [Route ("videos")]
    [Authorize (Policy = "TrialOnly")]
    public IActionResult Videos () {
        var videos = VideoRepository.Videos.Take (4);
    
        return Ok (videos);
    }
    
  3. The third part is to assign a “Trial” claim to a user. You will find that the Register view of our application has a Start a free trial check box.

    When you try to register a user while having this checkbox checked, the AccountController register method will assign a “Trial” claim to the user.
    result = await _userManager.CreateAsync (user, model.Password);
    
    if (result.Succeeded) {
        if (model.StartFreeTrial) {
            Claim trialClaim = new Claim ("Trial", DateTime.Now.ToString ());
            await _userManager.AddClaimAsync (user, trialClaim);
        } else if (model.IsAdmin) {
    // Code omitted
    

    Go ahead register a Trial user and navigate to /videos. Confirm that you can access the view.

The value of the Claim can be used to check for example if the Trial period has ended. If so you can return a 403 code to the user.

Role-based authorization


As the name implies Role-base authorization is used to prohibit or authorize access to resources based on whether the user has specific roles assigned. It’s defined in the same way we defined the “TrialOnly” policy but this time using the RequireRole method. Our Streaming Platform website has an Admin view where Administrators can see all users registered in the system and by Administrators we mean users with the role Admin assigned. The way the role based authorization policy is used in the project is the following:

  1. Define the AdminOnly policy:
    services.AddAuthorization(options =>
     {
       options.AddPolicy ("TrialOnly", policy => {
                policy.RequireClaim ("Trial");
       });
       options.AddPolicy ("AdminOnly", policy => {
                policy.RequireRole ("Admin");
       });
     });   
    
  2. Allow only Administrators to access the Admin Panel view in the ManageController
    [HttpGet]
    [Authorize(Policy = "AdminOnly")]
    public async Task<IActionResult> Users () {
        return Ok(_context.Users);
    }
    

    The Policy property may have more than one roles, comma separated.

  3. Make sure the the Admin role is created in the database. There is a DbInitializer class to do this job
    var adminRoleExists = await _roleManager.RoleExistsAsync("Admin");
    
    if (!adminRoleExists) {
        //Create the Admin Role
        var adminRole = new IdentityRole ("Admin");
        var result = await _roleManager.CreateAsync (adminRole);
    
        if (result.Succeeded) {
            // Add the Trial claim
            var foreverTrialClaim = new Claim ("Trial", DateTime.Now.AddYears(1).ToString());
            await _roleManager.AddClaimAsync (adminRole, foreverTrialClaim);
        }
    }
    

    If you noticed in the database diagram a role may have 1 or more claims as well and this is what we did above. We added the “Trial” claim to the “Admin” role which means that an Admin will be able to access the Videos (Trial) view as well.

  4. Assign the Admin role to a user. In the register view check the Administrator checkbox and create a new user. The AccountController will assign the “Admin” role to the user and will be able to access the Admin Panel view
    result = await _userManager.CreateAsync (user, model.Password);
    
    if (result.Succeeded) {
        if (model.StartFreeTrial) {
            Claim trialClaim = new Claim ("Trial", DateTime.Now.ToString ());
            await _userManager.AddClaimAsync (user, trialClaim);
        } else if (model.IsAdmin) {
            await _userManager.AddToRoleAsync (user, "Admin");
        }
    // code omitted
    

Custom authorization policy providers


Now that we covered the most basic authorization types let’s explore more advanced scenarios. At the end of this section you will also understand how the two previous types works behind the scenes. Our Streaming Service platform has lots of video categories that a user may register for and of course these categories may grow in the future as well. Currently there are the following streaming categories:

public enum StreamingCategory {
    ACTION_AND_ADVENTURE = 1,
    ACTION_COMEDIES = 2,
    ACTION_THRILLERS = 3,
    SCI_FI = 4,
    ANIMATION = 5,
    MUSIC_VIDEOS = 6,
    BOXING_MOVIES = 7,
    FAMILY_MOVIES = 8
}

The question here is how would you implement authorization for each of those categories? Of course you could create a Claims-based authorization for each one or (even worse) create a specific Role for each category and the related Role-based policy. But there’s a better and cleaner way to accomplish this and this is where custom Authorization Policy Providers comes into the scene. Following are the steps to create the custom Policy Provider for our streaming platform:

  1. First of all we need somehow to identify the Policy to be used and check the user against. For this we will create a custom AuthorizeAttribute named StreamingCategoryAuthorizeAttribute. The role of this attribute is to be applied to each one of the StreamingController actions with a custom parameter equal to the specific category we want to secure the access. Following is the StreamingCategoryAuthorizeAttribute class:
    public class StreamingCategoryAuthorizeAttribute : AuthorizeAttribute {
        const string POLICY_PREFIX = "StreamingCategory_";
    
        public StreamingCategoryAuthorizeAttribute (StreamingCategory category) => Category = category;
    
        // Get or set the Category property by manipulating the underlying Policy property
        public StreamingCategory Category {
            get {
                var category = (StreamingCategory) Enum.Parse (typeof (StreamingCategory),
                    Policy.Substring (POLICY_PREFIX.Length));
    
                return (StreamingCategory) category;
            }
            set {
                Policy = $"{POLICY_PREFIX}{value.ToString()}";
            }
        }
    }
    

    The role of the attribute is to expose the custom Policy name for each category and that’s because authorization policies are identified by their names. To understand how a custom Streaming Category policy name looks like, take a look of how this attribute is applied in the ActionAdventure action of the StreamingController.

    [HttpGet]
    [Route ("ACTION_AND_ADVENTURE")]
    [StreamingCategoryAuthorize (StreamingCategory.ACTION_AND_ADVENTURE)]
    public IActionResult ActionAdventure () {
    
        var videos = VideoRepository.Videos
            .Where (v => v.Category == StreamingCategory.ACTION_AND_ADVENTURE);
    
        return Ok (videos);
    }
    

    We set the Category property of the Attribute to StreamingCategory.ACTION_AND_ADVENTURE which means:

     Policy = "StreamingCategory_ACTION_AND_ADVENTURE";
    

    Same applies for other actions and categories.

  2. The next step is to create a custom IAuthorizationPolicyProvider and define how these dynamic authorization policies are supplied. IAuthorizationPolicyProvider is a type which can provide an AuthorizationPolicy for a particular name. The interface looks like this:
    public interface IAuthorizationPolicyProvider
    {
        /// <summary>
        /// Gets an AuthorizationPolicy from the given policyName
        /// </summary>
        /// <param name="policyName">The policy name to retrieve.</param>
        /// <returns>The named AuthorizationPolicy</returns>
        Task<AuthorizationPolicy> GetPolicyAsync(string policyName);
    
        /// <summary>
        /// Gets the default authorization policy.
        /// </summary>
        /// <returns>The default authorization policy.</returns>
        Task<AuthorizationPolicy> GetDefaultPolicyAsync();
    }
    

    When not using a custom IAuthorizationPolicyProvider then the DefaultAuthorizationPolicyProvider default implementation is used.

    public class DefaultAuthorizationPolicyProvider : IAuthorizationPolicyProvider
    {
        private readonly AuthorizationOptions _options;
    
        /// <summary>
        /// Creates a new instance of DefaultAuthorizationPolicyProvider
        /// </summary>
        /// <param name="options">The options used to configure this instance.</param>
        public DefaultAuthorizationPolicyProvider(IOptions<AuthorizationOptions> options)
        {
            if (options == null)
            {
                throw new ArgumentNullException(nameof(options));
            }
    
            _options = options.Value;
        }
    
        /// <summary>
        /// Gets the default authorization policy.
        /// </summary>
        /// <returns>The default authorization policy.</returns>
        public Task<AuthorizationPolicy> GetDefaultPolicyAsync()
        {
            return Task.FromResult(_options.DefaultPolicy);
        }
    
        /// <summary>
        /// Gets an AuthorizationPolicy from the given policyName
        /// </summary>
        /// <param name="policyName">The policy name to retrieve.</param>
        /// <returns>The named AuthorizationPolicy</returns>
        public virtual Task<AuthorizationPolicy> GetPolicyAsync(string policyName)
        {
            // MVC caches policies specifically for this class, so this method MUST return the same policy per
            // policyName for every request or it could allow undesired access. It also must return synchronously.
            // A change to either of these behaviors would require shipping a patch of MVC as well.
            return Task.FromResult(_options.GetPolicy(policyName));
        }
    }
    

    As you can see an IAuthorizationPolicyProvider has a GetPolicyAsync method that returns the policy for the given policy name (IF FOUND) and a GetDefaultPolicyAsync method which returns the fallback default authorization policy. This is very critical to understand because ASP.NET uses only one instance of IAuthorizationPolicyProvider which means that if the custom provider cannot provide an authorization policy for a given policy name then it should fall back to a default implementation. Back to our project, check out the GetPolicyAsync method in the StreamingCategoryPolicyProvider class.

    public Task<AuthorizationPolicy> GetPolicyAsync (string policyName) {
        if (policyName.StartsWith (POLICY_PREFIX, StringComparison.OrdinalIgnoreCase)) {
            var category = (StreamingCategory) Enum.Parse (typeof (StreamingCategory),
                policyName.Substring (POLICY_PREFIX.Length));
    
            var policy = new AuthorizationPolicyBuilder ();
            policy.AddRequirements(new StreamingCategoryRequirement(category.ToString ()));
            return Task.FromResult (policy.Build ());
        } else {
            // If the policy name doesn't match the format expected by this policy provider,
            // try the fallback provider. If no fallback provider is used, this would return 
            // Task.FromResult<AuthorizationPolicy>(null) instead.
            return FallbackPolicyProvider.GetPolicyAsync (policyName);
        }
    }
    

    What the code does it trying to parse the streaming category from the policyName and in case it succeed creates an AuthorizationPolicy using an AuthorizationPolicyBuilder. Next the AuthorizationPolicyBuilder adds requirements to the policy which will be evaluated to either authorize or prohibit the access to a specific resource (more on this later on..). Before explaining the requirements lets take a look how the default authorization provider is applied in case the custom one cannot provide a policy:

    public StreamingCategoryPolicyProvider (IOptions<AuthorizationOptions> options) {
        // ASP.NET Core only uses one authorization policy provider, so if the custom implementation
        // doesn't handle all policies (including default policies, etc.) it should fall back to an
        // alternate provider.
        //
        // In this sample, a default authorization policy provider (constructed with options from the 
        // dependency injection container) is used if this custom provider isn't able to handle a given
        // policy name.
        //
        // If a custom policy provider is able to handle all expected policy names then, of course, this
        // fallback pattern is unnecessary.
    
        // Claims based authorization
        options.Value.AddPolicy ("TrialOnly", policy => {
            policy.RequireClaim ("Trial");
        });
    
        // Role based authorization
        options.Value.AddPolicy ("AdminOnly", policy => {
            policy.RequireRole ("Admin");
        });
    
        options.Value.AddPolicy("AddVideoPolicy", policy =>
            policy.Requirements.Add(new UserCategoryRequirement()));
    
        FallbackPolicyProvider = new DefaultAuthorizationPolicyProvider (options);
    }
    
    public Task<AuthorizationPolicy> GetDefaultPolicyAsync () => FallbackPolicyProvider.GetDefaultPolicyAsync ();
    
    // code omitted
    

    Now you can understand why the TrialOnly and AdminOnly policies aren’t defined in the Startup class.

    You can ignore the AddVideoPolicy for the moment, it is described on the next section

  3. In ASP.NET Core, authorization is expressed in requirements, and handlers evaluate a user’s claims against those requirements. We have defined in our custom authorization provider, that Streaming Category related policies have a requirement of type StreamingCategoryRequirement.
    var policy = new AuthorizationPolicyBuilder ();
    policy.AddRequirements(new StreamingCategoryRequirement(category.ToString ()));
    return Task.FromResult (policy.Build ());
    

    A requirement isn’t anything but a simple class implementing the empty IAuthorizationRequirement interface which represents an authorization requirement.

    internal class StreamingCategoryRequirement: IAuthorizationRequirement
    {
        public string Category { get; private set; }
    
        public StreamingCategoryRequirement(string category) { Category = category; }
    }
    

    So what we have right now is a custom provider that can provide the dynamic streaming category policies and adds a StreamingCategory requirement. What’s missing is how this requirement will be eventually processed and evaluated. This is something that an instance of AuthorizationHandler handles. This class makes the decision if authorization is allowed or not against a requirement.

    public abstract class AuthorizationHandler<TRequirement> : IAuthorizationHandler
                where TRequirement : IAuthorizationRequirement
        {
            /// <summary>
            /// Makes a decision if authorization is allowed.
            /// </summary>
            /// <param name="context">The authorization context.</param>
            public virtual async Task HandleAsync(AuthorizationHandlerContext context)
            {
                foreach (var req in context.Requirements.OfType<TRequirement>())
                {
                    await HandleRequirementAsync(context, req);
                }
            }
    
            /// <summary>
            /// Makes a decision if authorization is allowed based on a specific requirement.
            /// </summary>
            /// <param name="context">The authorization context.</param>
            /// <param name="requirement">The requirement to evaluate.</param>
            protected abstract Task HandleRequirementAsync(AuthorizationHandlerContext context, TRequirement requirement);
        }
    

    Back to our project the StreamingCategoryAuthorizationHandler authorizes requests against StreamingCategory requirements:

    internal class StreamingCategoryAuthorizationHandler : AuthorizationHandler<StreamingCategoryRequirement> {
        private readonly UserManager<IdentityUser> _userManager;
    
        public StreamingCategoryAuthorizationHandler (UserManager<IdentityUser> userManager) {
            _userManager = userManager;
        }
    
        protected override Task HandleRequirementAsync (AuthorizationHandlerContext context, StreamingCategoryRequirement requirement) {
    
            var loggedInUserTask = _userManager.GetUserAsync (context.User);
    
            loggedInUserTask.Wait ();
                
            var userClaimsTask = _userManager.GetClaimsAsync (loggedInUserTask.Result);
    
            userClaimsTask.Wait ();
    
            var userClaims = userClaimsTask.Result;
    
            if (userClaims.Any (c => c.Type == requirement.Category)) {
                context.Succeed (requirement);
            }
    
            return Task.CompletedTask;
        }
    }
    

    The code checks the user’s claims and if a claim matches the streaming category which means that the user is registered to that streaming category, then authorization is allowed, otherwise denied.

  4. The final step to complete a custom authorization provider is to register it at the Startup class. You also need to register the Authorization Handler you created before.
    public void ConfigureServices (IServiceCollection services) {
    
        services.AddTransient<IAuthorizationPolicyProvider, StreamingCategoryPolicyProvider>();
    
        // As always, handlers must be provided for the requirements of the authorization policies
        services.AddTransient<IAuthorizationHandler, StreamingCategoryAuthorizationHandler>();
        // code omitted
    

Time to try the custom provider! Go ahead and click My Streaming from the left menu. You will see a list with Streaming Categories. If you click the View button on the right of each category you should see the category’s videos but only if you have been registered to that category. Otherwise you will see the Access Denied view.

Select the categories you wish to register at and then click the Update button. Try again to access one of the category’s videos you have been registered for and confirm that this time you have been authorized.

Let’s see how we prevent unauthorized access to some of our streaming categories in the StreamingController

[HttpGet]
[Route ("ACTION_AND_ADVENTURE")]
[StreamingCategoryAuthorize (StreamingCategory.ACTION_AND_ADVENTURE)]
public IActionResult ActionAdventure () {

    var videos = VideoRepository.Videos
        .Where (v => v.Category == StreamingCategory.ACTION_AND_ADVENTURE);

    return Ok (videos);
}

[HttpGet]
[Route ("ACTION_THRILLERS")]
[StreamingCategoryAuthorize (StreamingCategory.ACTION_THRILLERS)]
public IActionResult ActionThrillers () {

    var videos = VideoRepository.Videos
        .Where (v => v.Category == StreamingCategory.ACTION_THRILLERS);

    return Ok (videos);
}

[HttpGet]
[Route ("SCI_FI")]
[StreamingCategoryAuthorize (StreamingCategory.SCI_FI)]
public IActionResult SCI_FI () {

    var videos = VideoRepository.Videos
        .Where (v => v.Category == StreamingCategory.SCI_FI);

    return Ok (videos);
}

[HttpGet]
[Route ("ANIMATION")]
[StreamingCategoryAuthorize (StreamingCategory.ANIMATION)]
public IActionResult ANIMATION () {

    var videos = VideoRepository.Videos
        .Where (v => v.Category == StreamingCategory.ANIMATION);

    return Ok (videos);
}

Now that we finished explaining requirements, handlers and custom providers can you guess what’s happening behind the scenes when you defining a policy as follow?

services.AddAuthorization(options =>
 {
   options.AddPolicy ("AdminOnly", policy => {
            policy.RequireRole ("Admin");
   });
 });

I would guess that RequireRole is simply a method that adds a requirement passing the role as parameter and there must be a handler that evaluates that requirement by checking if the role is assigned to the user. Well.. let’s find out the truth..
RequireRole is just a method that adds a requirement of type RolesAuthorizationRequirement passing the roles as parameter..

public AuthorizationPolicyBuilder RequireRole(IEnumerable<string> roles)
{
    if (roles == null)
    {
        throw new ArgumentNullException(nameof(roles));
    }

    Requirements.Add(new RolesAuthorizationRequirement(roles));
    return this;
}

The RolesAuthorizationRequirement is not only the IAuthorizationRequirement but also the handler that evaluates that type of requirements (this is actually very convenient).

public class RolesAuthorizationRequirement : AuthorizationHandler<RolesAuthorizationRequirement>, IAuthorizationRequirement
{
    /// <summary>
    /// Creates a new instance of <see cref="RolesAuthorizationRequirement"/>.
    /// </summary>
    /// <param name="allowedRoles">A collection of allowed roles.</param>
    public RolesAuthorizationRequirement(IEnumerable<string> allowedRoles)
    {
        if (allowedRoles == null)
        {
            throw new ArgumentNullException(nameof(allowedRoles));
        }

        if (allowedRoles.Count() == 0)
        {
            throw new InvalidOperationException(Resources.Exception_RoleRequirementEmpty);
        }
        AllowedRoles = allowedRoles;
    }

    /// <summary>
    /// Gets the collection of allowed roles.
    /// </summary>
    public IEnumerable<string> AllowedRoles { get; }

    /// <summary>
    /// Makes a decision if authorization is allowed based on a specific requirement.
    /// </summary>
    /// <param name="context">The authorization context.</param>
    /// <param name="requirement">The requirement to evaluate.</param>

    protected override Task HandleRequirementAsync(AuthorizationHandlerContext context, RolesAuthorizationRequirement requirement)
    {
        if (context.User != null)
        {
            bool found = false;
            if (requirement.AllowedRoles == null || !requirement.AllowedRoles.Any())
            {
                // Review: What do we want to do here?  No roles requested is auto success?
            }
            else
            {
                found = requirement.AllowedRoles.Any(r => context.User.IsInRole(r));
            }
            if (found)
            {
                context.Succeed(requirement);
            }
        }
        return Task.CompletedTask;
    }

}

Imperative authorization

Imprerative authorization is very much like the custom provider type but this time you manually check if the user is allowed to access a specific resource. Let’s assume that you want to allow users to add videos on your streaming platform but only to those categories that are registered for. It makes sense right? To implement that type of functionality you will need a requirement and a handler again but not a custom provider.

public class UserCategoryAuthorizationHandler : 
    AuthorizationHandler<UserCategoryRequirement, VideoVM>
{
    private readonly UserManager<IdentityUser> _userManager;

    public UserCategoryAuthorizationHandler (UserManager<IdentityUser> userManager) {
        _userManager = userManager;
    }

    protected override Task HandleRequirementAsync(AuthorizationHandlerContext context,
                                                    UserCategoryRequirement requirement,
                                                    VideoVM resource)
    {
        var loggedInUserTask = _userManager.GetUserAsync (context.User);

        loggedInUserTask.Wait ();
            
        var userClaimsTask = _userManager.GetClaimsAsync (loggedInUserTask.Result);

        userClaimsTask.Wait ();

        var userClaims = userClaimsTask.Result;

        if (userClaims.Any (c => c.Type == resource.Category.ToString())) {
            context.Succeed (requirement);
        }

        return Task.CompletedTask;
    }
}

public class UserCategoryRequirement : IAuthorizationRequirement { }

The handler simply checks if the category of the video posted by the user belongs to his/her claims (it means that the user is registered to that category). The related policy should be added to the default authorization handler as follow:

options.Value.AddPolicy("AddVideoPolicy", policy =>
    policy.Requirements.Add(new UserCategoryRequirement()));

.. register the handler to the Startup class:

services.AddTransient<IAuthorizationHandler, UserCategoryAuthorizationHandler>();

The last thing remained is to check the AddVideoPolicy policy based permissions for a user. The way you do it is through the IAuthorizationService which is a simple interface and available through dependency injection (registered in the services collection).

public interface IAuthorizationService
{
    /// <summary>
    /// Checks if a user meets a specific set of requirements for the specified resource
    /// </summary>
    /// <param name="user">The user to evaluate the requirements against.</param>
    /// <param name="resource">
    /// An optional resource the policy should be checked with.
    /// If a resource is not required for policy evaluation you may pass null as the value.
    /// </param>
    /// <param name="requirements">The requirements to evaluate.</param>
    /// <returns>
    /// A flag indicating whether authorization has succeeded.
    /// This value is <value>true</value> when the user fulfills the policy; otherwise <value>false</value>.
    /// </returns>
    /// <remarks>
    /// Resource is an optional parameter and may be null. Please ensure that you check it is not 
    /// null before acting upon it.
    /// </remarks>
    Task<AuthorizationResult> AuthorizeAsync(ClaimsPrincipal user, object resource, IEnumerable<IAuthorizationRequirement> requirements);

    /// <summary>
    /// Checks if a user meets a specific authorization policy
    /// </summary>
    /// <param name="user">The user to check the policy against.</param>
    /// <param name="resource">
    /// An optional resource the policy should be checked with.
    /// If a resource is not required for policy evaluation you may pass null as the value.
    /// </param>
    /// <param name="policyName">The name of the policy to check against a specific context.</param>
    /// <returns>
    /// A flag indicating whether authorization has succeeded.
    /// Returns a flag indicating whether the user, and optional resource has fulfilled the policy.    
    /// <value>true</value> when the policy has been fulfilled; otherwise <value>false</value>.
    /// </returns>
    /// <remarks>
    /// Resource is an optional parameter and may be null. Please ensure that you check it is not 
    /// null before acting upon it.
    /// </remarks>
    Task<AuthorizationResult> AuthorizeAsync(ClaimsPrincipal user, object resource, string policyName);
}

Back to the StreamingController AddVideo action we use an instance of IAuthorizationService to evaluate the user’s claims against the “AddVideoPolicy” policy:

[HttpPost]
[Route ("videos/add")]
[Authorize]
public async Task<IActionResult> AddVideo ([FromBody] VideoVM video) {

    var authorizationResult = await _authorizationService
        .AuthorizeAsync (User, video, "AddVideoPolicy");

    if (authorizationResult.Succeeded) {
        VideoRepository.Videos.Add (video);
        return Ok ();
    } else {
        return new ForbidResult ();
    }
}

The default Authorize attribute uses the DefaultAuthorizationHandler we have talked about and ensures the user is Authenticated. Last but not least, we use an instance of IAuthorizationService and check if the user has the permission to add the video to our streaming platform. Click the Add Video button on the left and try to post a video with a category that you aren’t registered at. Confirm that you get redirected to the Access Denied view. Try again but this time select a category for which you are already registered. The video should be posted successfully.

That’s it we finished! Hopefully you have understood how authorization works under the hood and how to use different types of authorization to prohibit unauthorized access to your resources.

In case you find my blog’s content interesting, register your email to receive notifications of new posts and follow chsakell’s Blog on its Facebook or Twitter accounts.

Facebook Twitter
.NET Web Application Development by Chris S.
facebook twitter-small
twitter-small

Getting started with Azure Service Fabric

$
0
0

In case you are planning to build the new Facebook or Twitter you probably need to adopt a Microservice architecture that allows you to easily scale up to thousands of machines (Scalability) and be always-on having zero downtime during application upgrades or hardware failures (Availability-Reliability). While Microservices architecture provides this type of critical features it also raises operational or communication nature difficulties that need to be handled. The most common difficulty is the service discovery or in other words, how services communicate with each other when there may be thousands of these and each one may stop functioning or change hosting machine at any time. Another major challenge is how to apply system upgrades to such a large amount of hosted services. There are two popular solutions for building Microservices-based applications, the one that uses containers and Orchestrators such as Kubernetes or Docker Swarm to solve all the management and operational issues and Azure Service Fabric which is Microsoft’s distributed systems platform for packaging, deploying and managing scalable and reliable microservices and containers.

Azure Service Fabric Series

This post is the first one related to Azure Service Fabric but there will be more. The purpose of the Azure Service Fabric blog post series is to get you familiar with the platform and learn how to use it in order to build and manage enterprise, cloud-scale applications. You will learn the different types of services that you can use (Stateless, Stateful, Actors), how to scale them, how to handle deployments or upgrades in a fully distributed system and many more… Probably at the end of the series we will also build and learn how to manage a Microservice based application that can scale up to thousands of machines. But first things first so on this very post we ‘ll try to keep it simple and learn just the basics. More specifically:

  • Install Azure Service Fabric SDK: You will prepare your development environment by installing and configuring a local cluster
  • Create your first Stateless and Stateful services: You will scaffold a stateless and a stateful service. We ‘ll study their code and understand their differences and when to use one over the other
  • Deploy the services on the local cluster and study their behavior using the Diagnostic Event Viewer in Visual Studio. You will use Powershell to check and monitor your cluster’s status
  • Learn the basic Configuration options such as service’s Instance Count or Partition Count

Install Azure Service Fabric SDK

When using ASF you deploy your application services in an Azure Service Fabric Cluster which consists of 1 or more nodes. Ideally you would like to have a similar environment on your development machine so that you can test and simulate your multinode application behavior locally. Luckily you can install Azure Service Fabric SDK and run your services as if they were running in a production environment. Install the SDK by clicking one of the following links depending on your development environment.

Azure PowerShell

Go ahead and install PowerShell and Azure PowerShell. They can be used to monitor and manage the services deployed in a Service Fabric cluster

After installing the SDK you should see the Azure Service Fabric icon on right bottom of your screen.

Right click the icon and select the Manage Local Cluster menu item to open the Service Fabric Explorer. This is a panel where you can see all the applications and services hosted on your local cluster. One thing you can notice is that the cluster can be configured as a single or a 5 node cluster (this can be done through the Switch Cluster Mode menu item on the tray). Service Fabric Explorer can be opened alternatively by navigating to http://localhost:19080/Explore. Before opening though the explorer make sure the cluster is running by selecting Start Local Cluster from the tray icon.

A Service Fabric cluster is a shared pool of network-connected physical or virtual machines (Nodes) where microservices are deployed and managed. A Service Fabric cluster can scale up to thousands machines. Each machine or a VM in a cluster is considered as a Node but what Service Fabric actually considers as a Node is two executables, Fabric.exe and FabricGateway.exe which are started by a Windows Service named FabricHost.exe.

When Service Fabric local cluster is up and running you should be able to see these services in the Windows Task manager. The following screenshot shows the previous services for a 5-Node mode local cluster.

Stateless services

A service in SF is an isolated unit responsible to deliver specific functionality. It should be able to be managed, scaled and evolved independently from other services in the cluster. A Stateless service as its name implies is a service that doesn’t save any state and just to make it more clear, a service that doesn’t save any state locally. This is the main difference with the Stateful service that actually saves some type of state locally. Open Visual Studio 2017 as Administrator and create a new project of type Service Fabric Application named CounterApplication. You will find the template by selecting the Cloud templates.

Click next, select the .NET Core Stateless Service template and name the service CounterStatelessService.

When VS finishes scaffolding the SF project your solution should look like this:

Each SF application has a specific named Type and by default it is named as <solution-name>Type. This is defined on the application level in the solution and more specifically in the ApplicationManifest.xml file. Go ahead and open that file.

<ApplicationManifest ApplicationTypeName="CounterApplicationType"
                     ApplicationTypeVersion="1.0.0"
                     xmlns="http://schemas.microsoft.com/2011/01/fabric"
                     xmlns:xsd="http://www.w3.org/2001/XMLSchema"
                     xmlns:xsi="http://www.w3.org/2001/XMLSchema-instance">

This file also defines which service types the application consists of plus any parameters and configuration to be used when the application is provisioned on the cluster. In our example the ApplicationManifest.xml file defines that we need to import the CounterStatelessServicePkg package with version “1.0.0” and instantiate [CounterStatelessService_InstanceCount] number of CounterStatelessService service instances.

  <Parameters>
    <Parameter Name="CounterStatelessService_InstanceCount" DefaultValue="-1" />
  </Parameters>
  <!-- Import the ServiceManifest from the ServicePackage. The ServiceManifestName and ServiceManifestVersion 
       should match the Name and Version attributes of the ServiceManifest element defined in the 
       ServiceManifest.xml file. -->
  <ServiceManifestImport>
    <ServiceManifestRef ServiceManifestName="CounterStatelessServicePkg" ServiceManifestVersion="1.0.0" />
    <ConfigOverrides />
  </ServiceManifestImport>
  <DefaultServices>
    <!-- The section below creates instances of service types, when an instance of this 
         application type is created. You can also create one or more instances of service type using the 
         ServiceFabric PowerShell module.
         
         The attribute ServiceTypeName below must match the name defined in the imported ServiceManifest.xml file. -->
    <Service Name="CounterStatelessService" ServicePackageActivationMode="ExclusiveProcess">
      <StatelessService ServiceTypeName="CounterStatelessServiceType" InstanceCount="[CounterStatelessService_InstanceCount]">
        <SingletonPartition />
      </StatelessService>
    </Service>
  </DefaultServices>

Lots of things were defined in the ApplicationManifest file so we need to see where are all these values come from and how they affect the final deployed application. Switch to CounterStatelessService project and check the first lines of its ServiceManifest.xml file. Each service has a manifest file that defines several types of configuration properties such as the service(s) to be activated, the package, config and code names and entry points as well.

<ServiceManifest Name="CounterStatelessServicePkg"
                 Version="1.0.0"
                 xmlns="http://schemas.microsoft.com/2011/01/fabric"
                 xmlns:xsd="http://www.w3.org/2001/XMLSchema"
                 xmlns:xsi="http://www.w3.org/2001/XMLSchema-instance">

The 1st two lines of the previous snippet declare the name of the service type and the current version. Notice that these matches the related properties declared in the ApplicationManifest.xml file. Version numbers have a significant role in application upgrades but we will cover upgrades in a future post. In the same way an SF application has a specific type, a service has a type as well defined in the ServiceManifest.mxl file.

<ServiceTypes>
    <!-- This is the name of your ServiceType. 
         This name must match the string used in the RegisterServiceAsync call in Program.cs. -->
    <StatelessServiceType ServiceTypeName="CounterStatelessServiceType" />
  </ServiceTypes>

Note that this value matches the ServiceTypeName for each service type need to be activated in the ApplicationServiceManifest.xml file. The next important configuration property is the definition of what your service actually doing which is the EntryPoint.

<CodePackage Name="Code" Version="1.0.0">
    <EntryPoint>
      <ExeHost>
        <Program>CounterStatelessService.exe</Program>
      </ExeHost>
    </EntryPoint>
  </CodePackage>

EntryPoint can also be used in case you need to run some initialization scripts or code before the service instance is activated. At the end of the day a service is an executable program like a normal console app. The Program.cs registers the service type in Service Fabric. Before ASF activates an instance of a service, its service type needs to be registered.

private static void Main()
{
    try
    {
        // The ServiceManifest.XML file defines one or more service type names.
        // Registering a service maps a service type name to a .NET type.
        // When Service Fabric creates an instance of this service type,
        // an instance of the class is created in this host process.

        ServiceRuntime.RegisterServiceAsync("CounterStatelessServiceType",
            context => new CounterStatelessService(context)).GetAwaiter().GetResult();

        ServiceEventSource.Current.ServiceTypeRegistered(Process.GetCurrentProcess().Id, typeof(CounterStatelessService).Name);

        // Prevents this host process from terminating so services keep running.
        Thread.Sleep(Timeout.Infinite);
    }
    catch (Exception e)
    {
        ServiceEventSource.Current.ServiceHostInitializationFailed(e.ToString());
        throw;
    }
}

The Main method also scaffolds code to generate logs using Event Tracing for Windows which is very usefull to understand the behavior, state and failures of your SF applications and services. A Stateless service class inherits from the StatelessService class.

internal sealed class CounterStatelessService : StatelessService
{
    public CounterStatelessService(StatelessServiceContext context)
        : base(context)
    { }
    // code omitted

Optionally it registers communication listeners so that can accept requests from other clients/services. Service Discovery is one of the best features in SF by providing a simple and straightforward way for services to find and communicate each other even when they change host machine or fail. You can use a number of communication protocols, not only HTTP which is great for boosting performance between internal service communication. We will see more on service discovery in a future post. Last but not least a service has an optional RunAsync method that defines what your service does when instantiated.

protected override async Task RunAsync(CancellationToken cancellationToken)
{
    long iterations = 0;

    while (true)
    {
        cancellationToken.ThrowIfCancellationRequested();

        ServiceEventSource.Current.ServiceMessage(this.Context, "Iteration-{0}   |   {1}",
                                                    ++iterations, this.Context.InstanceId);

        await Task.Delay(TimeSpan.FromSeconds(5), cancellationToken);
    }
}

What CounterStatelessService service does is just logging a message with the current number of iterations plus the instance id of the service every 5 seconds. Every time you instantiate a service this method runs. In the case of a stateless service such as the CounterStatelessService, each one uses a different iteration variable which means they all log values of a different variable.

Deploy the Stateless service

Let’s deploy the Azure Service application and see what happens. You can do it either by pressing F5 and start debugging in VS as usual or by right clicking the CounterApplication project and select Publish.. In case you choose the F5 option, the ASF application will be automatically deployed to your local cluster and de-provisioned when you stop debugging. If you choose the Publish option a new window will open where you have to choose:

  • Target profile: The options are the publish profiles exist in the CounterApplication/PublishProfiles folder
  • Connection Endpoint: The endpoint is defined (or not) in the publish profile chosen in the previous step. If you choose the PublishProfiles/Local.1Node.xml or PublishProfiles/Local.5Node.xml then your local cluster will be selected. Otherwise you have to enter the endpoint of your cluster. This is defined on the publish profile xml files as follow:
    <?xml version="1.0" encoding="utf-8"?>
    <PublishProfile xmlns="http://schemas.microsoft.com/2015/05/fabrictools">
      <ClusterConnectionParameters ConnectionEndpoint="" />
      <ApplicationParameterFile Path="..\ApplicationParameters\Cloud.xml" />
      <CopyPackageParameters CompressPackage="true" />
    </PublishProfile>
    

    If ClusterConnectionParameters is empty then local cluster is selected

  • Application Parameters file: The options are one of the files exist in the CounterApplication/ApplicationParameters folder and should match your publish profile selection

When choosing PublishProfiles/Local.1Node.xml or PublishProfiles/Local.5Node.xml publish profiles make sure that your local cluster’s mode configuration is the same, meaning choose the Local.5Node.xml when your cluster runs in 5 nodes mode and Local.1Node.xml otherwise. By default the local cluster is configured to run as a 5 node so your publish window should look like this:

Publish the CounterApplication (preferably using F5 during this post) in your local cluster and then open the Diagnostic Events view. You can open the view in VS by navigating View -> Other Windows -> Diagnostic Events

Now check the changes happened in the Service Fabric Explorer.

At this point we will pause and explain a few things. First of all only one instance of our Stateless service is deployed despite the fact that we run the cluster in a 5 node mode so why that happened? The ApplicationManifest.xml file defines that the default number of our CounterStatelessService service instances should be -1 which in Azure Service Fabric means that the service should be deployed to all nodes in the cluster. We should have seen 1 instance deployed per node but we only see 1 instance (in my case deployed on the _Node_0 but in yours can be different). This happened because the CounterStatelessService_InstanceCount parameter was overridden by a value provided in the Local.5Node.xml Application Parameter file..

<?xml version="1.0" encoding="utf-8"?>
<Application xmlns:xsd="http://www.w3.org/2001/XMLSchema" xmlns:xsi="http://www.w3.org/2001/XMLSchema-instance" Name="fabric:/CounterApplication" xmlns="http://schemas.microsoft.com/2011/01/fabric">
  <Parameters>
    <Parameter Name="CounterStatelessService_InstanceCount" Value="1" />
  </Parameters>
</Application>

Back to service explorer there are several types of nodes:

  • Application type: The top level Node is the Application Type which is created when you create a Service Fabric Application. In our case is CounterApplicationType (1.0.0) as defined in the ApplicationManifest.xml file
  • Application instance: It’s the second level in the hierarchy and the first one under the Application type node. Deploying an ASF application you get an instance of that application type on the cluster named fabric:/ApplicationName, in our case fabric:/CounterApplication
  • Service type: The nodes that define the service types registered in Azure Service Fabric. In a real scenario you will have many service types registered. The service type name has a format of fabric:/ApplicationName/ServiceName which in our case is fabric:/CounterApplication/CounterStatelessService
  • Partition type: A partition is identified by a Guid and makes more sense for stateful services. In our case we have one partition.
    <Service Name="CounterStatelessService" ServicePackageActivationMode="ExclusiveProcess">
      <StatelessService ServiceTypeName="CounterStatelessServiceType" InstanceCount="[CounterStatelessService_InstanceCount]">
        <SingletonPartition />
      </StatelessService>
    </Service>
    

    We will discuss partitions in the Stateful services section.

  • Replica or Instance type: It defines the cluster node where the service is currently hosted/running


Assuming that CounterStatelessService got activated in _Node_3 which is shown in the Replica Node you can narrow down in Service Fabric Explorer and get the Instance ID of that service.

Switch back to VS Diagnostic Events window and confirm that you get logs from that instance. Now we will make a test and simulate a system failure and make the Node that the CounterStatelessService is currently deployed fail and see what happens. To do this, find the current Node (in my case is _Node_3), click on the 3 dots on the right and select Deactivate (restart).

You will be prompt to enter the Node’s name to confirm restart. While the node is restarting make sure to have the Diagnostic Events opened and see what happens..

As you can see multiple Service Fabric related events have fired. The most important are the highlighted where the currently active service received a CancellationToken request. When a cancellation request is received from your services make sure you stop any active process running on the service. Next you can see that the Node deactivation has been completed and a new CounterStatelessService got activated. Since this is a new instance, you can see in the logs a new Instance ID plus the initialization of the iterations property. When Azure Service fabric detected that a Node failed, it checked the [CounterStatelessService_InstanceCount] and decided that one instance should always be active. So it found a healthy node on the cluster and instantiated a new instance for you automatically. Tha same will happen in case you try to change the [CounterStatelessService_InstanceCount] number, it will always try to keep the configured instances active.

You can reactivate the Node you deactivated before in the same way you did before by selecting Activate..

If you set it to 5 in a 5 Node cluster ASF will equally distribute the services to all nodes by instantiating an instance on each node. You would expect though that deactivating a Node in that case would result ASF to create a new instance in one of the other healthy nodes which means one Node would host 2 instances of the service. Well.. this wont happen due to partition constraints where multiple instances of a single partition cannot be placed in a node. In case you want to enforce or test this behavior you need to apply the following configuration:

  • Change the partition number of the CounterStatelessService to 5: Check the highlighted modifications made in the ApplicationManifest.xml file where a new CounterStatelessService_PartitionCount parameter added partition type changed from SingletonPartition to UniformInt64Partition.
    <?xml version="1.0" encoding="utf-8"?>
    <ApplicationManifest xmlns:xsd="http://www.w3.org/2001/XMLSchema" xmlns:xsi="http://www.w3.org/2001/XMLSchema-instance" ApplicationTypeName="CounterApplicationType" ApplicationTypeVersion="1.0.0" xmlns="http://schemas.microsoft.com/2011/01/fabric">
      <Parameters>
        <Parameter Name="CounterStatelessService_InstanceCount" DefaultValue="-1" />
        <Parameter Name="CounterStatelessService_PartitionCount" DefaultValue="-1" />
      </Parameters>
      <!-- Import the ServiceManifest from the ServicePackage. The ServiceManifestName and ServiceManifestVersion 
           should match the Name and Version attributes of the ServiceManifest element defined in the 
           ServiceManifest.xml file. -->
      <ServiceManifestImport>
        <ServiceManifestRef ServiceManifestName="CounterStatelessServicePkg" ServiceManifestVersion="1.0.0" />
        <ConfigOverrides />
      </ServiceManifestImport>
      <DefaultServices>
        <!-- The section below creates instances of service types, when an instance of this 
             application type is created. You can also create one or more instances of service type using the 
             ServiceFabric PowerShell module.
             
             The attribute ServiceTypeName below must match the name defined in the imported ServiceManifest.xml file. -->
        <Service Name="CounterStatelessService" ServicePackageActivationMode="ExclusiveProcess">
          <StatelessService ServiceTypeName="CounterStatelessServiceType" InstanceCount="[CounterStatelessService_InstanceCount]">
            <UniformInt64Partition PartitionCount="[CounterStatelessService_PartitionCount]" LowKey="-9223372036854775808" HighKey="9223372036854775807" />
          </StatelessService>
        </Service>
      </DefaultServices>
    </ApplicationManifest>
    
  • Change the parameter values in the ApplicationParameters/Local.5Node.xml file to reflect an environment where there are 5 different partitions of the CounterStatelessService with 1 instance each:
    <?xml version="1.0" encoding="utf-8"?>
    <Application xmlns:xsd="http://www.w3.org/2001/XMLSchema" xmlns:xsi="http://www.w3.org/2001/XMLSchema-instance" Name="fabric:/CounterApplication" xmlns="http://schemas.microsoft.com/2011/01/fabric">
      <Parameters>
        <Parameter Name="CounterStatelessService_InstanceCount" Value="1" />
        <Parameter Name="CounterStatelessService_PartitionCount" Value="5" />
      </Parameters>
    </Application>
    

Hit F5 to publish the app in the local cluster and check the Service Fabric Explorer.

What you see is 5 different partitions with a single instance of the CounterStatelessService each, deployed in 5 different cluster nodes. Try to deactivate a node and Service Fabric will create a new instance of the service in one of the remaining 4 nodes. In the following screenshot notice that _Node_3 was deactivated and a new instance instantiated in _Node_4

Partitions make more sense in Stateful services and this is where we will explain them in detail.

Stateful services

Sometimes you need your microservices to save some type of local state and also survive and restore that state after system failures. This is where Service Fabric Stateful services come into the scene to enhance the level of reliability and availability in scalable and distributed systems. Service Fabric provide reliable data structures (dictionaries or queues) which are persisted and replicated automatically to secondary replicas in the cluster. The main idea is simple: You have a partition which is nothing more that a set of replicas. There is only one primary replica in a partition and all writes go through it. All other replicas are considered secondaries and don’t accept or process requests. All state changes though are replicated to all secondaries and are handled in transactions meaning that changes are considered committed when all transactions have been applied to all replicas (primary and secondaries). Let’s create our first Stateful service and explain how it works in more detail..
Right click the CounterApplication and select Add => New Service Fabric Service...

Select the .NET Core Stateful Service template and name the service CounterStatefulService.

A Stateful service inherits from the StatefulService class.

internal sealed class CounterStatefulService : StatefulService
{
    public CounterStatefulService(StatefulServiceContext context)
        : base(context)
    { }
    // code omitted

StatefulService class has a property named StateManager of type IReliableStateManager. This class gives you access to a Reliable State Manager which is used to access the reliable collections like if they were local data.

public abstract class StatefulService : StatefulServiceBase
{
    protected StatefulService(StatefulServiceContext serviceContext);
    protected StatefulService(StatefulServiceContext serviceContext, IReliableStateManagerReplica reliableStateManagerReplica);

    public IReliableStateManager StateManager { get; }
}

Keep in mind that reliable data structures aren’t actually local data but distributed which means that somehow their lifetimes should be managed properly to ensure consistency and data integrity between all replicas. Change the RunAsync method as follow:

protected override async Task RunAsync(CancellationToken cancellationToken)
{
    var counterDictionary = await this.StateManager.GetOrAddAsync<IReliableDictionary<string, long>>("counter");

    while (true)
    {
        cancellationToken.ThrowIfCancellationRequested();

        using (var tx = this.StateManager.CreateTransaction())
        {
            var result = await counterDictionary.TryGetValueAsync(tx, "iteration");

            ServiceEventSource.Current.ServiceMessage(this.Context, "Iteration-{0}   |   {1}",
                (result.HasValue ? result.Value.ToString() : "Value does not exist."), this.Context.ReplicaOrInstanceId);

            await counterDictionary.AddOrUpdateAsync(tx, "iteration", 0, (key, value) => ++value);

            // If an exception is thrown before calling CommitAsync, the transaction aborts, all changes are 
            // discarded, and nothing is saved to the secondary replicas.
            await tx.CommitAsync();
        }

        await Task.Delay(TimeSpan.FromSeconds(5), cancellationToken);
    }
}

Here is an example of a reliable dictionary in action. First we use the StateManager to get a reference to a reliable dictionary named counter that keeps <string.long> key/value pairs. Next we create a transaction and try to read the value for the key iteration in the dictionary. Then we add or update the new value for that key and finally we commit the transaction. Before testing the behavior of our Stateful service remove the CounterStatefulService project from the solution so that we can focus on the stateful service only. The ApplicationManifest.xml file will automatically change and should look like this:

<?xml version="1.0" encoding="utf-8"?>
<ApplicationManifest xmlns:xsd="http://www.w3.org/2001/XMLSchema" xmlns:xsi="http://www.w3.org/2001/XMLSchema-instance" ApplicationTypeName="CounterApplicationType" ApplicationTypeVersion="1.0.0" xmlns="http://schemas.microsoft.com/2011/01/fabric">
  <Parameters>
    <Parameter Name="CounterStatefulService_MinReplicaSetSize" DefaultValue="3" />
    <Parameter Name="CounterStatefulService_PartitionCount" DefaultValue="1" />
    <Parameter Name="CounterStatefulService_TargetReplicaSetSize" DefaultValue="3" />
  </Parameters>
  <!-- Import the ServiceManifest from the ServicePackage. The ServiceManifestName and ServiceManifestVersion 
       should match the Name and Version attributes of the ServiceManifest element defined in the 
       ServiceManifest.xml file. -->
  <ServiceManifestImport>
    <ServiceManifestRef ServiceManifestName="CounterStatefulServicePkg" ServiceManifestVersion="1.0.0" />
    <ConfigOverrides />
  </ServiceManifestImport>
  <DefaultServices>
    <!-- The section below creates instances of service types, when an instance of this 
         application type is created. You can also create one or more instances of service type using the 
         ServiceFabric PowerShell module.
         
         The attribute ServiceTypeName below must match the name defined in the imported ServiceManifest.xml file. -->
    <Service Name="CounterStatefulService" ServicePackageActivationMode="ExclusiveProcess">
      <StatefulService ServiceTypeName="CounterStatefulServiceType" TargetReplicaSetSize="[CounterStatefulService_TargetReplicaSetSize]" MinReplicaSetSize="[CounterStatefulService_MinReplicaSetSize]">
        <UniformInt64Partition PartitionCount="[CounterStatefulService_PartitionCount]" LowKey="-9223372036854775808" HighKey="9223372036854775807" />
      </StatefulService>
    </Service>
  </DefaultServices>
</ApplicationManifest>

Also change the ApplicationParameters/Local.5Node.xml file as follow:

<?xml version="1.0" encoding="utf-8"?>
<Application xmlns:xsd="http://www.w3.org/2001/XMLSchema" xmlns:xsi="http://www.w3.org/2001/XMLSchema-instance" Name="fabric:/CounterApplication" xmlns="http://schemas.microsoft.com/2011/01/fabric">
  <Parameters>
    <Parameter Name="CounterStatefulService_PartitionCount" Value="1" />
    <Parameter Name="CounterStatefulService_MinReplicaSetSize" Value="3" />
    <Parameter Name="CounterStatefulService_TargetReplicaSetSize" Value="3" />
  </Parameters>
</Application>

Hit F5 and deploy the Service Fabric application to your local cluster. Hopefully you should be able to understand that we expect 1 partition with 3 replicas to be deployed in the cluster.. Confirm this by opening the Service Explorer.

What you see is that there is indeed one partition having 3 replicas (instances) of our CounterStatefulService. The primary is hosted on _Node_2 and the other 2 secondaries are active and hosted on _Node_0 and _Node_1. The interesting thing though is in the Diagnostic Events view..

Notice that there is only one replica active and logging the value from the counter dictionary and of course this is the primary one. Now let’s run the same test we run on the stateless service after publishing the app. Switch to the Service Explorer and Deactivate (restart) the node where the primary replica is hosted (in my case is _Node_2). Then switch back to the Diagnostic Events and take a look what happened..

This is pretty amazing. What happened is that Service Fabric detected the node’s failure and of course the failure of the primary replica on that node. Then due to the configuration parameters decided to elect a new primary replica by selecting one of the previous secondaries replicas. The new primary replica was able to read the last value of the iteration key in the counter dictionary which was originally written by the replica that was running on _Node_2. One strange thing you might notice in the Service Explorer is that Service Fabric didn’t created a new instance in some other available node but instead kept that node as active secondary but unhealthy. This makes sense cause it assumes that the node will recover and there is no need to instantiate a new service in a different node in the cluster. In case it does create a new stateful instance of the service in a different node it also has to trigger the state synchronization with that node which of course will consume resources (especially network..). If you want to test this scenario click the 3 dots on the currently primary replica’s node and select Deactivate (remove data). You will see that a new instance will be created in one of the available nodes in the local cluster.

Partitions

Partitioning is all about divide and conquer in order to increase scalability and performance by splitting the state and processing into smaller logical units. The first thing you need to know before viewing some examples is that partitioning works different for stateless and stateful services in Service Fabric meaning that all replicas/instances in a stateless service partition are active and running (probably accepting client requests as well) while as we have already mentioned only one replica is actually running in a stateful service partition and all others simply participating in the write quorum of the set (syncing state). For example if you have a stateless service with 1 partition having 5 instances in a 5-node cluster then you have 1 service instance up and running on each node.

On the other hand if you have a stateful service with the same configuration then again each node will host an instance of the service but only one will be up and running, accepting client requests. All others will be active secondaries syncing the state and nothing more.

We will cover Service Fabric listeners and communication stacks in a future post but for now just keep in mind that service instances can be targeted through the partition key they belong to. You don’t actually need partioning in stateless services since they don’t save any state locally and there is nothing to distributed equally. If you need to scale just add more instances of the service by increasing the instance count parameter and that’s all.

Targeting specific instances

The only scenario to use multiple partitions in stateless services is where you want to route certain requests to specific instances of the service.

Partitioning in stateful services is about splitting responsibilities for processing smaller portions of the state. What we mean by that? Let’s take an example where you have a stateful service that accepts requests for storing demographic data in a city with 5 regions. Then you could create 5 different Named partitions using the region code as the partition key. This way, all requests that are related to a region code would end up to the same partition (replicas) resulting to better resource load balancing since requests are distributed to different instances depending on the region code.

Be carefull though to choose a good partitioning strategy cause you may end up having instances that serve more traffic than others which also means that probably save more amount of state as well. In our previous example assuming that 2 of the 5 regions takes up to 80% percentage of the city’s population then these partitions serve way more traffic than all the other 3.

So when choosing a partition strategy try to figure out how to evenly split the amount of state across the partitions.
Another key aspect in Service Fabric partitioning is that SF will always try to distribute partitions and replicas across all available nodes in the cluster to even out the workload. This is not something that happens only once during deployment but also when nodes fail or new ones are added. Let’s say you start your Service Fabric application in a 4-Node cluster and you have a stateful service having 8 partitions with 3 instances each (one primary, two secondaries).

Notice how Service Fabric has evenly distributed all the 8 primary replicas by deploying 2 of them on each node. Scaling out the 4-Node cluster to a 8-Node cluster would result re-destributing partitions and primary replicas across the 8 nodes as follow:

Service Fabric detected that new nodes were added to the cluster and tried its best to relocate replicas in order to even out the workload in the cluster. Rebalancing the primary replicas across all 8 nodes causes the client requests to be distributed across all 8 nodes which certainly increases overall performance of the application.

Monitor Service Fabric applications with PowerShell

While you can monitor your Service Fabric cluster status and services using UI (Azure or Orchestrators) you can also use PowerShell cmdlets. These cmdlets are installed by Service Fabric SDK. When developing on your local machine, most of the times you will have many services (or partitions and replicas if you prefer) published in the local cluster. In case you wish to debug a specific instance you can do that by finding information using the PowerShell. In the following example I deployed both the CounterStatelessService and the CounterStatefulService in the cluster having 1 partition with 3 instances and 2 partitions with 3 instances respectively.

What if I wanted to debug the primary replica of the Stateful service which is hosted on the _Node_0? First thing we need to do is connect to the cluster by typing the following command in PowerShell.

Connect-ServiceFabricCluster 

The Connect-ServiceFabricCluster cmdlet creates a connection to a Service Fabric cluster and when called with no parameters connects to your local cluster.

You can check the applications published on your cluster using the Get-ServiceFabricApplication cmdlet.

Now let’s see what’s happening in _Node_0 node that we were interesting on by running the following command:

Get-ServiceFabricDeployedReplica -NodeName "_Node_0" -ApplicationName "fabric:/CounterApplication"


As you can see there are 2 replicas of the CounterStatefulService service coming from 2 different partitions. The primary is the one we are interested on so now we know its process id which is 9796. We can switch to VS and select Debug => Attach to process.., find the process with that id and start debugging.

You can find all the PowerShell Service Fabric cmdlets here.

That’s it we have finished! We saw the most basic things you need to know before taking a deeper dive into Service Fabric. In upcoming posts we are going to dig deeper and learn about Actors, the available communication stacks and how services communicate each other and many more so stay tuned till next time..

In case you find my blog’s content interesting, register your email to receive notifications of new posts and follow chsakell’s Blog on its Facebook or Twitter accounts.

Facebook Twitter
.NET Web Application Development by Chris S.
facebook twitter-small
twitter-small

Instant page rendering and seamless navigation for SPAs

$
0
0

Single Page Applications SPAs nowadays are probably the latest trend when building web applications and this comes for two reasons: a) they offer a smoothless user experience with no page reloads and b) the existence of so many javascript frameworks that supports them. They are known though for several unwanted behaviors such as that they need to be loaded first and make at least one API call before showing the initial view, displaying a loader until that call ends and that it’s difficult to keep the code clean either in the back end or front end when the app grows, having too many views with different shared components such as sidebars. For the initial rendering issue, you will find Server Side rendering solutions that involve webpack plugins or server-side middleware. Those kinds of middlewares though may raise new issues such as decrease overall performance or strange server-side behavior (aggregating requests on the first load). This post will introduce a new technique that can set the initial state on the client when the page loads plus provides a seamless SPA route navigation from views with entirely different structures and reusable components while keeping both your backend and frontend code clean. Before continuing and explain the technique I strongly recommend you to download the associated repository and understand how the technique works. The app is also deployed here.

The project is built with ASP.NET Core and Vue.js on the front but don’t worry, it’s just a few lines and you can do the same with other frameworks as well, what matters is the technique, not the framework used.

Explaining the app

Build an fire the application on your favorite browser. The app is a fiction Sports Betting website having the following views:

  • Home: This view has a Header, a Sidebar, some content and a Footer
  • Offers: same as the home view with different content coming from a OffersController controller
  • Article: Clicking on item in the Offers view you will navigate to the Article view where you can see that the sidebar is missing
  • League: Clicking an item from the sidebar you will navigate to the league view where there are two components: a Live bet widget and the actual content of the selected league. When the league changes the widget remains the same

Play around with the app and ask yourself the following questions:

  • If the landing page is the Article view what happens when navigating to Home or Offers? Do their controller actions need to know about the sidebar and if so how?
  • When switching leagues from the sidebar, does the action needs to know about the live bet widget? Notice that in this case the route remains the same, only the resource changes

Open the network tab and check what happens in the traffic. You will find that shared-required components such as the sidebar and the widget are only retrieved only if they don’t exist on the application’s store state. More over the JSON response is broken in two parts, d: which contains the action’s data specific related to the view, for example the OffersController/Index action returned result and s: which contains any shared structural data. The following screenshot shows the response when the landing page is the Article and then navigating to Offers:

Of course you will find that when loading the page, no API calls required to display the initial view regardless of the route. So what happens and all the actions know what to render? Time to dig in and explain the technique.

The technique

The solution is based in a new term named Structural Components:

Definition

Structural Components are the components that their state is shared across either different routes or different resources for the same route.

In our demo app we have the following structural components:

  • Header and footer because their state is used for all views/routes
  • Sidebar because its state is used for home, offers and league routes
  • Bet of day widget because its state is shared by different resources of the same route

Now that we have defined what Structural components are we can see how backend and frontend understand what’s missing and what’s not.

Server side

ASP.NET Core MVC ResultFilter attributes are applied on the MVC actions to describe the structural requirements of the route. Result filters can be used to alter the response of an MVC action based on certain conditions. The base class of our result filter is StructureResult. An instance of a StructuralResult contains a list of StuctureRequirement.

A structural requirement defines the requirement a follow:

public class StuctureRequirement
{
    public string StoreProperty { get; set; }
    public string Alias { get; set; }

    public Func<object, object> function;
}

The StoreProperty maps the client’s store application property while the Alias is the parameter added in the query string by the client when that property is found. If the parameter not found in the query string then the server will call the Func function to retrieve the data for this requirement. The result will be added on a property named StoreProperty in the s: object of the result. Let’s see the example where we create the DefaultStructureResult to describe the filter result for the routes where Header, Footer and Sidebar are required.

public class DefaultStructureResult : StructureResult
{
    public DefaultStructureResult(IContentRepository contentRepository) : base(contentRepository)
    {
        StuctureRequirement headerRequirement = new StuctureRequirement();
        headerRequirement.StoreProperty = "header";
        headerRequirement.Alias = "h";
        headerRequirement.function = (x) => contentRepository.GetHeaderContent("Sports Betting");

        StuctureRequirement footerRequirement = new StuctureRequirement();
        footerRequirement.StoreProperty = "footer";
        footerRequirement.Alias = "f";
        footerRequirement.function = (x) => contentRepository.GetFooterContent();

        StuctureRequirement sidebarRequirement = new StuctureRequirement();
        sidebarRequirement.StoreProperty = "sidebar";
        sidebarRequirement.Alias = "s";
        sidebarRequirement.function = (x) => contentRepository.GetSports();

        AddStructureRequirement(headerRequirement);
        AddStructureRequirement(footerRequirement);
        AddStructureRequirement(sidebarRequirement);
    }
}

The DefaultStructureResult result is applied on an MVC action as follow:

[ServiceFilter(typeof(DefaultStructureResult))]
public IActionResult Index()
{
    var result = new OffersVM {Offers = _offers};
    return ResolveResult(result);
}

ResolveResult method is responsible to return a ViewResult on a Page load request or a JSON response if it’s an API request.

public class BaseController : Controller
{
    protected IActionResult ResolveResult(object data = null)
    {
        var nameTokenValue = (string)RouteData.DataTokens["Name"];

        if (nameTokenValue != "default_api")
        {
            return View("../Home/Index", data);
        }

        return Ok(data);
    }
}

We used a ServiceFilter because we want to use Dependency Injection. Now back to the base StructureResult class where all the magic happens. Let’s break it step by step cause it is crucial to understand how it works. First we have the list of requirements..

public abstract class StructureResult : Attribute, IResultFilter
{
    private readonly IContentRepository _contentRepository;

    private List<StuctureRequirement> _requirements;

    protected StructureResult(IContentRepository contentRepository)
    {
        _contentRepository = contentRepository;
        _requirements = new List<StuctureRequirement>();
    }
    // code omitted

The OnResultExecuting method starts by checking if there’s a ns parameter and if so ignores any structure requirements – ns comes from no structures. You want this behavior cause sometimes you just want to make a pure api call and get the default result, ignoring any structure requirements applied to the action.

public void OnResultExecuting(ResultExecutingContext context)
{
    if (!string.IsNullOrEmpty(context.HttpContext.Request.Query["ns"]))
        return;
        // code omitted

The purpose of a StructureResult is to return any required structure data back to the client. The data can be returned in two different forms depending on either if it’s a full page load or an api call. If it’s a full page load then viewResult won’t be null and if it’s an API call then objectResult won’t be null.

var objectResult = context.Result as ObjectResult;
var viewResult = context.Result as ViewResult;

The part that checks the requirements is the following:

// Check requirements
foreach (var requirement in _requirements)
{
    if (string.IsNullOrEmpty(context.HttpContext.Request.Query[requirement.Alias]))
    {
        var val = requirement.function.Invoke(null);
        jobj.Add(requirement.StoreProperty, JToken.FromObject(val));
    }
}

It is generic and depends on the requirements added on the custom StructuralResult applied on the action. Structural components data are stored in a JObject. If it’s a full page load the final result which is a Partial representation of the client’s store state is stored in ViewBag.INITIAL_STATE and is instantly available on the client.

JObject initialData = null;
if (viewResult.ViewData["INITIAL_STATE"] != null)
{
    initialData = JObject.Parse(viewResult.ViewData["INITIAL_STATE"].ToString());
    jobj.Merge(initialData, new JsonMergeSettings
    {
        // union array values together to avoid duplicates
        MergeArrayHandling = MergeArrayHandling.Union
    });
}

viewResult.ViewData = new ViewDataDictionary(new Microsoft.AspNetCore.Mvc.ModelBinding.EmptyModelMetadataProvider(),
    new Microsoft.AspNetCore.Mvc.ModelBinding.ModelStateDictionary()) { { "INITIAL_STATE", jobj.ToString() } };

The if statement above is needed in case you have applied more that one StructuralResult filters on the action invoked. When the page finishes loading, the result is available inside a div and the client needs to parse it to a JSON object and merge it with the default initial state.

INIT_STATE: (state, initState) => {
    store.replaceState(Object.assign({}, store.state, initState));
}

The changes will be instantly applied on the components connected to the store and you don’t have to make any api calls.
If it was an api call then the result is stored in a s: property on the response:

else if (objectResult != null)
{
    var notFirstIteration = objectResult.Value != null && JObject.FromObject(objectResult.Value).ContainsKey("s");
    JToken previousValue = null;

    if (notFirstIteration)
    {
        previousValue = JObject.FromObject(objectResult.Value)["d"];
        jobj.Merge(JObject.FromObject(objectResult.Value)["s"], new JsonMergeSettings
        {
            // union array values together to avoid duplicates
            MergeArrayHandling = MergeArrayHandling.Union
        });
    }

    objectResult.Value = new
    {
        d = !notFirstIteration ? objectResult.Value : previousValue,
        s = jobj
    };
}

Client side

The only thing required for the client side for this technique to work is to use a store that keeps the application’s state and reactively pushes any changes made to components, a pattern known as State management pattern. The demo uses Vue.js for simplicity and has the Vuex library to store application’s state. In case you use angular on the front you can use the @ngrx/store. The client needs to define the structural components requirements per route and the best place to do this is in the route definition. Here’s the structural definitions:

const RouteStructureConfigs = {
    defaultStructure : [
        { title: 'header', alias: 'h', getter: 'getHeader', commits: [ { property: 'header', mutation: 'SET_HEADER' }] },
        { title: 'footer', alias: 'f', getter: 'getFooter', commits: [ { property: 'footer', mutation: 'SET_FOOTER' }] },
        { title: 'sidebar', alias: 's', getter: 'getSports', commits: [ { property: 'sidebar', mutation: 'SET_SIDEBAR' }]}
    ],
    noSidebarStructure : [
        { title: 'header', alias: 'h', getter: 'getHeader', commits: [ { property: 'footer', mutation: 'SET_HEADER' }] },
        { title: 'footer', alias: 'f', getter: 'getFooter', commits: [ { property: 'footer', mutation: 'SET_FOOTER' }]}
    ],
    liveBetStructure: [
        { title: 'live', alias: 'l', getter: 'getLiveBet', commits: [{ property: 'live', mutation: 'SET_LIVE_BET' }] }
    ]
}

A structure array defines the requirements and each requirement has an alias which should match the alias on the backend. It defines a getter function which tells which property should look for in the store. @ngrx/store should have a related getter method to check a state’s property. The commits array defines the mutations that should run when the response is returned from the server. Here’s the routes definitions:

const router = new VueRouter({
    mode: 'history',
    routes: [
        { name: 'home', path: '/', component: homeComponent, 
            meta: 
            {
                requiredStructures: RouteStructureConfigs.defaultStructure
            } 
        },
        { name: 'offers', path: '/offers', component: offerComponent,
            meta:
            {
                requiredStructures: RouteStructureConfigs.defaultStructure
            } 
        },
        { name: 'article', path: '/offers/:id', component: articleComponent,
            meta:
            {
                requiredStructures: RouteStructureConfigs.noSidebarStructure
            }
        },
        {
            name: 'league', path: '/league/:sport/:id', component: leagueComponent,
            meta:
            {
                requiredStructures: [...RouteStructureConfigs.defaultStructure, ...RouteStructureConfigs.liveBetStructure]
            }
        }
    ]
})

Following is the method that builds the request’s uri before sending an API call:

const buildUrl = (component, url) => {
    
    var structures = component.$router.currentRoute.meta.requiredStructures;

    // Checking structural required components..
    structures.forEach(conf => {
        var type =  typeof(component.$store.getters[conf.getter]);
        var value = component.$store.getters[conf.getter];
        console.log(conf);
        console.log(conf.title + ' : ' +  component.$store.getters[conf.getter] + ' : ' + type);
        if( 
            (type === 'string' && value !== '') || 
            (type === 'object' && Array.isArray(value) && value.length > 0)
        ){
            url = updateQueryStringParameter(url, conf.alias, true);
        }
    });

    console.log(url);
    return url;
}

The code retrieves the structural requirements/definitions for the current route and uses the aliases to build the uri. When the response is returned the updateStructures method is called to run the related mutations if required.

function updateStructures(component, response) {
    
    var structures = component.$router.currentRoute.meta.requiredStructures;

    structures.forEach(conf => {

        conf.commits.forEach(com => {
            if(response.data.s[com.property]) {
                console.log('found ' + com.property + ' component..');
                component.$store.commit(com.mutation, response.data.s[com.property]);
                console.log('comitted action: ' + com.mutation);
            }
        });
    });
}

When you have a full page load things are even more easy. The only thing to do is run a single mutation that merges the server’s INITIAL_STATE object with the default state:

INIT_STATE: (state, initState) => {
    store.replaceState(Object.assign({}, store.state, initState));
},

The entire process is described in the following diagram:

That’s it we finished! We saw how to return and set an initial state on the first page load and how to transition between different routes with entirely different structures. The key to the solution is the definition of the term Structural Components and should be easily applied on different back end and front end frameworks. You can download the repository associated with the post here.

In case you find my blog’s content interesting, register your email to receive notifications of new posts and follow chsakell’s Blog on its Facebook or Twitter accounts.

Facebook Twitter
.NET Web Application Development by Chris S.
facebook twitter-small
twitter-small

Building serverless apps with Azure Functions

$
0
0

As the cloud evolves over the years, application architectures also adapt to changes resulting to new, modern and more flexible patterns of how we build applications today. One of the hottest patterns nowadays is the serverless architecture which is the evolution of Platform as a Service (PaaS). Starting from On-Premises where we had to deal with the very hardware itself, backups or OS updates, cloud introduced IaaS where at least hardware management was delegated to the cloud provider. Still though, you have to manually install and run your software so PaaS was introduced to take cloud to the next step. PaaS were a major cloud upgrade where developers actually could start focusing on the business needs rather than the infrastructure. Who could even possibly think that you could spin up tens of VMs in a matter of a few minutes?

Cloud Evolution


So how come serverless architecture is an evolution of PaaS? The answer is two words: Speed and Cost. With PaaS when you need to scale you ask for specific size of computing power (disk capacity, memory, CPU etc..) despite the fact that you probably won’t be using it at its maximum scale. But you certainly pay for 100% of it, don’t you. Take for example a website that starts receiving thousands of requests/sec and getting too slow so you make the decision to spin up a new VM and distribute the work load. First of all spinning up the VM needs some time to finish and secondly you start paying for the new VM while it is possible that you may use less that its half resources. What serverless says is forget about servers, forget about disk capacity or memory, all this kind of stuff and much more will be handled automatically for you per need. The computing power and the resources you may need at some point in order to scale, are somewhere out there, ready to be allocated for you if needed which means speed is not a problem anymore. The best part is that you will pay for what and when you use it only.

In this post we are going to see what Azure Functions are and how they can help us build serverless applications. More specifically we are going to:

  • Define what Azure Functions are and what problems they can solve
  • Describe the different components of an Azure Function – Triggers and Bindings
  • What are the options to create and publish Azure Functions
  • Demo – Take a tour with a common application scenario where Azure Functions handle success payments from Stripe payment provider
  • Define what Durable Azure Functions are and how they differ from common Azure Functions
  • Describe Durable Azure Functions types
  • Demo – Take a look how Durable Azure Functions can process reports

You can find the most important parts of this post in the following presentation.


Ready? Let’s start..

Azure Functions

Azure Functions which is a serverless compute service, at its core is code running on cloud, triggered by specific events.

With Azure Functions you simply publish small pieces of code and define when you want that code to be executed. Azure ensures that your code has always the required computation resources to run smoothly even when the demands get too high. You can run your functions in a language of your choice and as described in the Consumption plan you will only pay for the time Azure spent running your code. When your functions are idle then you are stopped being charged. Functions can be created either directly on Azure Portal or in Visual Studio and are executed when specific events named triggers occur. Each Azure Function must have only one trigger which usually comes along with a payload to be consumed by the function’s code. For example in case the trigger is a QueueTrigger which means the function is executed when a new message arrives in a queue, then that message will be available on the function’s code. Here is a some of the available triggers:

Trigger Code executes on
HTTPTrigger New HTTP request
TimerTrigger Timer schedule
BlobTrigger New blob added to an azure storage container
QueueTrigger New message arrived on an azure storage queue
ServiceBusTrigger New message arrived on a Service Bus queue or topic
EventHubTrigger New message delivered to an event hub

Another key aspect of Azure functions is Bindings which let you declarative connect with data from other services instead of hard coding the connection details. Input bindings are used for making data available when the trigger is fired and Output bindings are used to push data back to the sources. For example, if your function receives as an input a record from an Azure Table named payments it could have a parameter as follow:

[Table("payments", "stripe", "{name}")] Payment payment

The {name} segment is the RowKey value of the Azure Table record to be retrieved which means when this function is triggered Azure will search the payments table for a record with PartitionKey equals to “stripe” and RowKey equal to the {name} value. Similar to the input binding your function could save a record to an Azure Table by declaring an output parameter as follow:

[Table("payments")] out Payment payment

When you populate the payment parameter the function will push a record to the Azure Table named payments. Default connection keys exist in a json configuration file. A Function may have multiple input and output bindings.

Creating Azure Functions

Azure Functions can be created and configured either directly on Azure Portal as scripts or published precompiled. In the first case you simply create an Azure App on Azure, you add a new Azure Function and write your code. It just works. Though this way can be very useful for prototyping you won’t be able to build large scale serverless apps. The best way to do it is through Visual Studio where you write your functions in the same way you already write your web applications (sharing libraries, models, packages, etc..). As far as deployment, Azure functions sit on top of Azure Service Apps which means they support a large range of deployment options. You can deploy your code using Visual Studio, Kudu, FTP, ZIP or via popular continuous integration solutions, like GitHub, Azure DevOps, Dropbox, Bitbucket, and others.

Demo – Payments

Enough with the talk, let’s see Azure functions in action by implementing a real application scenario for processing payments. In this scenario, we have a website where we provide some subscription plans for our customers. The customer selects a subscription plan, enters payment details using various payment methods such as VISA or MasterCard and completes the payment. They charge goes through a well known payment provider named Stripe. Stripe lets you test payments using test cards and customers which is what we are going to do for this post.

If you want to follow along go ahead and create a new account. Next visit API keys page and create a Test API key. Save both the Publishable and the Secret keys for later use

When the charge is completed we want to generate a licence file and email its url for download to the customer. In a traditional monolithic web application the flow would go like this:

  • Customer submits the checkout form to web app
  • Web app charges customer on the payment provider
  • Web app creates a licence file
  • Web app sends a confirmation email to the customer
  • Web app returns a success message to the client


The problem with this architecture is that the web app is responsible for too many things and customer waits too long before seeing the success message. Since any of the activities could create a bottleneck, scaling doesn’t work well either.

Serverless approach

In a serverless approach using Azure Functions the customer would see the success message instantly after the successful charge. All others would be handled by different Azure Functions, each responsible for different operation.

The first function uses an HTTPTrigger and pushes a message to a storage queue. HTTPTrigger means that the function can be called directly using an HTTP request. We will bound its URL to a stripe’s webhook which fires when a success charge occurs. This means that when the charge is completed stripe will invoke our Azure Function passing a Charge object along with any metadata we passed when calling the provider’s API. The output will be a payment message in an azure storage queue. The second azure function has a QueueTrigger attribute which triggers the function when a message is pushed to a storage queue. Message is received deserialized and the function outputs a licence file as a blob in an azure storage container. The third function is triggered when a new blob is pushed to the previous storage container. It has a SendGrid integration and sends the confirmation email which also contains the licence’s download URL.

SendGrid is a Email Delivery Service and you can use it for free. If you want to follow along go ahead and create a new account. Next visit API keys page and create a Test API key. Save it for later use

Demo application

Clone the repository associated with the post and open the solution in Visual Studio. First thing you need to do is setup the Stripe configuration. Open the appsettings.json file in the eShop .NET Core Web application and set the values for the SecretKey and PublishableKey keys from your stripe account API key you created before.

{
  "Logging": {
    "LogLevel": {
      "Default": "Warning"
    }
  },
  "AllowedHosts": "*",
  "Stripe": {
    "SecretKey": "",
    "PublishableKey": ""
  }
}

The eShop web app is the website that the customer may subscribe to one of the subscription plans.


Before moving to the first Azure Function take a look at the models inside the ServerlessApp.Models class library project. These are classes used by all Azure Functions. Azure Functions exist in an Azure Function App and each Azure Function app may have many Azure Functions. The project contains two Azure Function Apps, the ePaymentsApp for processing successful payments as described and the reportsApp that is responsible to produce reports for payments and we will review later on.

Visual Studio contains templates for Azure Function App when creating new projects. When you create one you can add Azure Functions on it by selecting one of the available templates for Triggers and Bindings

Azure Function available templates in VS

The first azure function in ePaymentsApp is the OnSuccessCharge. Let’s review and explain what the code does.

[FunctionName("OnSuccessCharge")]
public static async Task Run(
    [HttpTrigger(AuthorizationLevel.Anonymous, "get", "post", Route = null)]
    HttpRequestMessage req,
    [Queue("success-charges", Connection = "AzureWebJobsStorage")]IAsyncCollector<Transaction> queue,
    ILogger log)
{
    log.LogInformation("OnSuccessCharge HTTP trigger function processed a request.");

    var jsonEvent = await req.Content.ReadAsStringAsync();

    var @event = EventUtility.ParseEvent(jsonEvent);

    var charge = @event.Data.Object as Charge;
    var card = charge.Source as Card;

    var transaction = new Transaction
    {
        Id = Guid.NewGuid().ToString(), 
        ChargeId = charge.Id,
        Amount = charge.Amount,
        Currency = charge.Currency,
        DateCreated = charge.Created,
        StripeCustomerId = charge.CustomerId,
        CustomerEmail = card.Name,
        CardType = card.Brand,
        CustomerId = int.Parse(charge.Metadata["id"]),
        CustomerName = charge.Metadata["name"],
        Product = charge.Metadata["product"]
    };

    await queue.AddAsync(transaction);
}

HTTPTrigger attribute defines that the function can be triggered via an HTTP request. The attribute accepts several parameters such as the AuthorizationLevel which in this case is Anonymous meaning no token required for the function to be called. Also it defines that the HTTP request can be either a GET a or a POST method. If Route parameter is null then the function’s URL will be in the form application-host:port/api/method-name so in this case would be application-host:port/api/OnSuccessCharge. The req parameter is the HttpRequestMessage coming from the HTTP request that triggered the function. The code deserializes the request to a stripe’s Charge object since we know that we will bind its URL on stripe’s success charge webhook.
The Queue output binding defines the azure storage queue where the message will be pushed.

[Queue("success-charges", Connection = "AzureWebJobsStorage")]

The attribute says that the queue’s name is success-charges and the connection to the storage account comes from the key named AzureWebJobsStorage inside the local.settings.json file. By default this connection key will be used so you can just remove the Connection parameter of the Queue attribute. IAsyncCollector<Transaction> can be used to asynchronously push multiple messages to the queue by using the AddAsync method.

await queue.AddAsync(transaction);

If you want to push just one message synchronously to the queue you can use the following format:

[Queue("success-charges")]out Transaction queue

Assigning a value to the queue parameter results pushing the message to the queue. The flow for the first Azure Function is shown below:

Notice that the code reads some kind of metadata from the stripe’s webhook request:

var transaction = new Transaction
{
    Id = Guid.NewGuid().ToString(), 
    ChargeId = charge.Id,
    Amount = charge.Amount,
    Currency = charge.Currency,
    DateCreated = charge.Created,
    StripeCustomerId = charge.CustomerId,
    CustomerEmail = card.Name,
    CardType = card.Brand,
    CustomerId = int.Parse(charge.Metadata["id"]),
    CustomerName = charge.Metadata["name"],
    Product = charge.Metadata["product"]
};

Obviously metadata are information that we need in order to identify which customer triggered the entire process. But where do they come from? Switch to the HomeController.Charge method in the eShop website and take a look how a stripe charge is made:

Random r = new Random();
var customerService = new CustomerService();
var chargeService = new ChargeService();
var dbCustomerId = r.Next(0, 10);

var customer = await customerService.CreateAsync(new CustomerCreateOptions
{
    Email = stripeEmail,
    SourceToken = stripeToken
});

var charge = await chargeService.CreateAsync(new ChargeCreateOptions
{
    Amount = amountInCents,
    Description = "Azure Functions Payment",
    Currency = "usd",
    CustomerId = customer.Id,
    Metadata = new Dictionary<string, string> {
        { "id", dbCustomerId.ToString() },
        { "name", RandomNames[dbCustomerId] },
        { "product", productName }
    }
});

When calling the CreateAsync method of the stripe’s ChargeService, you can fill a Metadata dictionary which will be available when the webhook fires back to the Azure Function. Here we pass the subscription plan the customer selected, some random Customer Id and Name but in a real application would be the loggedin customer’s id and name respectively.

The second Azure Function is the ProcessSuccessCharge and is responsible to process a message from the success-charges queue and output a licence file as a blob. It also saves a payment record to an azure storage table.

[FunctionName("ProcessSuccessCharge")]
public static void Run([QueueTrigger("success-charges", Connection = "")]Transaction transaction, 
IBinder binder, 
[Table("payments")] out Payment payment,
ILogger log)
{
    log.LogInformation($"ProcessSuccessCharge function processed: {transaction}");

    payment = new Payment
    {
        PartitionKey = "stripe",
        RowKey = transaction.Id,
        ChargeId = transaction.ChargeId,
        Amount = transaction.Amount,
        CardType = transaction.CardType,
        Currency = transaction.Currency,
        CustomerEmail = transaction.CustomerEmail,
        CustomerId = transaction.CustomerId,
        CustomerName = transaction.CustomerName,
        Product = transaction.Product,
        DateCreated = transaction.DateCreated
    };

    using (var licence = binder.Bind<TextWriter>(new BlobAttribute($"licences/{transaction.Id}.lic")))
    {
        licence.WriteLine($"Transaction ID: {transaction.ChargeId}");
        licence.WriteLine($"Email: {transaction.CustomerEmail}");
        licence.WriteLine($"Amount payed: {transaction.Amount}  {transaction.Currency}");
        licence.WriteLine($"Licence key: {transaction.Id}");
    }
}

Since we want the function to get triggered every time a new message arrives on the success-charges queue we used a QueueTrigger.

[QueueTrigger("success-charges", Connection = "")]Transaction transaction

The trigger knows which queue needs to watch out for messages and how to automatically deserialize them to Transaction instances. This function produces two outputs, first it writes a record to an azure storage table named payments using an output Table binding (they will be used by the other Function App for reporting purposes) and secondly it writes the licence file to an azure storage blob container named licences using an IBinder. While it could just use a Blob output binding to create the blob, IBinder lets you define the blob’s name the way you want to. In our case the name will be transaction-id.lic which means for each customer’s transaction there will be a licence file. Visit Azure Blob storage bindings for Azure Functions to learn more about blob bindings.

The last Azure Function of the ePaymentsApp is the SendEmail.

[FunctionName("SendEmail")]
public static void Run([BlobTrigger("licences/{name}.lic")]CloudBlockBlob licenceBlob, 
    string name, 
    [Table("payments", "stripe", "{name}")] Payment payment,
    [SendGrid] out SendGridMessage message,
    ILogger log)
{
    log.LogInformation($"SendEmail Blob trigger function processing blob: {name}");
    message = new SendGridMessage();
    message.AddTo(System.Environment.GetEnvironmentVariable("EmailRecipient", EnvironmentVariableTarget.Process));
    message.AddContent("text/html", $"Download your licence <a href='{licenceBlob.Uri.AbsoluteUri}' alt='Licence link'>here</a>");
    message.SetFrom(new EmailAddress("payments@chsakell.com"));
    message.SetSubject("Your payment has been completed");
}

The function is triggered when a new blob is added to the licences container but also has the .lic extension. It also integrates with a Table binding so that automatically retrieves the payment record written to the payments azure storage table from the previous function. This is achieved by using the same name of the licence file as the search RowKey term in the payments table. The segment {name} will be the same for both the BlobTrigger and the Table binding. If you noticed the previous function uses the same value for the licence’s name and the table’s record RowKey value. This function manages to retrieve the right record from the table without hard coding any connection details. Last but not least is the SendGrid output binding which automatically uses the configuration property AzureWebJobsSendGridApiKey from the local.settings.json file.

Running the ePaymentsApp

After cloning the repository open a cmd and at the root of the solution restore the NuGet packages:

dotnet restore

Right click the ePaymentsApp and select Publish.. In the Create new App Service window select Create New and click Publish

For the Demo you can leave all the default values and click Create. Notice that VS knows that it is an Azure Function App and that’s why it will create the required Storage Account as well. Any queues or tables referenced by Azure Functions will be created automatically.

If asked to update the Azure Functions version click YES.

When the resources created and the deployment finishes, open Azure Portal and find the Azure Function App created. Mind that the Azure Function’s type will shown as App Service in the portal.

Navigate to that resource and find the Application Settings tab of the Azure Function App.

In case you have seen Azure App Services then this view should look familiar to you. You have to add the SendGrid configuration so that the SendEmail Azure Function can send the confirmation emails. Also you need to set an email where the emails will be sent so you don’t spam anyone during the demo. Add the following two properties to the App Settings:

  1. AzureWebJobsSendGridApiKey: Set the API key you created in SendGrid
  2. EmailRecipient: Set your email address so all emails are sent to you


Click Save and then select the OnSuccessCharge Azure Function to get its URL. It should look like this:

You need to add this URL as a Webhook in Stripe. Click Add endpoint, paste the URL and select the charge.succeeded event.


Now back to Visual Studio, make sure you have set the Stripe settings in the appsettings.json file and fire the app.

{
  "Logging": {
    "LogLevel": {
      "Default": "Warning"
    }
  },
  "AllowedHosts": "*",
  "Stripe": {
    "SecretKey": "",
    "PublishableKey": ""
  }
}

Complete a subscription by entering some of the Stripe’s test cards. It’s ok to enter a random email but expiration date must be a future date.

If the charge was successful you should see a view similar to the following:

Open Azure Storage Explorer (install it if you haven’t already) and confirm that there is a success-charges queue, a licences blob container and a payments table other than those that Azure Functions need to operate.

If you have set the SendGrid’s configuration properly you should have received an email as well.

You won’t be able to download the file before you set the Public Access Level to the licences container. Back to the Azure Storage Explorer, right click the licences container, select Set Public Access Level..


Select Public read access for containers and blobs and click apply. Now you should be able to download the license file directly from your email link.

Azure Durable Functions

So far the Azure Functions we have seen in action are quite isolated and they don’t have any knowledge about what happens in other functions during the payment process flow. This is OK for this scenario but there are times that you want to build a flow where there are dependencies and some kind of state between the functions. For example the output of the first function is the input for the second and so on. Also, you want to be able to cancel the entire flow or handle exceptions at any point during the flow, something that you cannot do with the common Azure Functions we have seen.

In common Azure functions you usually handle exceptions by sending messages to the appropriate queues and let other Functions start a retry or log the exception etc..

Azure Durable Functions is an extension of Azure Functions and Azure WebJobs for writing stateful functions that let you programmatically define workflows between different functions. Before explaining how it works let’s see two common patterns for Azure Durable Functions.

In Function Chaining you can execute a sequence of functions in a particular order. Output of one function is used as an input in the next one

The code for the previous looks like this:

public static async Task<object> Run(DurableOrchestrationContext ctx)
{
    try
    {
        var x = await ctx.CallActivityAsync<object>("F1");
        var y = await ctx.CallActivityAsync<object>("F2", x);
        return await ctx.CallActivityAsync<object>("F3", y);
    }
    catch (Exception)
    {
        // error handling/compensation goes here
    }
}

In Fan-out/fan-in you can execute multiple functions in parallel. When all functions running in parallel finish, you can aggregate their results and use them as you wish.

Fan-out/fan-in Pattern


We will see an example of the pattern on the demo for producing reports.

Azure Durable Functions Concepts

A flow with Azure Durable Functions consists of 3 types of Azure functions, Starter, Orchestrator and Activity functions.

  • Starter Function: Simple Azure Function that starts the Orchestration by calling the Orchestrator function. It uses an OrchestrationClient binding
  • Orchestrator Function: Defines a stateful workflow in code and invokes the activity functions. Sleeps during activity invocation and replays when wakes up. The code in an orchestrator function MUST be deterministic because during the flow the code will be executed again and again till all activity functions finish. You declare a function as an orchestrator by using a DurableOrchestrationContext
  • Activity Functions: Simple Azure Functions that are part of the workflow and can receive or return data. An Activity function uses an ActivityTrigger so that can be invoked by the orchestrator

Azure Durable Functions

Demo – Reports

The solution contains a reportsApp that uses Azure Durable Functions for creating reports for the payments created from the eShop website. More specifically recall that the ProcessSuccessCharge Azure Function of the ePaymentsApp writes a payment record in the azure storage table named payments. Each payment record contains also the payment type for that transaction.

Assuming that each payment method (VISA, MasterCard, etc..) needs to be processed differently we wish our reporting system to be fast and fully scalable. Every time the reporting process starts, for example at the end of each day, we want the final result to be an email containing links for the report created for each type of payment method, meaning the URL to the report file generated for all VISA payments, the URL for the report file generated for all MasterCard payments and so on. This scenario fits perfectly with the Fan-out/fan-in pattern we saw previously. Let’s take a look on the flow:

Serverless Reports

  • The starter function reads the latest payments from an Azure Storage table
  • For each type of payment (e.g visa, mastercard, paypal etc..) the orchestrator sends a group of payments to an activity function to generate the report
  • The report for each type is an azure blob. Reports for each card type are created in parallel
  • When all activities finish, the final result is an list of report urls

Starter Function

The starter function is the S_CreateReports and the only thing it does is reading the payment records and fire up an orchestration by calling the orchestrator function.

[FunctionName("S_CreateReports")]
public static async Task<HttpResponseMessage> Run([HttpTrigger(AuthorizationLevel.Function, "get", "post", Route = null)]
    HttpRequestMessage req,
    [OrchestrationClient] DurableOrchestrationClient starter,
    ILogger log)
{
    log.LogInformation($"Executing Starter function S_CreateReports at: {DateTime.Now}");

    var orders = await GetOrders();

    var orchestrationId = await starter.StartNewAsync("O_GenerateReports", orders);

    return starter.CreateCheckStatusResponse(req, orchestrationId);
}

The DurableOrchestrationClient.CreateCheckStatusResponse method returns management operations links for:

  1. Query current orchestration status
  2. Send event notifications
  3. Terminate orchestration

Orchestrator Function

The Orchestrator function defines the workflow in code and must be deterministic since it is replayed multiple times. The reliability of the execution is ensured by saving execution history in azure storage tables. In the example, for each type of payments generate a single report (blob) by calling an activity function. Finally aggregate and return the results.

[FunctionName("O_GenerateReports")]
public static async Task<List<Report>> GenerateReports(
    [OrchestrationTrigger] DurableOrchestrationContext ctx,
    ILogger log)
{
    log.LogInformation("Executing orchestrator function");
    var payments = ctx.GetInput<List<Payment>>();
    var reportTasks = new List<Task<Report>>();

    foreach (var paymentGroup in payments.GroupBy(p => p.CardType))
    {
        var task = ctx.CallActivityAsync<Report>("A_CreateReport", paymentGroup.ToList());
        reportTasks.Add(task);
    }

    var reports = await Task.WhenAll(reportTasks);

    return reports.ToList();
}

Notice that the payments have been passed as in input from the Starter function. That’s because the Orchestrator cannot have non-deterministic code, that is code that may fetch different results during the replay of the function. Passing the payments from the starter function is good for this demo but in real cases you probably need other stuff too such as configuration values. For any non-deterministic data that you need on your orchestrator function you MUST call activity functions. You can run several activity functions in parallel by using the Task.WhenAll method. When all activities finish generating reports for each payment method, reports variable will contain a list of reports objects coming from the activity functions that run in parallel.

Activity Function

Activity functions are the units of work in durable orchestrations and they use an ActivityTrigger in order to be called by an orchestration function. In our example, the A_CreateReport activity function receives a list of payments for a specific payment method and generates the report as a blob file. Then it returns the blob’s URL for that report.

[FunctionName("A_CreateReport")]
public static async Task<Report> CreateReport(
    [ActivityTrigger] List<Payment> payments,
    IBinder binder, ILogger log)
{
    log.LogInformation($"Executing A_CreateReport");

    var cardType = payments.Select(p => p.CardType).First();
    var reportId = Guid.NewGuid().ToString();
    var reportResourceUri = $"reports/{cardType}/{reportId}.txt";

    using (var report = binder.Bind<TextWriter>(new BlobAttribute(reportResourceUri)))
    {
        report.WriteLine($"Total payments with {cardType}: {payments.Count}");
        report.WriteLine($"Total amount paid: ${payments.Sum(p => p.Amount)}");
    }

    CloudStorageAccount storageAccount = CloudStorageAccount.Parse(Utils.GetEnvironmentVariable("AzureWebJobsStorage"));

    return new Report
    {
        CardType = cardType,
        Url = $"{storageAccount.BlobStorageUri.PrimaryUri.AbsoluteUri}{reportResourceUri}"
    };
}

Running the reportsApp

Right click the reportsApp and publish it to Azure but this time make sure to select the same Storage Account that created when you published the previous Azure Function App, otherwise the Starter Function will look in a payments table of a different azure storage account. (actually only the App name should be different in the create App Service window). When the app is deployed go to that resource and find the S_CreateReports starter function. Since it’s an HTTP triggered based function we can call it directly on the browser. Notice that the URL for this function contains a code token query string.

This is because we set the AuthorizationLevel for this function to AuthorizationLevel.Function.

[FunctionName("S_CreateReports")]
public static async Task<HttpResponseMessage> Run(
    [HttpTrigger(AuthorizationLevel.Function, "get", "post", Route = null)]
    HttpRequestMessage req,
    [OrchestrationClient] DurableOrchestrationClient starter,
    ILogger log)
    // code omitted

Now the interesting part. Paste the URL on the browser and you will get an instant reponse with information about the orchestration that started. This comes from the following code in the starter function.

var orchestrationId = await starter.StartNewAsync("O_GenerateReports", orders);
return starter.CreateCheckStatusResponse(req, orchestrationId);


Click the statusQueryGetUri to check the status of the orchestration. In my case when the orchestration finished the response was the following:

{
{
   "instanceId":"203b69cc0c54440b929e06210f68f492",
   "runtimeStatus":"Completed",
   "input":[
      {
         "$type":"ServerlessApp.Models.Payment, ServerlessApp.Models",
         "ChargeId":"ch_1DXqnOHIJGnF6W22L7aMiR3s",
         "CardType":"MasterCard",
         "Amount":12000,
         "Currency":"usd",
         "CustomerId":9,
         "CustomerName":"Teressa Suitt",
         "CustomerEmail":"hello@world.com",
         "Product":"STARTER PLAN",
         "DateCreated":"2018-11-18T13:58:42Z",
         "PartitionKey":"stripe",
         "RowKey":"1ba832b5-5920-49fa-9557-fb8bb4940909",
         "Timestamp":"2018-11-18T13:58:50.3242492+00:00",
         "ETag":"W/\"datetime'2018-11-18T13%3A58%3A50.3242492Z'\""
      },
      {
         "$type":"ServerlessApp.Models.Payment, ServerlessApp.Models",
         "ChargeId":"ch_1DXn9eHIJGnF6W22TicIFksV",
         "CardType":"Visa",
         "Amount":60000,
         "Currency":"usd",
         "CustomerId":9,
         "CustomerName":"Teressa Suitt",
         "CustomerEmail":"test@example.com",
         "Product":"DEV PLAN",
         "DateCreated":"2018-11-18T10:05:26Z",
         "PartitionKey":"stripe",
         "RowKey":"41fc7a80-d583-422c-a720-7b957196d6bb",
         "Timestamp":"2018-11-18T10:05:35.8105278+00:00",
         "ETag":"W/\"datetime'2018-11-18T10%3A05%3A35.8105278Z'\""
      },
      {
         "$type":"ServerlessApp.Models.Payment, ServerlessApp.Models",
         "ChargeId":"ch_1DXqoFHIJGnF6W22RKPldJpV",
         "CardType":"American Express",
         "Amount":99900,
         "Currency":"usd",
         "CustomerId":9,
         "CustomerName":"Teressa Suitt",
         "CustomerEmail":"john@doe.com",
         "Product":"PRO PLAN",
         "DateCreated":"2018-11-18T13:59:35Z",
         "PartitionKey":"stripe",
         "RowKey":"a2739770-74b4-49d7-84ec-c6fb314cd223",
         "Timestamp":"2018-11-18T13:59:43.002334+00:00",
         "ETag":"W/\"datetime'2018-11-18T13%3A59%3A43.002334Z'\""
      },
      {
         "$type":"ServerlessApp.Models.Payment, ServerlessApp.Models",
         "ChargeId":"ch_1DXqpSHIJGnF6W22KW9pzz8K",
         "CardType":"American Express",
         "Amount":6000,
         "Currency":"usd",
         "CustomerId":1,
         "CustomerName":"Errol Medeiros",
         "CustomerEmail":"mario@example.com",
         "Product":"FREE PLAN",
         "DateCreated":"2018-11-18T14:00:50Z",
         "PartitionKey":"stripe",
         "RowKey":"aff5311d-e2f5-4b57-a24a-84bfceacc2b5",
         "Timestamp":"2018-11-18T14:01:35.0534822+00:00",
         "ETag":"W/\"datetime'2018-11-18T14%3A01%3A35.0534822Z'\""
      },
      {
         "$type":"ServerlessApp.Models.Payment, ServerlessApp.Models",
         "ChargeId":"ch_1DXqqTHIJGnF6W22Slz4R0JH",
         "CardType":"MasterCard",
         "Amount":60000,
         "Currency":"usd",
         "CustomerId":4,
         "CustomerName":"Buster Turco",
         "CustomerEmail":"nick@example.com",
         "Product":"DEV PLAN",
         "DateCreated":"2018-11-18T14:01:53Z",
         "PartitionKey":"stripe",
         "RowKey":"b8ecfe78-ae72-4f0c-9312-63ad31a1b5f2",
         "Timestamp":"2018-11-18T14:02:02.5297923+00:00",
         "ETag":"W/\"datetime'2018-11-18T14%3A02%3A02.5297923Z'\""
      }
   ],
   "customStatus":null,
   "output":[
      {
         "CardType":"MasterCard",
         "Url":"https://epaymentsapp201811181133.blob.core.windows.net/reports/MasterCard/3b751f4d-015c-42bb-9bd0-f5a22d2e9750.txt"
      },
      {
         "CardType":"Visa",
         "Url":"https://epaymentsapp201811181133.blob.core.windows.net/reports/Visa/c313e6a1-2147-47ca-b20b-df11c02366b5.txt"
      },
      {
         "CardType":"American Express",
         "Url":"https://epaymentsapp201811181133.blob.core.windows.net/reports/American Express/c234d014-99d0-43ab-9e57-3b535c58d6c5.txt"
      }
   ],
   "createdTime":"2018-11-18T14:10:37Z",
   "lastUpdatedTime":"2018-11-18T14:11:01Z"
}

The response shows what was the input to the orchestrator function and what was the final result. In my case, I had several payments with 3 different card types so it created 3 reports in parallel and returned their urls. The code saves each report as a blob in a reports container so don’t forget to set the Public Access Level again, as we did with the licences container.

Debugging Azure Functions

You can debug Azure Functions in the same way you debug web applications. First of all when you create an Azure Function App in Visual Studio, there is a local.settings.json where all the settings and default keys exist. The file looks like this:

{
  "IsEncrypted": false,
  "Values": {
    "AzureWebJobsStorage": "UseDevelopmentStorage=true",
    "AzureWebJobsDashboard": "",
    "AzureWebJobsSendGridApiKey": ""
  }
}

You won’t find it though in the repository because VS includes it at the Git ignore list. You will find though a local.settings-template.json file that I added so you can just rename it to local.settings.json. You can use the local azure storage emulator as well. While I was developing the apps the only thing that was tricky to reproduce was the stripe’s webhook. For this I took a sample of how the request looks like from the stripe’s website and sent the request locally on the OnSuccessCharge function, so simple. Another thing you have to do is install the latest Azure Functions Core Tools. You can use the following npm command:

npm i -g azure-functions-core-tools --unsafe-perm true

Next for each Azure Function App you want to debug, you have to create a Profile that has the following settings:

  • Launch: Executable
  • Executable: dotnet.exe
  • Application arguments: %userprofile%\AppData\Roaming\npm\node_modules\azure-functions-core-tools\bin\func.dll host start

You can create a profile by right clicking the project, go to Properties and click the Debug tab.

Last but not least check that you have the latest Azure Functions and Web Jobs Tools extension installed.

That’s it we finished! We have seen how Azure functions work and how they can help us build serverless applications. All the Azure functions you created scale automatically and Azure will ensure that they always have the required resources to run regardless the load they receive. I recommend you to read the Performance Consideration page on Microsoft for Azure Functions best practices.

In case you find my blog’s content interesting, register your email to receive notifications of new posts and follow chsakell’s Blog on its Facebook or Twitter accounts.

Facebook Twitter
.NET Web Application Development by Chris S.
facebook twitter-small
twitter-small

Azure Functions Proxies in Action

$
0
0

Azure Functions Proxies is serverless API toolkit that basically allows you to modify the requests and responses of your APIs. This feature might sounds a little bit simple but it’s not. With AF Proxies you can expose your multiple Azure Function apps built as a Microservice Architecture in a single unified endpoint. Also, during development you can use the proxies to mock up the responses of your APIs (Mock APIs). Last but not least, the proxies can be used to quickly switch to different versions of your APIs. In this post we will see all these in action using a a sceleton of an e-shop app built with Azure Functions using a microservice architecture. The post will also save you some time by explaining how to setup your development environment and resolve common errors when using the proxies either in development or production environment. Are your ready? Let’s start!

Download and setup the sample app

To follow along with the post clone the associated repository using the following command:

git clone https://github.com/chsakell/azure-functions-proxies

Prerequisites

In order to build and run the e-shop app locally you need to have the followings installed:

After installing azure-functions-core-tools npm package you need to configure some application arguments for the Basket.API, Catalog.API and Ordering.API function apps projects inside the solution. azure-functions-core-tools package is usually installed (in Windows machines) inside the %userprofile%\AppData\Roaming\npm\node_modules\azure-functions-core-tools folder. For each of the following projects, right click the project, select Properties and then switch to the Debug tab. Configure the projects as follow:

  1. Catalog.API:
    • Launch: Executable
    • Executable: dotnet.exe
    • Application arguments: %userprofile%\AppData\Roaming\npm\node_modules\azure-functions-core-tools\bin\func.dll host start –pause-on-error –port 1072
  2. Basket.API:
    • Launch: Executable
    • Executable: dotnet.exe
    • Application arguments: %userprofile%\AppData\Roaming\npm\node_modules\azure-functions-core-tools\bin\func.dll host start –pause-on-error –port 1073
  3. Ordering.API:
    • Launch: Executable
    • Executable: dotnet.exe
    • Application arguments: %userprofile%\AppData\Roaming\npm\node_modules\azure-functions-core-tools\bin\func.dll host start –pause-on-error –port 1074

In case azure-functions-core-tools have been installed in some other path or you are on Linux or Mac environment you need to alter the Application arguments func.dll path accordingly

The configurations should look like this:


Mocking APIs


We will start by using AF Proxies for mocking API responses. Mocks are useful in scenarios when backend implementation takes time to finish and you don’t want to block and make the front-end team waiting for it. We will use the Catalog.API function app to test our first proxy. Catalog.API microservice is supposed to expose two endpoints for accessing catalog items: /api/items for retrieving all items and /api/items/{id} for accessing a specific item. Before implementing those endpoints in backend we want to provide mock data to front-end developers so that they can move forward with their implementation. Proxies are defined inside a proxies.json configuration file at the root of the project. Create a new proxies.json file at the root of Catalog.API project and set its contents as follow:

{
    "$schema": "http://json.schemastore.org/proxies",
    "proxies": {
      "mock.catalog.items": {
        "matchCondition": {
          "methods": [ "GET" ],
          "route": "/api/items"
        },
        "responseOverrides": {
          "response.body": "{'message' : 'Hello world from proxies!'}",
          "response.headers.Content-Type": "application/json"
        }
      }
    }
  }

Build, right click and debug the Catalog.API app. Navigate to http://localhost:1072/api/items and confirm that you get your first proxy response: “Hello world from proxies!”.

When the app fires up, you will get some messages on the console, printing all the endpoints available on the function app.

Of course the “hello world from proxies” message is not what you want, instead you want to return a valid items array:

{
    "$schema": "http://json.schemastore.org/proxies",
    "proxies": {
  
      "mock.catalog.items": {
        "matchCondition": {
          "methods": [ "GET" ],
          "route": "/api/items"
        },
        "responseOverrides": {
          "response.body": [
            {
              "Id": 1,
              "CatalogType": "T-Shirt",
              "CatalogBrand": ".NET",
              "Description": ".NET Bot Black Hoodie, and more",
              "Name": ".NET Bot Black Hoodie",
              "Price": 19.5,
              "availablestock": 100,
              "onreorder": false
            },
            {
              "Id": 2,
              "CatalogType": "Mug",
              "CatalogBrand": ".NET",
              "Description": ".NET Black & White Mug",
              "Name": ".NET Black & White Mug",
              "Price": 8.5,
              "availablestock": 89,
              "onreorder": true
            }
          ],
          "response.headers.Content-Type": "application/json"
        }
  
      }
    }
  }

If you build and try again the /api/items endpoint you will get back the two items defined in the request.body property. Now let’s break down how Azure function proxies.json file works. Inside the proxies property we define as many proxies we want. In our example we created a proxy named mock.catalog.items that returns some mock data for the route /api/items. The matchCondition property defines the rules that match the proxy configuration that is the HTTP methods and the route. We defined that when an HTTP GET request to /api/items reaches the app we want to override the response and send back a JSON array. We also defined that the response type is of type application/json.

"responseOverrides": {
    "response.body": [..],
    "response.headers.Content-Type": "application/json"
  }

When the actual endpoint is ready and you want to send back the real data all you need to do is remove the mock.catalog.items proxy from the proxies configuration. The GetItems HTTP triggered function is responsible to return all the items defined in the catalog.items.json file at the root of the project.

public static class GetItems
{
    [FunctionName("GetItems")]
    public static async Task<IActionResult> Run(
        [HttpTrigger(AuthorizationLevel.Function, "get",
        Route = "items")] HttpRequest req,
        ILogger log, ExecutionContext context)
    {
        string catalogItemsFile = Path.Combine(context.FunctionAppDirectory, "catalog.items.json");
        string itemsJson = File.ReadAllText(catalogItemsFile);

        var items = JsonConvert.DeserializeObject<List<CatalogItem>>(itemsJson);

        return new OkObjectResult(items);
    }
}

Now let’s see how to define a proxy that listens to the /api/items/{id} endpoint and returns a single catalog item. Add the following proxy to the proxies.json file:

{
    "$schema": "http://json.schemastore.org/proxies",
    "proxies": {
      "mock.catalog.item": {
        "matchCondition": {
          "methods": [ "GET" ],
          "route": "/api/items/{id}"
        },
        "responseOverrides": {
          "response.body": {
            "Id": 1,
            "CatalogType": "T-Shirt",
            "CatalogBrand": ".NET",
            "Description": ".NET Bot Black Hoodie, and more",
            "Name": ".NET Bot Black Hoodie",
            "Price": 19.5,
            "availablestock": 100,
            "onreorder": false
          },
          "response.headers.Content-Type": "application/json"
        }
  
      }
    }
  }

The mock.catalog.item proxy will return the same catalog item for all requests to /api/items/{id} where {id} is a route parameter.

The GetItem function returns the real item read from the catalog.items.json file.

[FunctionName("GetItem")]
public static async Task<IActionResult> Run(
    [HttpTrigger(AuthorizationLevel.Function, "get",
    Route = "items/{id}")] HttpRequest req,
    int id,
    ILogger log, ExecutionContext context)
{

    string catalogItemsFile = Path.Combine(context.FunctionAppDirectory, "catalog.items.json");
    string itemsJson = File.ReadAllText(catalogItemsFile);

    var items = JsonConvert.DeserializeObject<List<CatalogItem>>(itemsJson);

    var item = items.FirstOrDefault(i => i.Id == id);

    if (item != null)
        return new OkObjectResult(item);
    else
        return new NotFoundObjectResult("Item  not found");

}

API versioning

Now let’s assume you have decided to envolve your catalog api and introduce a new version where a new item property is added. Before exposing your new version you would also like to test it in the production environment and when you are sure that it works fine switch all your clients to it. The V2_GetItems function returns catalog items with a new property named Image. Notice that the new route defined is v2/items

[FunctionName("V2_GetItems")]
public static async Task<IActionResult> Run(
    [HttpTrigger(AuthorizationLevel.Function, "get",
    Route = "v2/items")] HttpRequest req,
    ILogger log, ExecutionContext context)
{
    string catalogItemsFile = Path.Combine(context.FunctionAppDirectory, "catalog.items_v2.json");
    string itemsJson = File.ReadAllText(catalogItemsFile);

    var items = JsonConvert.DeserializeObject<List<CatalogItem>>(itemsJson);

    return new OkObjectResult(items);
        
}
public class CatalogItem
{
    public int Id { get; set; }
    public string Name { get; set; }
    public string Description { get; set; }
    public decimal Price { get; set; }
    public string CatalogType { get; set; }
    public string CatalogBrand { get; set; }
    public int AvailableStock { get; set; }
    public bool OnReorder { get; set; }

    // Added for V2 version
    [JsonProperty(NullValueHandling = NullValueHandling.Ignore)]
    public string Image { get; set; }
}

Of course you don’t want your clients to change their endpoint to /api/v2/items but use the default /api/items instead. All you have to do is define a new proxy that forwards all requests to api/items to api/v2/items, processed by the new function.

{
    "$schema": "http://json.schemastore.org/proxies",
    "proxies": {
      "v2.catalog.items": {
        "matchCondition": {
          "methods": [ "GET" ],
          "route": "/api/items/"
        },
        "backendUri": "http://localhost:1072/api/v2/items"
      }
    }
  }  

In this proxy configuration we introduced a new property named backendUri which is the URL of the back-end resource to which the request will be proxied. The backendUri could be any valid URL that may return a valid respond for your app. For example assuming you were building a weather API the “backendUri” could be https://some-weather-api.org/ (it isn’t an real weather endpoint). Also it is most likely that you would like to pass some information to the API such as the location that you wish to search the weather for or some subscription key required by the api. The requestOverrides property can be used to configure that kind of stuff as follow:

{
    "$schema": "http://json.schemastore.org/proxies",
    "proxies": {
        "some-weather-api": {
            "matchCondition": {
                "methods": [ "GET" ],
                "route": "/api/weather/{location}"
            },
            "backendUri": "https://some-weather-api.org/",
            "requestOverrides": {
                "backend.request.headers.Accept": "application/xml",
                "backend.request.headers.x-weather-key": "MY_WEATHER_API_KEY",
                "backend.request.querystring.location:": "{location}"
            }
        }
    }
}

The previous configuration listens to your function’s endpoint /api/weather/{location} and proxies the request to https://some-weather-api.org.org. Before proxying the request adds some headers required by the some-weather-api. Also notice how the {location} parameter value is added to the query string of the backend URI resulting to a https://some-weather-api.org?location={location} request.

Unified API Endpoints


When building microservices using Function Apps each function app ends up with a unique endpoint as it was a different App Service. The e-shop application is broken to 3 microservices, Basket.API, Catalog.API and Ordering.API and when deployed on Azure ends up with the following hosts:

What you really want for your clients thought is a single unified endpoint for all of your APIs such as https://my-eshop/azurewebsites.net. You can use AF proxies to proxy requests to the internal function apps based on the route. In the solution you will find an Azure Function App named ProxyApp that contains the proxies required to expose all e-shop APIs as a unified API. Let’s see the proxies.json file for this app.

{
    "$schema": "http://json.schemastore.org/proxies",
    "proxies": {
      "catalog.item": {
        "matchCondition": {
          "methods": [ "GET" ],
          "route": "/api/items/{id}"
        },
        "backendUri": "%catalog_api%/items/{id}",
        "debug": true
      },
      "catalog.items": {
        "matchCondition": {
          "methods": [ "GET" ],
          "route": "/api/items"
        },
        "backendUri": "%catalog_api%/items"
      },
      "baskets.get": {
        "matchCondition": {
          "methods": [ "GET" ],
          "route": "/api/baskets/{id}"
        },
        "backendUri": "%basket_api%/baskets/{id}"
      },
      "baskets.update": {
        "matchCondition": {
          "methods": [ "PUT" ],
          "route": "/api/baskets"
        },
        "backendUri": "%basket_api%/baskets"
      },
      "baskets.delete": {
        "matchCondition": {
          "methods": [ "DELETE" ],
          "route": "/api/baskets/{id}"
        },
        "backendUri": "%basket_api%/baskets/{id}"
      },
      "orders.list": {
        "matchCondition": {
          "methods": [ "GET" ],
          "route": "/api/orders"
        },
        "backendUri": "%ordering_api%/orders"
      }
    }
  }

There are proxy configurations for all available endpoints in the e-shop app. The new and most interesting thing on the above configuration though is the way the backendUri properties are defined. Instead of hard-coding the different function apps endpoints, we used settings properties surrounded with percent signs (%). Anything that is surrounded with the percent sign will be replaced with the respective app setting defined in the local.settings.json locally. We will see how this works up on Azure soon. This means that %catalog_api%, %basket_api% and %ordering_api% will be replaced with the settings defined in the local.settings.json file inside the ProxyApp.

{
    "ConnectionStrings": {},
    "IsEncrypted": false,
    "Values": {
      "AZURE_FUNCTION_PROXY_DISABLE_LOCAL_CALL": true,
      "FUNCTIONS_WORKER_RUNTIME": "dotnet",
      "catalog_api": "http://localhost:1072/api",
      "basket_api": "http://localhost:1073/api",
      "ordering_api": "http://localhost:1074/api"
    }  
}

Notice that the parameters are defined inside the Values property not outside.

Azure Functions App Settings

Azure Functions have many settings that can affect your functions behavior. Here we set the AZURE_FUNCTION_PROXY_DISABLE_LOCAL_CALL to true so that the proxy will trigger new HTTP requests to the different Azure function apps rather than dispatching the requests to the same app, something that would result to 404 errors. We also set the FUNCTIONS_WORKER_RUNTIME setting that is relative to the language being used in our application.

In order to fully test the ProxyApp proxies, right click the solution, select Set Startup Projects.. and configure as follow:

Start debugging and all function apps will be hosted as configured in the Application Arguments. ProxyApp console logs will print all the available endpoints defined on its configuration.

Go ahead and test this unified API endpoint and confirm that requests are properly dispatched to the correct function apps. The ProxyApp contains a Postman collection named postman-samples to help you test the APIs. Open that file in Postman and test the Catalog, Basket and Ordering APIs using the unified endpoint exposed by the ProxyApp.

Proxies configuration in Microsoft Azure

After deploying all your function apps up on Azure you need to configure the proxies and application settings. First of all you need to check all the endpoints per function app (microservice). Keep in mind that in our example, all the functions require an access code to be added on the query string in order to be consumed. This is due to the AuthorizationLevel used on each function level.

[FunctionName("GetItems")]
public static async Task<IActionResult> Run(
    [HttpTrigger(AuthorizationLevel.Function, "get",
    Route = "items")] HttpRequest req,
    ILogger log, ExecutionContext context)
// code omitted

Let’s see how these functions looks like when deployed on Azure.

Each of the function app has a unique host and each function requires an access token.

If you try to get the URL for a specific function of an Azure Service App you will also see the required access token. Here is how the URL for the GetItems function looks like:

The code is different for each function so you need to get them all before setting the proxies on the root Proxy App function app.

After gathering all this information, open the Proxies menu item in the ProxyApp app.

Azure portal let’s you configure the proxies you have defined in the proxies.json file. Clicking on the catalog.items proxy opens a view where we can configure its behavior.

The picture shows that we need to add the code query string for this function plus to configure the catalog_api application setting for the App Service. Of course you could create an app setting parameter for the code as well and define it in the app settings. Unfortunately the UI won’t let you update the backend URL cause it requires that it starts with http or https

That’s ok though because you can use the Advanced editor as shown on the picture.

Next, open and configure the Application settings for the ProxyApp by adding all the parameters defined in the proxies:

Try the root endpoint of your app and confirm that all work as indented.


Mind that you can add or configure proxies to your functions whenever you want. Just open the Advanced editor, add a new proxies.json file, define your proxies and that’s it. No restart required.

That’s it we finished! I hope you have learned a lot about Azure Functions Proxies and how they can help you when building apps using Microservice architecture.

In case you find my blog’s content interesting, register your email to receive notifications of new posts and follow chsakell’s Blog on its Facebook or Twitter accounts.

Facebook Twitter
.NET Web Application Development by Chris S.
facebook twitter-small
twitter-small
Viewing all 43 articles
Browse latest View live